A well-organized pantry saves time, reduces food waste, and makes everyday cooking feel easier. You do not need a huge space or fancy containers to get started. With a few clear zones, some practical labels, and a simple maintenance routine, you can turn even a small, crowded pantry into a space that actually works for you. This guide walks you through the pantry organization basics step by step, using a checklist style so you can move at your own pace and check off tasks as you go.
On this page(click to collapse)
- Step 1: Prepare and Empty Your Pantry
- Step 2: Sort and Declutter Your Food
- Step 3: Plan Your Pantry Zones
- Step 4: Choose Containers and Group Items
- Step 5: Label Your Pantry Clearly
- Step 6: Create a Simple Pantry Maintenance Routine
- Step 7: Make Your Pantry Work for Your Household
- Printable-Style Pantry Organization Checklist
- Bringing It All Together
- Related guides
Whether you have a walk-in pantry, a cabinet, or a few shelves in a closet, the same principles apply. You will group similar foods together, give everything a clear home, and create habits that keep the space tidy over time. Use this as your go-to reference whenever your pantry starts to feel cluttered again, or when you move into a new home and want to set things up the right way from the start.
Step 1: Prepare and Empty Your Pantry
Before you can set up zones or add labels, you need a clean slate. This step may feel messy, but it is the foundation for a truly organized pantry.
Preparation Checklist
- Set aside at least one to two hours when you will not be rushed.
- Gather trash bags, recycling bags, a box for donations, and a box for items that belong elsewhere.
- Have basic cleaning supplies ready: all-purpose cleaner, microfiber cloths, and a handheld vacuum or broom.
- Clear a nearby surface such as a table or counter to sort items.
Empty and Clean Checklist
- Remove everything from the pantry, shelf by shelf.
- Group items loosely on your counter or table by type as you go.
- Check each shelf for crumbs, spills, or sticky spots.
- Wipe down shelves with cleaner and let them dry completely.
- Vacuum or sweep the floor under and around the pantry area.
Once the pantry is empty and clean, you can see the space clearly and start planning how to use it in a more intentional way.
Step 2: Sort and Declutter Your Food
Sorting and decluttering helps you see what you actually have and what you truly use. This step also prevents you from organizing expired or unwanted food.
Sorting Checklist
- Create temporary piles for each general food type, such as:
- Canned goods
- Dry goods (pasta, rice, grains)
- Baking supplies
- Snacks
- Breakfast items
- Condiments and sauces
- Oils and vinegars
- Drinks and drink mixes
- Kids or on-the-go items
- Keep items from the same category together so you can see duplicates.
- Place anything that does not belong in the pantry into the “belongs elsewhere” box.
Decluttering Checklist
- Check expiration or best-by dates on every item.
- Throw away expired or spoiled items.
- Set aside unopened, still-good items you know you will not use in a donation box, if local guidelines allow.
- Combine partially used duplicates when safe and appropriate, such as two open boxes of the same cereal.
- Be honest about foods your household never eats and avoid giving them prime pantry space.
After decluttering, you will have a clearer idea of how much space you need for each category and which zones should be the largest.
Step 3: Plan Your Pantry Zones
Zones are the backbone of pantry organization. A zone is simply a dedicated area for a specific type of food or purpose. When everything has a home, it is easier to put items away and find them later.
Common Pantry Zones
Use this checklist to decide which zones make sense for your household. You do not need every zone on this list; choose what fits your space and habits.
- Everyday snacks: Chips, crackers, nuts, granola bars, dried fruit.
- Breakfast: Cereal, oatmeal, pancake mix, breakfast bars.
- Baking: Flour, sugar, baking powder, baking soda, chocolate chips, cocoa, baking decorations.
- Cooking staples: Rice, pasta, grains, beans, lentils.
- Canned goods: Vegetables, beans, tomatoes, soups, tuna, fruit.
- Condiments and sauces: Salad dressings, pasta sauces, marinades, hot sauces.
- Oils and vinegars: Cooking oils, specialty oils, vinegars.
- Kids shelf: Kid-friendly snacks and lunch items you are comfortable keeping within reach.
- Backstock or overflow: Extras of items you buy in bulk or on sale.
- Specialty or occasional items: Holiday baking supplies, party snacks, or rarely used ingredients.
Where to Place Each Zone
Placement matters. Use the most convenient shelves for the items you reach for every day, and place less-used items higher or lower.
- Eye-level shelves: Everyday snacks, breakfast items, and cooking staples.
- Lower shelves: Heavy items, large containers, or a kid-friendly snack zone.
- Upper shelves: Backstock, rarely used appliances, and special-occasion items.
- Door racks (if available): Spices, small condiments, drink mixes, or small snack packs.
Walk through a typical day in your kitchen and imagine reaching into the pantry. Adjust your zones so the items you use most are the easiest to grab and put away.
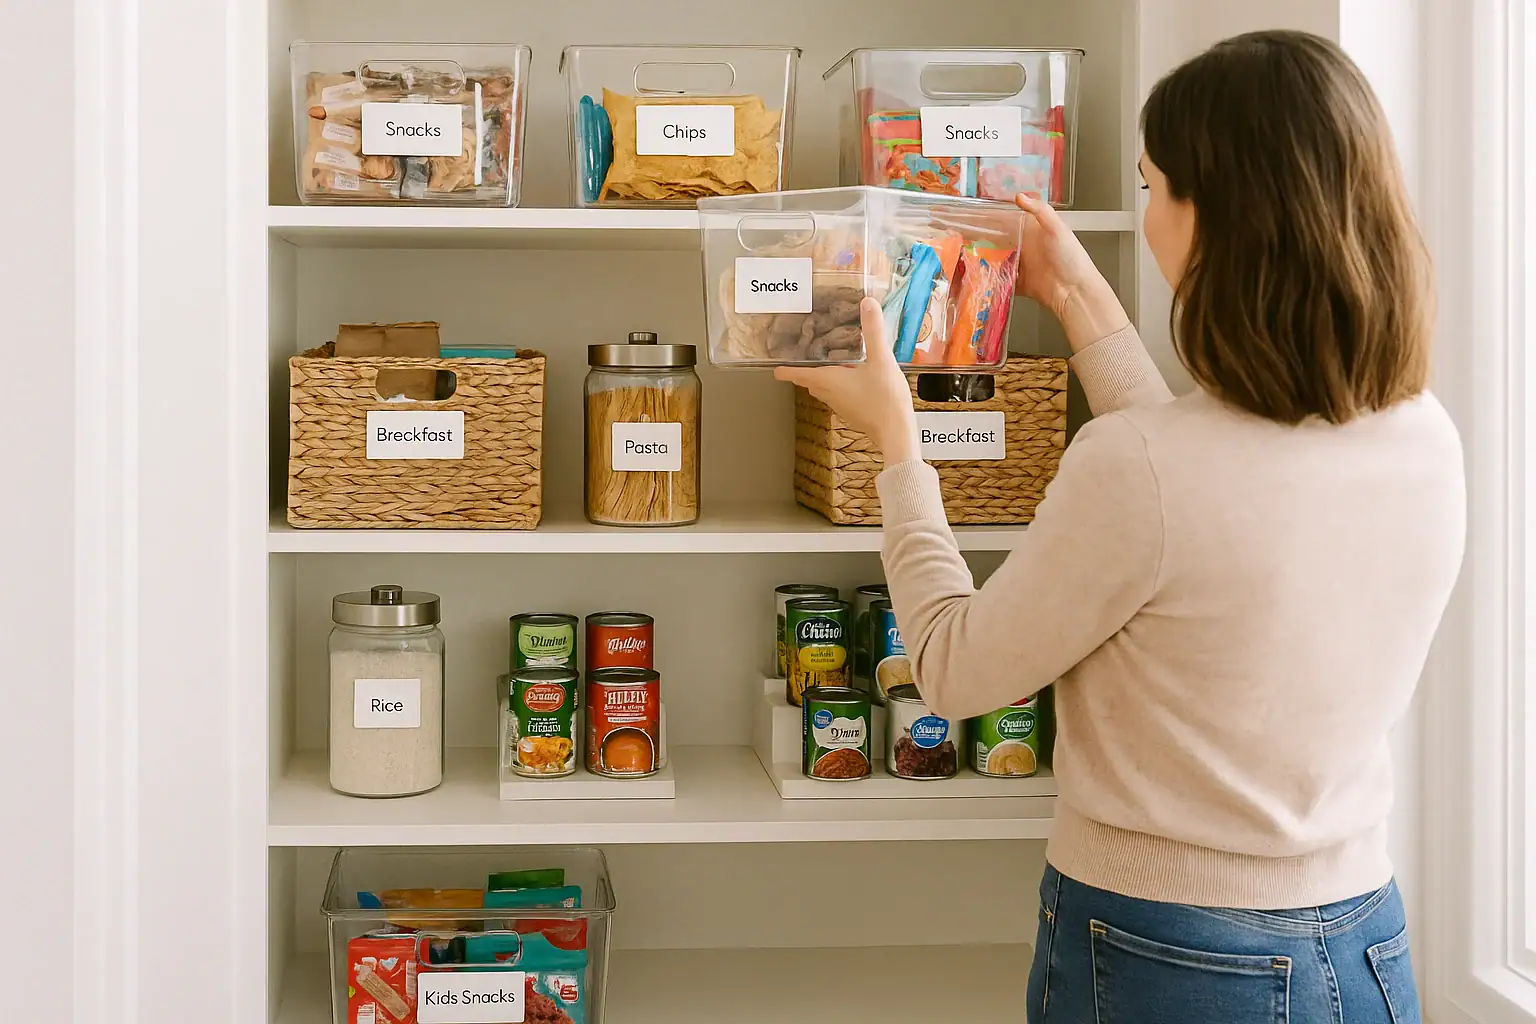
Step 4: Choose Containers and Group Items
You do not need matching containers to have an organized pantry, but some simple groupings can make a big difference. Use what you already have first, then add a few helpful pieces if needed.
Container and Grouping Checklist
- Use bins or baskets to corral loose items like snack bags, pouches, and small boxes.
- Consider clear jars or canisters for frequently used dry goods like flour, sugar, oats, or rice.
- Keep original packaging when it provides important instructions or nutrition information.
- Use shallow bins or trays to group oils, vinegars, and sauces to catch drips and make them easy to pull out.
- Group like with like within each zone, such as all pasta shapes together or all canned beans together.
- Place taller items in the back and shorter items in the front so you can see everything.
- Use risers or tiered shelves for canned goods or jars if you have deep shelves.
Focus on function first. The goal is to see what you have at a glance and reach it without knocking over other items.
Step 5: Label Your Pantry Clearly
Labels are a simple tool that make your system understandable for everyone in your household. When zones and containers are labeled, it is easier for others to help put groceries away and keep the pantry tidy.
What to Label
- Bins and baskets used for snacks, baking supplies, and packets.
- Jars or canisters that hold dry goods like flour, sugar, and rice.
- Shelves or sections dedicated to specific zones, such as “Canned Goods” or “Breakfast”.
- Backstock area so everyone knows where extras belong.
Labeling Checklist
- Choose simple, clear wording such as “Snacks,” “Pasta,” or “Baking” rather than long descriptions.
- Use labels that are easy to remove or change as your needs shift.
- Write dates on containers when you transfer items out of their original packaging.
- For families, consider adding short reminders like “Open first” on older items you want used up.
- Place labels where they are visible from the front, not hidden on the side or back.
Labels do not have to be fancy. Handwritten labels on tape or simple tags can work just as well as printed ones. The key is consistency and clarity.
Step 6: Create a Simple Pantry Maintenance Routine
Even the best-organized pantry will drift out of order without a basic maintenance routine. The goal is not perfection, but a simple set of habits that keep things under control.
Daily or Weekly Quick Checks
These small steps take just a few minutes and prevent clutter from building up.
- Do a quick visual scan before making your grocery list so you do not buy duplicates.
- Return items to their labeled zones after cooking or snacking.
- Slide older items to the front and newer purchases to the back.
- Wipe up small spills or crumbs as soon as you notice them.
Monthly Pantry Reset
Once a month, set aside 15 to 30 minutes for a mini reset.
- Pick one or two shelves at a time to straighten and declutter.
- Check dates and move items that need to be used soon to the front.
- Consolidate duplicates and toss empty or nearly empty packaging.
- Adjust zones if you notice certain categories growing or shrinking.
- Refresh any labels that are peeling or no longer accurate.
Seasonal Deep Clean
Every few months, or at least twice a year, do a deeper pantry clean.
- Remove items shelf by shelf and wipe everything down.
- Reevaluate your zones based on current habits, dietary changes, or family needs.
- Donate unopened, still-good items you no longer want, if possible.
- Make a list of staples that are running low so you can restock.
By building these habits into your regular routine, your pantry will stay functional without needing a full overhaul every few months.
Step 7: Make Your Pantry Work for Your Household
Every home is different, so your pantry organization should reflect your real life. Use this step to fine-tune your zones, labels, and routines to match how your household actually uses food.
Family-Friendly Adjustments
- Create a kid-accessible snack zone with items you are comfortable letting them choose independently.
- Keep lunch-packing supplies together, such as sandwich fixings, snacks, and drink boxes.
- Use sturdy, lightweight bins on lower shelves so children can pull them out safely.
- Label shelves with both words and simple icons if that helps younger children.
Cooking and Meal Planning Support
- Group ingredients you often use together, such as pasta near sauces and canned tomatoes.
- Keep a notepad or digital list handy to jot down staples as soon as you run low.
- Use a small bin for “use first” items that are close to their date or opened.
- Store quick meal options at eye level so they are easy to grab on busy nights.
Pay attention to what is not working. If a shelf always ends up messy, ask whether that zone needs to move, expand, or be broken into smaller categories.
Printable-Style Pantry Organization Checklist
Use this condensed checklist as a reference each time you organize or reset your pantry.
Pantry Setup Checklist
- Empty pantry completely.
- Clean shelves and floor.
- Sort food by category.
- Discard expired or spoiled items.
- Set aside donations when allowed.
- Decide on main pantry zones.
- Assign shelves based on how often you use items.
- Group like items together within each zone.
- Use bins, baskets, or jars where helpful.
- Label shelves, bins, and containers.
Maintenance Checklist
- Do a quick weekly scan before grocery shopping.
- Return items to their labeled zones after use.
- Rotate older items to the front.
- Wipe spills and crumbs as needed.
- Reset one or two shelves each month.
- Do a seasonal deep clean and zone review.
Keep this checklist handy in your kitchen or saved on your phone so you can refer to it whenever your pantry starts to feel cluttered again.
Bringing It All Together
Pantry organization basics come down to three main ideas: clear zones, simple labels, and a realistic maintenance routine. When you group similar foods together, give everything a labeled home, and build small habits to keep the space tidy, your pantry becomes a tool that supports your daily life instead of a source of stress.
You do not have to finish everything in one day. Work shelf by shelf, zone by zone, and check off each step as you go. Over time, you will refine your setup until it fits your household perfectly. For more cleaning and organization ideas for your home, explore other guides and tips at Signature Home Guide.
Related posts
Browse this topic →
How to Organize Cleaning Supplies for Speed and Safety at Home
Spring Cleaning Checklist for the Whole Home (Printable Plan)
How to Disinfect Surfaces Safely: What Really Needs It and What Does Not
How to Clean Hardwood Floors Without Ruining the Finish
Best Way to Clean Laminate Floors Without Swelling or Haze
Vacuum vs Mop Order: The Most Efficient Floor Cleaning Routine Checklist
Keep reading
About this site
Signature Home Guide publishes practical, independent home guides. We aim to be clear, helpful, and transparent.
Affiliate disclosure
As an Amazon Associate, we earn from qualifying purchases. Some links on this site may be affiliate links. If you buy through these links, we may earn a small commission at no extra cost to you. This helps support our content. Learn more.