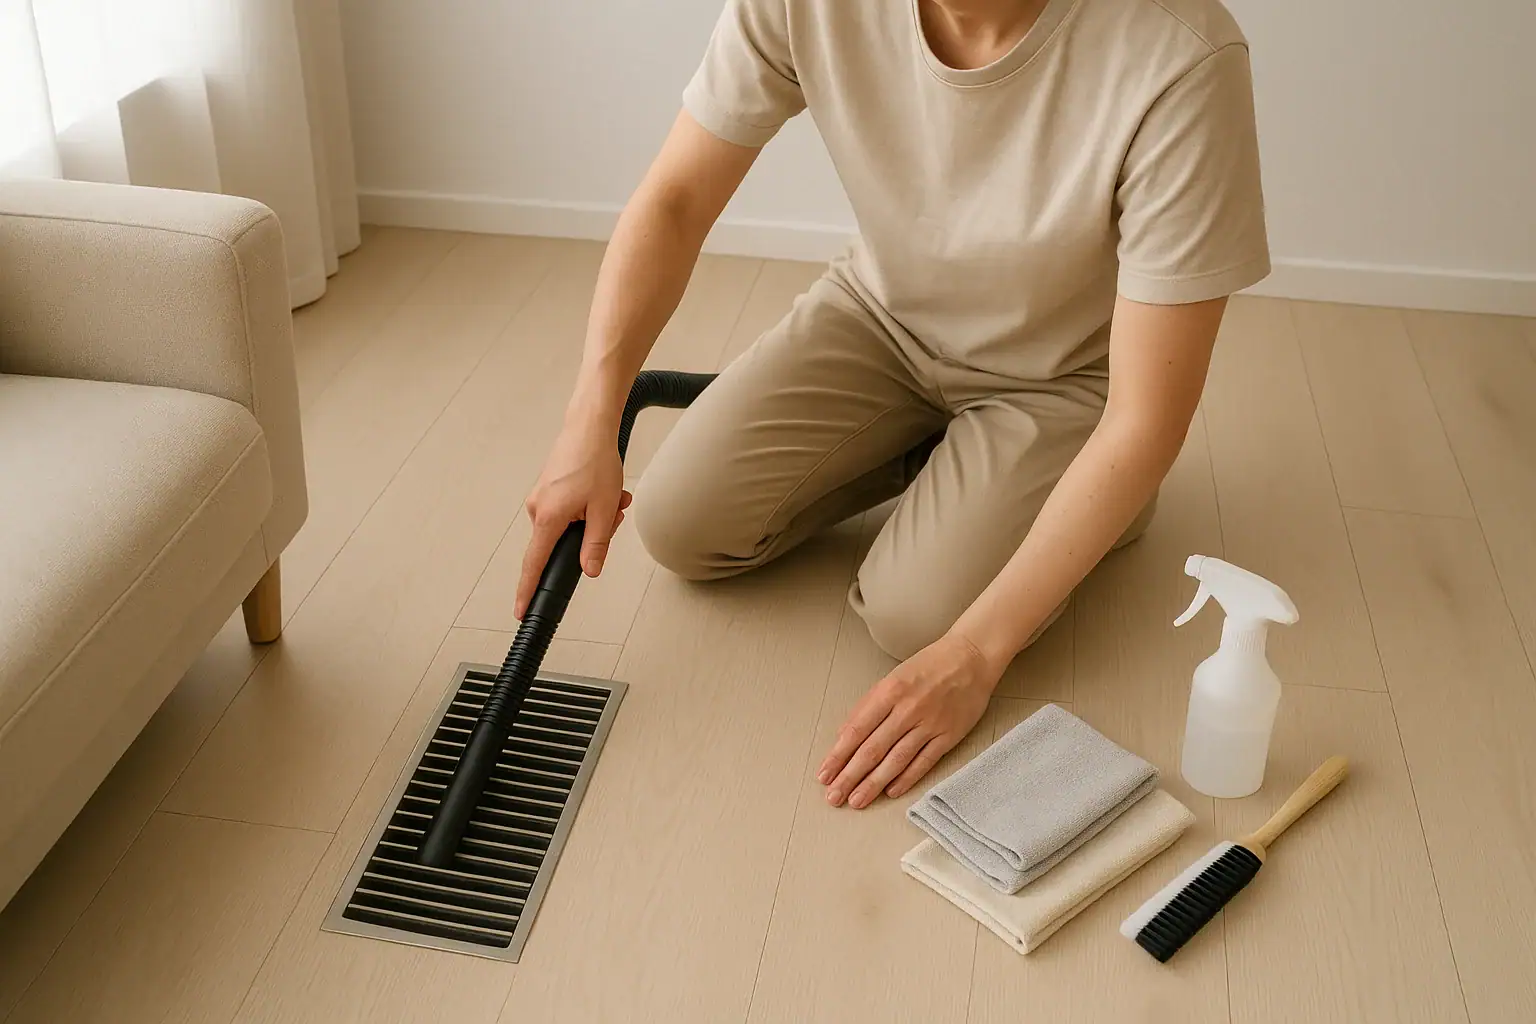
Dusty air vents and floor registers can undo a lot of your hard work cleaning the rest of your home. Every time your heating or cooling system turns on, built-up dust, pet hair, and debris can get pushed into the air you breathe. The challenge is that many people try to clean vents with a quick swipe of a duster, which actually sends more particles floating around the room. With a few simple tools and a careful method, you can clean vents and registers thoroughly while keeping dust under control.
This guide walks you step-by-step through how to clean air vents and registers without spreading dust all over your home. You will learn how your vent system works, which tools make the job easier, and how to safely remove and wash covers. We will also cover how to vacuum inside the duct opening without pushing dust deeper into the system, plus tips for tackling stubborn grime and preventing future buildup. Use this as a practical routine you can repeat a few times a year for cleaner air and less dust on your surfaces.
Why Cleaning Air Vents and Registers Matters
Air vents and registers are the exit points for the air that moves through your heating and cooling system. When they are dirty, they do more than just look bad. They can affect your indoor air quality and how efficiently your system runs.
Common problems caused by dirty vents
- More dust in the air: Every time the fan kicks on, loose dust can be blown into the room.
- Allergy and asthma irritation: Dust, pet dander, and pollen can collect on vents and recirculate.
- Musty or stale odors: Built-up dust mixed with humidity can create unpleasant smells.
- Blocked airflow: Thick layers of dust and debris can restrict air, making your system work harder.
- Visible dirt and discoloration: Dirty grilles and streaks on nearby walls make rooms feel less clean.
Regularly cleaning vents and registers is a simple way to support cleaner air, reduce dusting, and help your system run more smoothly.
How Air Vents, Registers, and Returns Work
Understanding the basic parts of your system helps you clean the right areas and avoid pushing dust where it should not go.
Supply vents vs. return vents
- Supply vents: These blow conditioned air into the room. They are often on floors, low on walls, or in ceilings.
- Return vents (or return grilles): These pull air from the room back into the system. They are usually larger and often found on walls or ceilings.
Both supply and return covers collect dust. Returns often get dirtier faster because air is constantly being pulled through them.
Registers vs. grilles
- Registers: Vents with adjustable dampers or louvers that let you direct or reduce airflow.
- Grilles: Fixed covers without moving parts, usually over return openings.
In this guide, the same cleaning approach works for both, with a little extra care for moving parts on registers.
Tools and Supplies You Will Need
Gather your tools before you start so you can work efficiently and keep dust contained.
Basic tools for low-dust vent cleaning
- Vacuum with a hose and brush attachment (ideally with a HEPA filter)
- Microfiber cloths (a few clean, dry ones)
- Soft-bristle brush or old soft toothbrush
- Warm water and mild dish soap
- Bucket or sink for soaking vent covers
- Small screwdriver (if your vents are screwed in place)
- Step stool or ladder for ceiling or high wall vents
- Old sheet or towels to protect floors and catch any loose dust
Optional supplies for deeper cleaning
- Compressed air can (for blowing dust out of tight corners outside the duct)
- Flexible vent cleaning brush with a long handle
- Disinfecting or all-purpose cleaner safe for painted metal or plastic
- Mask and safety glasses if you are sensitive to dust
Microfiber cloths are especially helpful because they grab and hold dust instead of just pushing it around.
Safety and Dust-Control Steps Before You Start
Taking a few precautions at the beginning will keep dust from spreading through your home while you clean.
Turn off your system
- Set your thermostat to “off” so the fan does not turn on while vents are uncovered.
- If your system has a separate fan setting, make sure it is also off.
This prevents dust from being pulled or blown through open vents while you work.
Protect surfaces and yourself
- Lay an old sheet or towels under floor registers to catch any loose debris.
- Use a step stool on a stable surface for high vents; avoid overreaching.
- Wear a simple mask and safety glasses if you are sensitive to dust or have allergies.
Step-by-Step: How to Clean Air Vents Without Spreading Dust
Follow these steps in order, moving room by room. Start with return vents, then move to supply vents and floor registers.
Step 1: Vacuum the vent surface first
Before removing any covers, vacuum the outside surface to capture loose dust.
- Attach the brush tool to your vacuum hose.
- Hold the brush gently against the vent or register.
- Vacuum in slow passes, moving with the direction of the slats.
- Pay attention to corners and edges where dust collects.
Vacuuming first prevents large clumps of dust from falling into the duct or onto the floor when you remove the cover.
Step 2: Loosen and remove the vent cover
Once the surface is vacuumed, you can safely remove the cover with less mess.
- Use a screwdriver if the vent is screwed to the wall, ceiling, or floor.
- For drop-in floor registers, gently lift them straight up.
- Place screws in a small container so they do not get lost.
- Carry the vent cover to a sink, tub, or work area over a towel.
Handle the cover carefully so any remaining dust stays on the vent, not in the air.
Step 3: Clean inside the duct opening carefully
With the cover removed, you can safely clean just inside the opening without disturbing deeper ductwork.
- Use your vacuum hose with the brush attachment.
- Vacuum around the inside edges of the duct opening.
- Keep the hose slightly inside the opening but avoid pushing it far into the duct.
- Move slowly so the vacuum can pull dust in rather than stir it up.
Focus on what you can easily reach. If you see heavy buildup far inside the duct, that is a sign you may need a professional duct cleaning, not a deeper DIY approach.
Step 4: Wash the vent covers
Most metal or plastic vent covers can be washed with mild soap and water. Always check for any signs of damage or peeling paint before soaking.
- Fill a sink or tub with warm water and add a small amount of mild dish soap.
- Place the vent covers in the soapy water and let them soak for a few minutes.
- Use a soft brush or old toothbrush to scrub between the slats.
- For stubborn grime, apply a little dish soap directly on the brush.
- Rinse thoroughly with clean water to remove all soap.
If your vent covers are painted and you are concerned about chipping, skip soaking and instead wipe them with a damp microfiber cloth and a small amount of mild cleaner.
Step 5: Dry vent covers completely
Reinstalling damp covers can lead to dust clinging more quickly and may cause rust on metal vents.
- Shake off excess water over the sink or tub.
- Pat dry with a clean towel.
- Lay vents flat on a dry towel to air dry completely.
- Use a dry microfiber cloth to remove any remaining moisture.
Make sure all corners, screw holes, and moving parts on registers are fully dry before putting them back.
Step 6: Wipe surrounding walls, floors, and trim
Dust often collects around vents, not just on them. Cleaning the nearby area helps keep dust from returning right away.
- Use a slightly damp microfiber cloth to wipe the wall or ceiling around the vent opening.
- For floor registers, vacuum and wipe the floor area where the register sits.
- Dry the area with a clean cloth to prevent streaks or water spots.
Step 7: Reinstall the clean, dry vent covers
Once everything is clean and dry, you can put the vents and registers back in place.
- Position the cover or register over the opening.
- For screw-on vents, line up the holes and gently tighten the screws. Do not overtighten.
- For drop-in floor registers, set them back into the opening so they sit flat and secure.
- Adjust any louvers or dampers as desired for airflow.
After all vents are reinstalled, turn your thermostat back on and return your system to its normal settings.
How to Clean Floor Registers Without Kicking Up Dust
Floor registers tend to collect more debris, including crumbs, pet hair, and small items. They also sit right where foot traffic can stir up dust.
Special tips for floor registers
- Vacuum the area around the register before removing it.
- Lift the register slowly and hold it level to avoid dropping debris into the duct.
- Use the vacuum hose to clean inside the duct opening and the floor edges.
- Consider using a small handheld brush to loosen pet hair before vacuuming.
If you have children or pets, you may find small toys or objects under the register. Remove these by hand rather than pushing them deeper into the duct.
How Often Should You Clean Vents and Registers?
The right schedule depends on your home, lifestyle, and local conditions, but a simple guideline works for most households.
General cleaning schedule
- Light cleaning: Dust or vacuum vent surfaces every 1 to 2 months.
- Deeper cleaning: Remove and wash covers every 6 to 12 months.
Clean more often if you notice
- Visible dust buildup or gray streaks around vents
- Increased sneezing or allergy symptoms at home
- Strong musty or dusty odors when the system turns on
- Recent renovation or construction dust in the home
Homes with pets, smokers, or residents with allergies may benefit from more frequent vent cleaning and regular filter changes.
Extra Tips to Avoid Spreading Dust While You Clean
Small changes in your method can make a big difference in how much dust ends up in the air.
Use the right tools and motions
- Choose microfiber over feather dusters, which tend to scatter dust.
- Vacuum slowly; fast movements stir up more particles.
- Wipe surfaces with slightly damp cloths so dust sticks instead of floating.
Work in a smart order
- Clean higher vents first, then lower ones, then floors.
- Vacuum the room after cleaning vents to catch any dust that settled.
- Keep interior doors open while you work so air can circulate gently.
When to Call a Professional for Duct Cleaning
Cleaning vents and registers yourself is safe and effective for surface dust and light buildup. However, there are times when deeper duct cleaning may be needed.
Signs you may need professional help
- Thick dust or debris visible several feet inside the duct
- Persistent moldy or musty odors that return quickly after cleaning vents
- Evidence of pests or droppings inside ducts
- Severe allergy or respiratory issues that do not improve with surface cleaning and filter changes
Professional duct cleaning uses specialized equipment to clean deeper inside the system. Avoid trying to reach far into ducts with improvised tools, which can damage components or push dust further inside.
Simple Habits to Keep Vents Cleaner Longer
A few everyday habits can reduce how often you need to do a full vent cleaning and help keep dust under control.
Maintain your filters and routine cleaning
- Change or clean your system filter as often as recommended, or more often if you have pets or allergies.
- Vacuum and dust regularly, focusing on baseboards and window sills where dust collects.
- Use entryway rugs and encourage shoes-off habits to reduce tracked-in dirt.
Protect vents from excess debris
- Avoid placing furniture directly over floor registers, which can trap dust and block airflow.
- Keep toys, pet beds, and storage bins a few inches away from vents.
- Check vents after seasonal projects, such as painting or sanding, and clean them if needed.
Putting It All Together
Cleaning air vents and registers without spreading dust is mostly about using the right tools and working in a careful order. Start by turning off your system and vacuuming vent surfaces, then remove covers and gently clean just inside the duct opening. Wash and dry the covers, wipe surrounding surfaces, and reinstall everything once it is fully dry. Finish by vacuuming the room to catch any remaining particles.
By repeating this routine a few times a year and keeping up with basic dusting, vacuuming, and filter changes, you can reduce dust in your home, support better air quality, and keep your vents looking neat. A little attention to these often-overlooked spots can make your whole home feel fresher and easier to keep clean.
 How to Clean Under Appliances Safely Without Moving Everything
 How to Clean Blinds Without Removing Them: A Simple Step-by-Step Guide
 How to Clean Baseboards Quickly Without Spreading Dust Everywhere