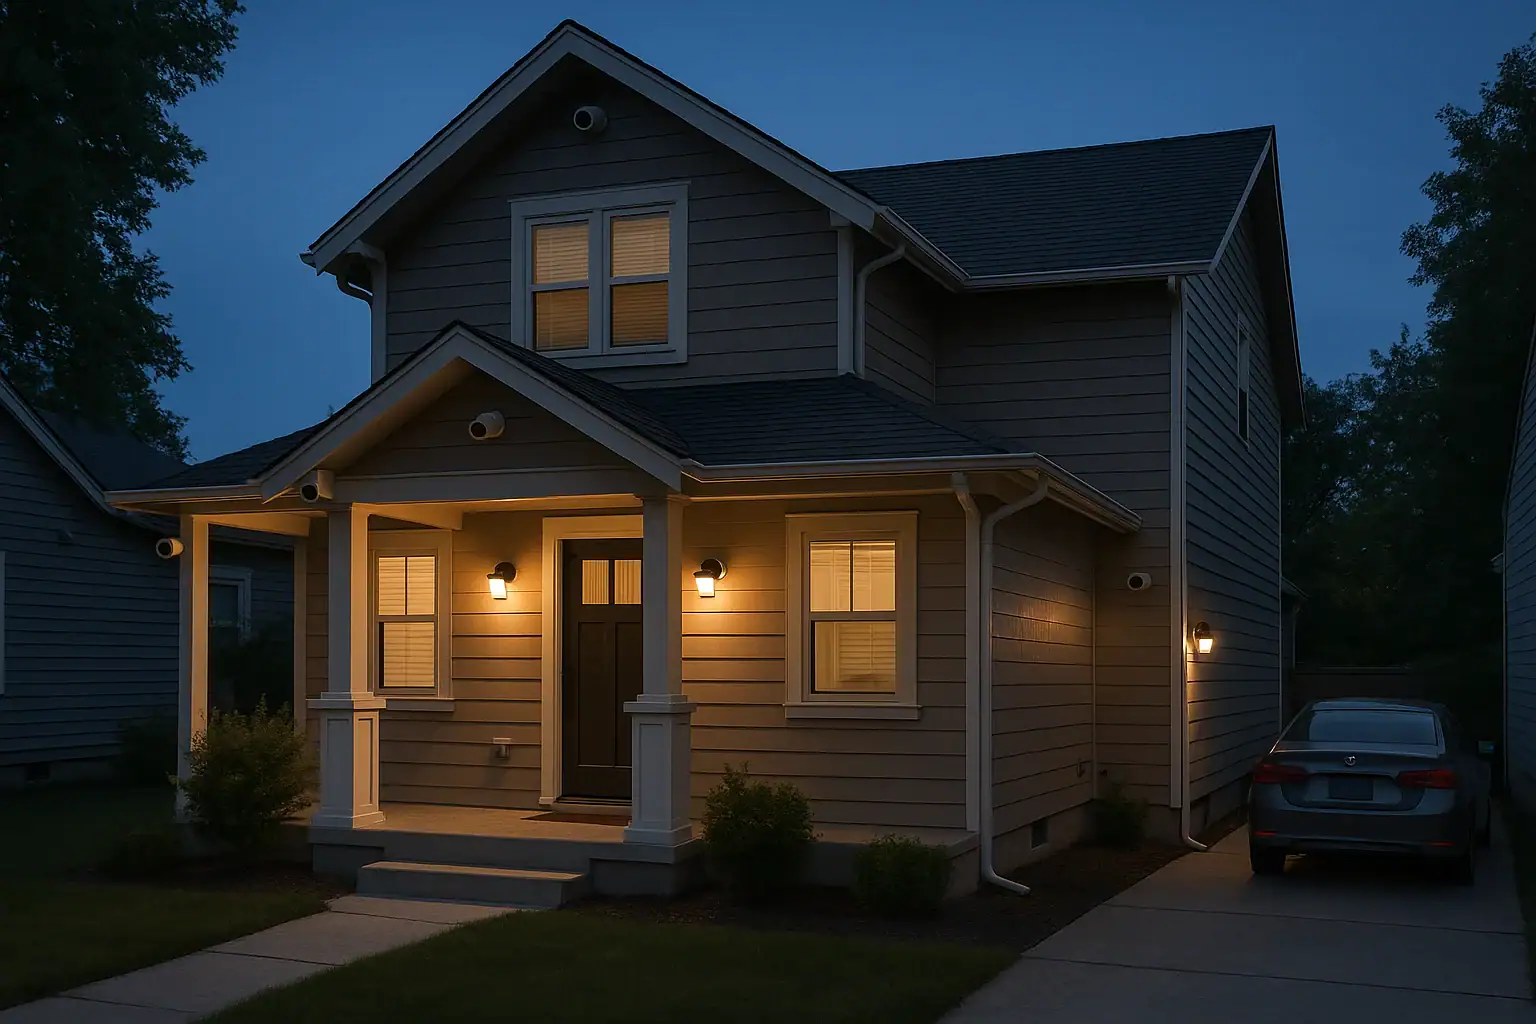
Thoughtful security camera placement can turn an ordinary house into a well-protected home. But simply buying cameras and pointing them at doors is not enough. Poor angles, bad mounting heights, and overlooked corners can create blind spots that leave you vulnerable. This guide walks you step by step through planning and placing cameras so you cover key areas, reduce blind spots, and still respect privacy and local rules. Whether you live in a small apartment or a large single-family home, you will learn how to map out coverage, choose smart mounting locations, and fine-tune your setup for day and night visibility.
Start With a Security Walkthrough of Your Home
Before you mount any camera, walk your property the way a stranger might. This helps you see where someone could approach, hide, or enter without being noticed.
Identify High-Risk Areas First
Focus on locations where intruders are most likely to enter or move around:
- Main front door and any side doors
- Back door and sliding glass doors
- Ground-floor windows, especially those hidden from the street
- Driveway and garage doors
- Yard gates and access paths along the sides of the house
Mark these spots on a simple sketch of your home. You can use graph paper or a quick drawing on a notepad. This becomes your camera placement map.
Think Like an Intruder
Ask yourself:
- Where could someone stand without being seen from the street or a neighbor’s house?
- Which doors or windows are hidden by fences, shrubs, or parked vehicles?
- How might someone move from the street to a door while staying out of sight?
Any place you identify as a potential hiding spot or hidden approach path should be covered by at least one camera, ideally more than one if possible.
Understand Camera Fields of View and Blind Spots
To avoid blind spots, you need to understand how cameras “see.” Most consumer security cameras use wide-angle lenses, but their coverage still has limits.
Horizontal and Vertical Coverage
Each camera has a horizontal field of view (side to side) and a vertical field of view (top to bottom). Wider angles cover more area but can make objects look smaller and farther away.
In general:
- A wide field of view (around 120° or more) is good for covering large areas like driveways or yards.
- A narrower field of view (around 90°) is better for focusing on specific targets like a doorway or gate.
Blind spots appear when the camera’s viewing cone does not reach certain corners, or when objects block the line of sight.
Common Causes of Blind Spots
Watch out for these common issues that create gaps in coverage:
- Obstructions: Columns, porch railings, fences, shrubs, and parked vehicles can block the view.
- Mounting too high or too low: Cameras mounted too high may miss faces; too low and they may only see torsos or be easily tampered with.
- Extreme angles: Mounting a camera at a sharp angle to the target area can distort distance and leave side areas uncovered.
- Lighting contrast: Bright sunlight, deep shade, or glare from windows or headlights can hide details.
When planning each camera, imagine a cone extending from the lens. Anything outside that cone or blocked by an object is a potential blind spot.
Best Practices for Outdoor Camera Placement
Outdoor cameras are your first line of defense. They should capture clear views of anyone approaching, entering, or leaving your property.
Ideal Mounting Height
For most outdoor locations, mount cameras about 8 to 10 feet above the ground. This height:
- Is high enough to reduce tampering or vandalism
- Still allows a clear view of faces and identifying details
- Provides a good angle to cover both the ground and doorways
Avoid mounting cameras at roofline height unless you are specifically trying to capture a wide overview of the yard or property.
Cover Every Exterior Door
Every exterior door should have at least one camera with a clear, close view. For each door:
- Mount the camera slightly to the side of the door, not directly above it, to better capture faces.
- Angle the camera so the field of view includes the steps or landing, not just the door itself.
- Ensure the door area is well lit at night, or that the camera has strong low-light performance.
If you have a covered porch, mount the camera on the ceiling or side wall so it looks across the porch toward the walkway or driveway, rather than straight down at the doormat.
Driveway and Garage Coverage
Driveways and garages are common entry points and targets for theft. To reduce blind spots:
- Place a camera where it can see the full length of the driveway from the street to the garage door.
- If the driveway curves or is long, consider a second camera at the bend or near the street.
- Mount a separate camera above or near the garage door to capture anyone approaching or entering.
Try to avoid pointing cameras directly at the street if possible, to reduce motion alerts from passing vehicles and to minimize recording of public areas.
Side Yards, Backyards, and Gates
Side yards and backyards often provide hidden access routes. To avoid blind spots:
- Place cameras at each side of the house to watch narrow paths and gates.
- Angle cameras so that their fields of view overlap slightly in the backyard.
- Use fence or eave mounting to gain a higher vantage point over shrubs or furniture.
If you have a large yard, consider one camera focused on the house itself and another looking outward from the house toward the fence or property line. This two-way coverage makes it harder for someone to approach without being seen.
Best Practices for Indoor Camera Placement
Indoor cameras help you monitor activity inside the home and verify what triggered an alert. They are especially useful for key interior routes and high-value areas.
Focus on Choke Points
Instead of trying to cover every room, focus on choke points where people must pass:
- Main hallway from the front door
- Stairways and landings
- Hallways leading to bedrooms or home offices
- Open-concept living areas that connect multiple rooms
Mount cameras at corners of these areas so they can see multiple doorways and pathways at once. This reduces the number of cameras needed while still limiting blind spots.
Protect High-Value Rooms
Consider placing cameras to monitor:
- Home offices with computers and important documents
- Rooms where safes or important storage cabinets are located
- Areas where electronics, collectibles, or tools are stored
Position cameras to capture anyone entering these rooms, not just the contents. A camera watching the doorway from across the room is often more useful than one pointed directly at a shelf or safe.
Respect Privacy in Bedrooms and Bathrooms
To respect privacy and comply with local expectations, avoid placing cameras in bathrooms or directly inside bedrooms. Instead, cover the hallways outside these rooms and any shared spaces. If you feel you must monitor a bedroom for safety reasons, consider a camera with a clear physical lens cover or shutter that can be closed when privacy is needed.
How to Overlap Coverage and Eliminate Blind Spots
The most effective way to reduce blind spots is to plan overlapping coverage. This means one camera’s field of view partially covers the same area as another camera.
Use Overlapping Angles
Where possible:
- Position cameras on opposite corners of a yard or large room so they look toward each other.
- Have one camera watching a door from the outside and another watching the same door from the inside.
- Angle side-yard cameras so each one can see part of the area covered by the next camera.
This way, if someone blocks or disables one camera, another camera still records their approach or exit.
Check for Vertical Blind Spots
Blind spots are not only side to side. They can also be vertical:
- A camera mounted too high may miss what is happening right below it.
- A camera pointed too far downward may not see faces until it is too late.
Adjust tilt so that the camera’s view includes both the ground near the camera and the area several yards away. Test by walking through the area and reviewing the footage.
Use Your Camera App’s Grid or Mask Tools
Many camera systems let you display a grid or set motion zones. Use these tools to:
- See exactly what parts of the scene are being monitored.
- Identify corners or edges that fall outside the grid.
- Adjust the camera until all important areas are inside the active zones.
Revisit these settings after you move furniture, park a new vehicle, or add landscaping that might block the view.
Lighting, Night Vision, and Glare
Even perfect placement can fail if lighting is poor. Night vision and daytime glare both affect how well your cameras perform.
Avoid Direct Light Sources
Do not aim cameras directly at:
- Bright outdoor lights or floodlights
- Headlights from parked vehicles
- Large windows with strong sunlight behind them
Strong light shining into the lens can wash out the image and create a blind spot. Instead, position cameras so that light sources are behind or to the side of the camera, not facing it.
Support Night Vision
For nighttime coverage:
- Make sure the area within the camera’s range is free of objects very close to the lens that can reflect infrared light, such as white walls or shiny surfaces.
- Use gentle, even lighting such as porch lights or pathway lights to help the camera capture more detail.
- Test night footage and adjust angles or lighting if faces or license plates are not clear.
Check both live view and recorded clips after dark to ensure there are no unexpected dark patches where someone could hide.
Wired vs. Wireless: Placement Considerations
The type of camera you use affects how and where you can mount it.
Wired Cameras
Wired cameras require power and often a data cable. When planning placement:
- Map routes for cables that stay protected and out of sight.
- Avoid running cables where they are easy to cut or disconnect.
- Use junction boxes or conduit outdoors to protect connections from weather.
Because wired cameras are harder to move, spend extra time planning their positions to avoid long-term blind spots.
Wireless and Battery-Powered Cameras
Wireless cameras offer more flexibility, but you still need to consider:
- Signal strength: Test the connection at the planned mounting spot before drilling.
- Battery access: Mount where you can safely reach the camera to recharge or replace batteries.
- Weather exposure: Shield cameras from direct rain and extreme sun where possible.
The flexibility of wireless cameras makes it easier to experiment with placement. Use this to your advantage by trying different angles until blind spots are minimized.
Testing Your Setup for Blind Spots
After everything is mounted, thorough testing is essential. Do not assume your coverage is complete until you confirm it on video.
Walk Test Every Camera
For each camera:
- Open the live view on your phone or computer.
- Walk slowly through the area from different directions, including less obvious routes.
- Pause in corners, behind vehicles, and near shrubs to see if you remain visible.
- Check whether motion alerts trigger when and where you expect.
Repeat the test at different times of day, including at night, to see how lighting changes affect visibility.
Review Recorded Clips
Live view is useful, but recorded clips show how your system works in real situations. Over several days:
- Review clips triggered by motion to see if people, vehicles, and animals are captured clearly.
- Look for any areas where movement occurs but is not recorded.
- Adjust camera angles or motion zones to close these gaps.
Consider asking a family member or friend to walk around the property while you monitor the cameras. A second person can help you spot coverage gaps you might miss.
Privacy, Neighbors, and Local Rules
While improving your own security, you should also respect the privacy of others and follow local guidelines.
Avoid Pointing Cameras into Neighboring Properties
Whenever possible:
- Angle cameras so they focus on your own doors, windows, and yard.
- Use privacy zones or masking features to block off neighboring windows or yards from the recording area.
- Explain to neighbors, if needed, that your cameras are focused on your property, not theirs.
Know the Basics of Local Expectations
Rules can vary, but as a general guideline:
- It is usually acceptable to record video of your own property and areas visible from it.
- Audio recording may have different requirements than video recording.
- Always check local guidance if you are unsure about where you can aim your cameras.
Being thoughtful about privacy not only keeps you compliant but also helps maintain good relationships with neighbors.
Maintaining Your System and Adjusting Over Time
Your home and habits change over time, and your camera setup should adapt as well.
Regular Maintenance Checklist
Every few months, or after major weather events, do a quick check:
- Clean camera lenses with a soft, dry cloth to remove dust, cobwebs, or water spots.
- Trim shrubs or branches that may have grown into the field of view.
- Check mounts and brackets to ensure they are still tight and secure.
- Test night vision and adjust lighting if needed.
Update Placement as Your Home Changes
Reevaluate your camera placement when:
- You add new structures like sheds, decks, or fences.
- You change parking habits or add vehicles.
- You remodel entryways, porches, or major rooms.
Use these changes as a reminder to repeat your security walkthrough and confirm that no new blind spots have appeared.
Reduce false alerts without creating blind spots
Before moving a camera, review a few days of unwanted alerts. Reflections, swaying branches, headlights, pets, insects near infrared LEDs, and traffic at the edge of the frame often explain the pattern. Use activity zones and sensitivity controls to exclude a narrow problem area while keeping doors, walkways, and other meaningful approach routes covered.
Test in daylight, darkness, rain, and after seasonal foliage changes. A slightly different angle can reduce glare or motion noise without sacrificing identification detail. Do not point a camera so high that faces disappear or so low that it records mainly the ground.
Protect camera accounts and private spaces
Use a unique password, enable two-factor authentication when available, install firmware and app updates, and review who can view or share recordings. Avoid indoor views of bedrooms, bathrooms, or other highly private spaces. Check local laws and avoid recording neighboring areas more than is reasonably necessary for your property.
The U.S. Federal Trade Commission provides practical advice on encryption, secure Wi-Fi, account access, updates, and remote viewing in its guide to securing home security cameras.
Putting It All Together
Effective security camera placement is less about buying more equipment and more about using what you have wisely. Start by mapping your home, identifying high-risk areas, and understanding how your cameras see. Mount outdoor cameras at the right height to cover doors, driveways, and hidden approaches. Indoors, focus on hallways, stairways, and high-value rooms rather than trying to watch every corner.
Overlap coverage where you can, test thoroughly for blind spots, and keep an eye on lighting conditions that might hide important details. As your home and lifestyle evolve, revisit your setup and make small adjustments. With a thoughtful plan and regular checks, you can greatly reduce blind spots and create a safer, more secure home for everyone who lives there.
If you want to explore more ways to strengthen your home’s protection, including alarms, smart locks, and other connected devices, consider building a complete smart home safety plan that works together with your camera system.
 How to Keep Security Camera Footage Private Inside Your Home
 Door and Window Sensor Placement for Sliding Doors: A Practical Checklist
 Noise and Privacy: Choosing Indoor Cameras Responsibly