Water damage is one of the most expensive and disruptive problems a homeowner can face. A small, slow leak behind a toilet or under a sink can quietly soak floors, damage cabinets, and invite mold long before you notice a visible puddle. Water leak sensors offer an early warning system that can alert you to trouble while it is still easy and relatively inexpensive to fix. But these devices can only help if they are placed in the right locations and installed correctly. This guide explains exactly where to put water leak sensors throughout your home, how many you really need, and how to position them for reliable protection. You will also find practical tips for setup, testing, and ongoing maintenance so your sensors stay ready when you need them most.
On this page(click to collapse)
- How Water Leak Sensors Work
- General Rules for Placing Water Leak Sensors
- Priority Locations for Water Leak Sensors
- How Many Water Leak Sensors Do You Need?
- Positioning Tips for Reliable Detection
- Integrating Leak Sensors with Your Smart Home
- Testing and Maintaining Water Leak Sensors
- Creating a Simple Water Leak Sensor Checklist
- Final Thoughts
- Related guides
How Water Leak Sensors Work
Before choosing locations, it helps to understand how most water leak sensors operate. While designs vary, most residential sensors use two or more metal contacts on the bottom of the device. When water bridges these contacts, the sensor detects moisture and triggers an alarm or sends a notification through your smart home system.
Because of this design, placement on the floor or on a flat surface where water naturally collects is critical. Some models also include:
- Remote probe cables that can be snaked into tight spaces
- Temperature sensors to warn about freezing conditions
- Audible alarms plus app or email alerts
Regardless of features, the same basic rule applies: put sensors where leaks are most likely to start and where water will reach the sensor quickly.
General Rules for Placing Water Leak Sensors
Every home is different, but a few simple guidelines will help you get the most from your leak sensors.
Place Sensors at the Lowest Point Where Water Will Collect
Water flows to the lowest point. In most rooms, that means near the floor and often toward a wall or corner. Position sensors:
- Flat on the floor, not tilted or resting on cords or debris
- Near walls or corners where water tends to pool
- Below or directly under potential leak sources whenever possible
Keep Sensors Accessible but Protected
You need to access sensors for testing and battery changes, but they should not be in the way of daily activities. Try to:
- Avoid placing sensors where they will be kicked, stepped on, or vacuumed over
- Keep them out of direct sunlight and away from heating vents
- Use probe cables for tight or awkward spaces
Avoid False Alarms from Normal Moisture
Some areas are naturally damp or prone to splashes. To reduce false alarms:
- Do not place sensors directly in shower stalls or right under open tub faucets
- Keep them away from floor drains that may get wet during normal use
- Avoid locations where condensation regularly forms puddles
Priority Locations for Water Leak Sensors
Most water damage starts from a handful of common sources. Focus first on these high-risk areas, then add more sensors as your budget allows.
1. Under Sinks and Around Plumbing Fixtures
Sinks are one of the most frequent sources of slow, hidden leaks. Pipes, fittings, and supply lines can drip for months before anyone notices.
Kitchen Sink
Place a sensor:
- On the bottom of the cabinet under the sink, near the back where pipes enter
- Far enough from the cabinet door to avoid splashes when you access cleaning supplies
- On a flat, stable surface free of loose items that could shift and block the contacts
Bathroom Sinks
In bathrooms, leaks may come from drain traps, supply lines, or faucet connections. Place a sensor:
- On the floor of the vanity cabinet, under the P-trap
- Closer to the back wall where water is likely to run
- Away from toiletries or stored items that might knock it over
2. Toilets
Toilets can leak from the tank, supply line, or base seal. These leaks may be slow but can cause serious floor and subfloor damage.
- Place a sensor on the floor behind the toilet, close to the wall
- Position it near the water supply valve and line connection
- Make sure it is not in the direct path of normal splashes from the toilet bowl
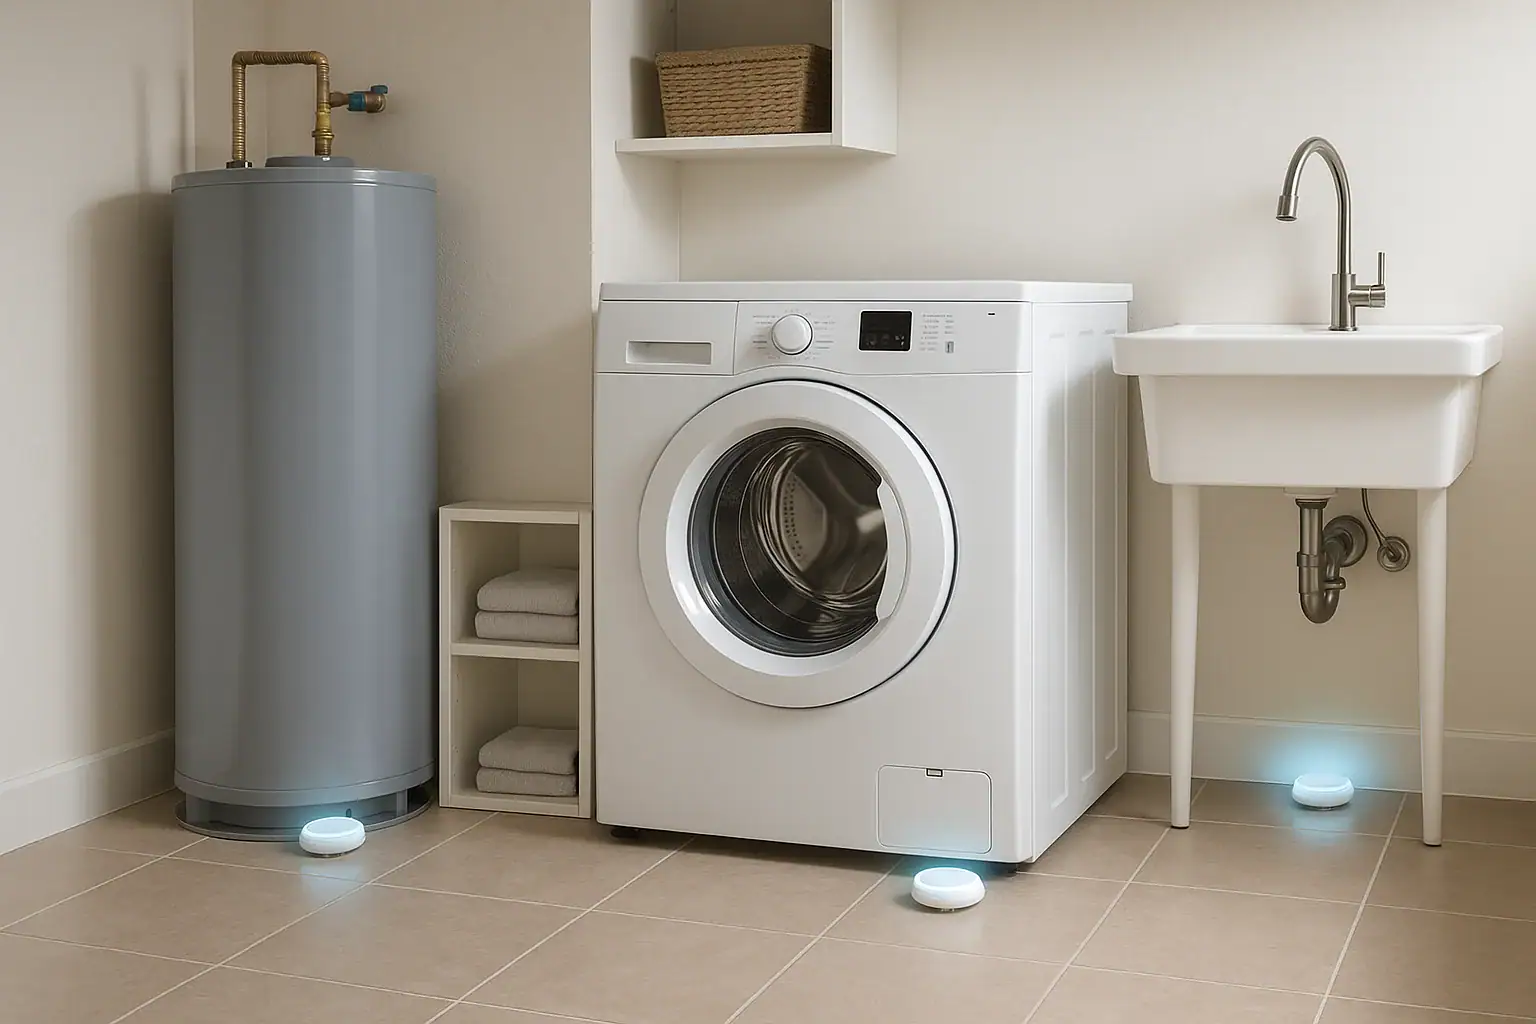
3. Washing Machines and Laundry Areas
Washer hoses and connections are a major source of sudden, high-volume leaks. A burst hose can release many gallons of water in minutes.
- Place a sensor on the floor behind or beside the washing machine
- Position it near the water supply valves and hose connections
- If the washer sits in a pan, place the sensor inside the pan at the lowest point
- Consider a second sensor near any floor drain to detect overflow
4. Water Heater
Water heaters can fail suddenly or develop slow leaks at the base or plumbing connections. Because they hold a large volume of water, early detection is critical.
- Place a sensor on the floor next to the water heater at the lowest side
- Position it where even a small amount of water will reach it quickly
- If the heater sits in a drain pan, place the sensor inside the pan
5. Dishwashers
Dishwasher leaks often occur out of sight, behind the appliance or under the front edge. By the time water appears on the floor, damage may already be significant.
- Place a sensor under the sink near the dishwasher water line connection
- If accessible, position a sensor on the floor under the front edge of the dishwasher
- Use a probe cable to reach under the unit if there is limited clearance
6. Refrigerators with Ice Makers or Water Dispensers
Refrigerators that use a water line can leak at the back connection or along the supply line running through cabinets or floors.
- Place a sensor on the floor behind or beside the refrigerator, near the water line connection
- Ensure it is at the lowest point where water would flow from under the appliance
- Keep it out of the path of routine mopping to avoid false alarms
7. Basements and Crawl Spaces
Basements and crawl spaces are vulnerable to seepage, foundation leaks, and sump pump failures. Because these areas are not checked daily, sensors can provide valuable early warnings.
Near Sump Pumps
- Place a sensor on the floor next to the sump pit, not inside the pit
- Position it where water would collect if the pump failed or overflowed
- Consider a second sensor on the opposite side of the room if the basement is large
Along Foundation Walls
- Place sensors in corners where water tends to collect during heavy rain
- Focus on walls that have shown past signs of dampness or staining
- Use multiple sensors for long walls or large open areas
8. Under Tubs and Showers (Where Accessible)
Leaks from tub drains, shower pans, and tile surrounds can be difficult to spot until they cause major damage to ceilings or adjacent walls.
- If there is an access panel behind the tub or shower, place a sensor on the floor under the plumbing
- Position it near the drain and supply line connections
- Avoid placing it where normal splashes or condensation will trigger alarms
9. Under Central Air Handlers or Indoor HVAC Units
Air conditioning systems often produce condensate that drains through a pan and line. If the drain clogs, water can overflow quietly.
- Place a sensor in the condensate pan if recommended by the manufacturer, or on the floor directly under the unit
- Position it at the lowest point where water would first appear
- Check that it does not interfere with service access to the unit
How Many Water Leak Sensors Do You Need?
The right number of sensors depends on the size of your home, the number of plumbing fixtures, and your tolerance for risk. Use these guidelines as a starting point.
Small Homes or Apartments
For a smaller space with one or two bathrooms, consider:
- 1 sensor under the kitchen sink
- 1 sensor near the washing machine
- 1 sensor near the water heater (if present)
- 1 sensor near the most heavily used bathroom fixtures
Medium to Large Homes
For larger homes or those with multiple floors, consider:
- 1 sensor under each kitchen and bathroom sink
- 1 sensor near each toilet
- 1 sensor near the washing machine
- 1 sensor near the water heater
- 1 sensor near the dishwasher
- 1 sensor near any refrigerator with a water line
- 1–3 sensors in the basement, focusing on sump pumps and foundation walls
If you cannot cover every location right away, start with the highest-risk areas: the water heater, washing machine, and basement or lowest level of the home.
Positioning Tips for Reliable Detection
Once you know the right rooms, fine-tuning the exact placement will improve performance and reduce false alarms.
Use a Level, Stable Surface
Water leak sensors need solid contact with the floor. Avoid placing them on:
- Thick rugs or mats
- Uneven or crumbling surfaces
- Loose cardboard or soft materials that can absorb water
If the floor is rough, consider using a thin, rigid plastic or metal plate under the sensor so water can reach the contacts easily.
Keep Sensors Away from Cleaning and Mopping Paths
Mopping, steam cleaning, and routine spills can trigger false alarms if sensors are in the way. To prevent this:
- Place sensors slightly behind appliances or inside cabinets when possible
- Avoid placing them right next to doorways or high-traffic floor areas
- Inform family members or house cleaners where sensors are located
Use Probe Cables for Tight Spaces
If you cannot fit a full sensor body under an appliance or fixture, many models allow a thin probe cable to extend the detection area.
- Run the probe tip to the lowest point under the appliance
- Secure the cable so it does not get pinched or pulled during cleaning
- Mount the main sensor body on a nearby wall or accessible surface
Integrating Leak Sensors with Your Smart Home
Water leak sensors become even more powerful when they are part of a connected smart home system. Instead of relying solely on an audible alarm, you can receive alerts on your phone or trigger automated responses.
Smart Notifications
When choosing and setting up sensors, look for options that can:
- Send push notifications or text messages when water is detected
- Alert multiple household members at once
- Provide battery and offline status updates
Automated Responses
Depending on your smart home setup, leak detection can trigger additional safety actions, such as:
- Shutting off a smart water valve to stop the flow of water
- Turning on lights in the affected area
- Activating a smart siren for added audible alerts
For more ideas on integrating sensors with other smart safety devices, you can explore related resources at this smart home and safety hub.
Testing and Maintaining Water Leak Sensors
Proper placement is only half the job. Regular testing and maintenance ensure your sensors will work when you need them.
Test Sensors Regularly
Plan to test each sensor every few months, and always after moving or cleaning around it.
- Check that the sensor is in the correct position and not blocked.
- Use a damp cloth or a few drops of water to lightly wet the contacts.
- Confirm that the alarm sounds and, if connected, that you receive a notification.
- Dry the sensor thoroughly before returning it to service.
Replace Batteries on a Schedule
Many battery-powered sensors will send low-battery alerts, but it is wise to set your own schedule as a backup.
- Replace batteries at least once a year, or as recommended by the manufacturer
- Check battery contacts for corrosion during replacement
- Keep spare batteries on hand so you can swap them immediately
Review Placement After Home Changes
Any time you remodel, replace appliances, or change plumbing, revisit your sensor layout.
- Confirm that sensors still sit at the lowest point for water collection
- Add sensors for any new fixtures or appliances that use water
- Remove or relocate sensors from areas that no longer pose a risk
Creating a Simple Water Leak Sensor Checklist
To make sure your home is covered, use this quick checklist as you walk through each room:
- Kitchen: sink, dishwasher, refrigerator with water line
- Bathrooms: under sinks, behind toilets, accessible tub or shower plumbing
- Laundry: washing machine, utility sink, floor drain
- Mechanical areas: water heater, indoor HVAC units, water treatment equipment
- Basement or crawl space: sump pump, foundation corners, known damp spots
Mark each location where you have installed a sensor, and note the date of the last test. A simple list on the inside of a utility closet door or in a home maintenance app can help you stay organized.
Final Thoughts
Water leak sensors are small devices that can prevent big problems. When placed thoughtfully under sinks, near toilets, around water heaters, and in basements or laundry areas, they provide early warnings that give you time to act before damage spreads. Focus first on the highest-risk locations, then expand coverage as your budget allows. Combine good placement with regular testing, battery replacement, and smart notifications, and you will have a practical, affordable layer of protection against one of the most common home disasters.
Recommended next:
Related posts
Browse this topic →
Carbon Monoxide Alarm End-of-Life Beeps: Troubleshooting and Safe Replacement
Childproofing Doors, Windows, Locks, Alarms, and Blind Cords: A Complete Checklist
How to Keep Security Camera Footage Private Inside Your Home
Router Placement at Home for Better WiFi Without Extra Devices
Smart Thermostat Vacation Mode Settings: A Complete Homeowner Guide

Emergency Lighting Plan for Power Outages Without Candles: A Practical Checklist
Keep reading
About this site
Signature Home Guide publishes practical, independent home guides. We aim to be clear, helpful, and transparent.
Affiliate disclosure
As an Amazon Associate, we earn from qualifying purchases. Some links on this site may be affiliate links. If you buy through these links, we may earn a small commission at no extra cost to you. This helps support our content. Learn more.