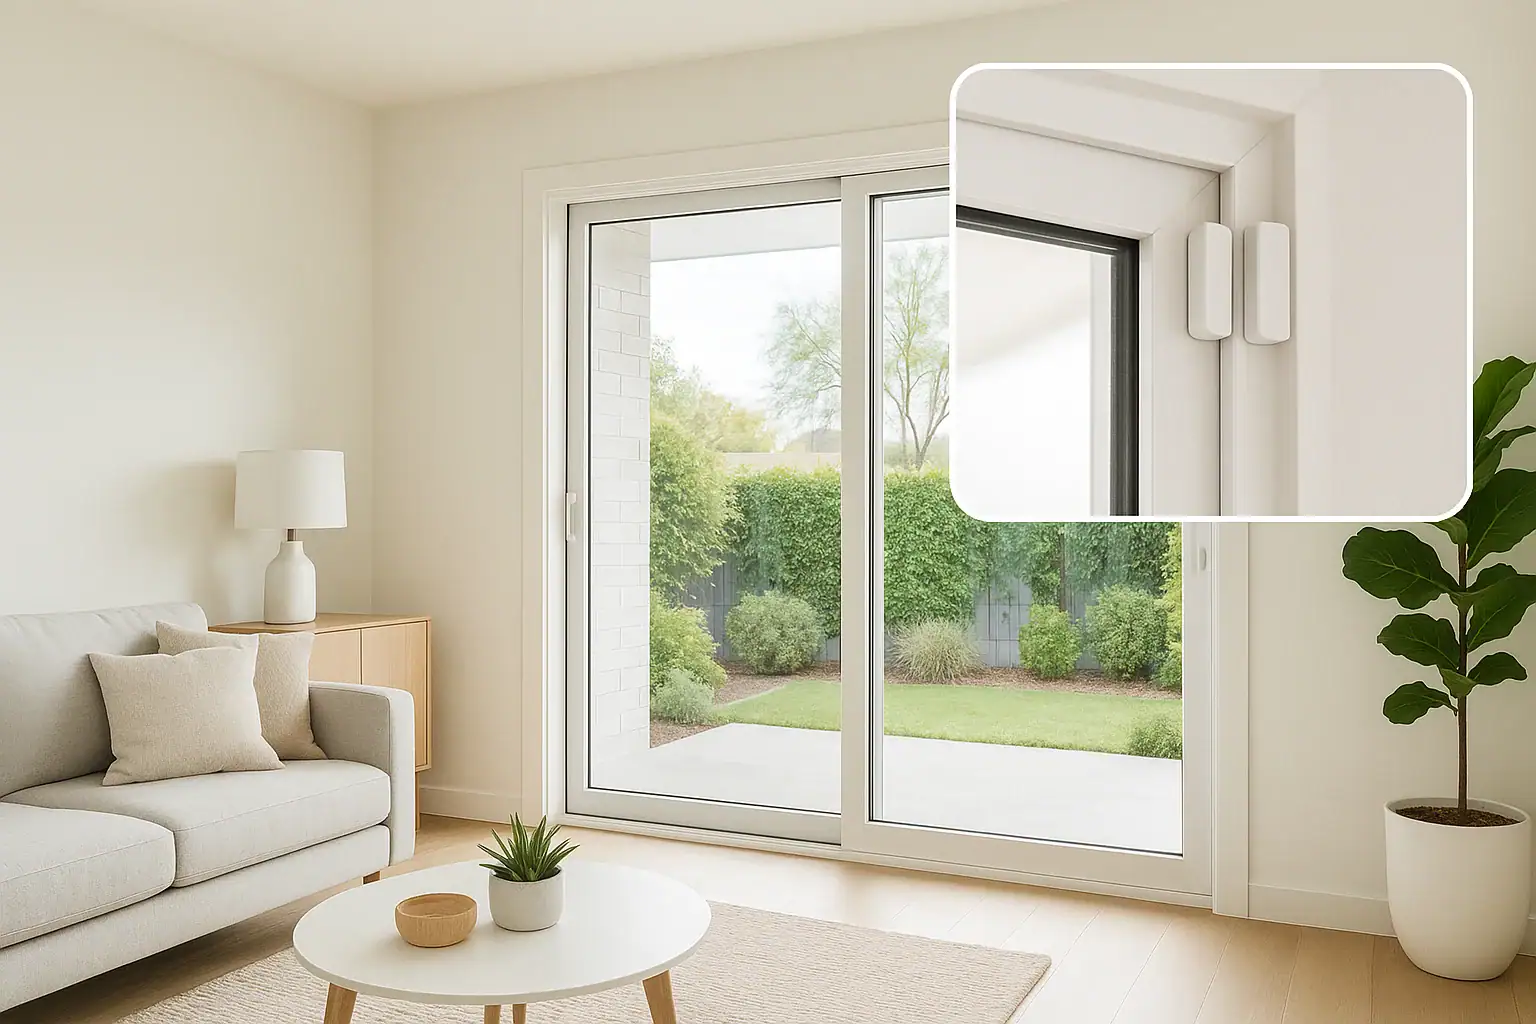
Sliding glass doors are a favorite entry point for both homeowners and intruders. They offer a wide view and easy access to patios and backyards, but they can also be a weak spot in your home security plan. Placing door and window sensors correctly on sliding doors is one of the simplest ways to strengthen this vulnerable area. Done well, sensors can alert you to forced entry, unexpected opening, or even a child slipping outside unnoticed. Done poorly, they can create blind spots, false alarms, or fail when you need them most. This guide walks you through a clear, step‑by‑step checklist so you can place and test your sensors with confidence.
Understanding How Sliding Door Sensors Work
Most door and window sensors for sliding doors use two parts: a magnet and a sensor body. When the door is closed, the two pieces sit close together and the circuit is considered closed. When the door opens and the magnet moves away, the circuit opens and your system triggers an alert or alarm.
Because sliding doors move along a track instead of swinging, you must think about how the magnet travels relative to the sensor. The goal is to keep the magnet aligned and close enough when the door is shut, and to ensure it clearly separates when the door opens even a few inches.
Key components to keep in mind
- Sensor body: Usually mounted on the fixed frame of the sliding door.
- Magnet piece: Usually mounted on the moving panel that slides open.
- Gap tolerance: The maximum distance between sensor and magnet when the door is closed. Check your device specs.
- Orientation: Some sensors must be aligned in a specific direction for reliable performance.
Pre‑Installation Checklist for Sliding Door Sensors
Before you peel any adhesive or drill any holes, walk through this quick preparation checklist. Good prep helps you avoid weak adhesion, misalignment, and repeat work.
1. Inspect the sliding door and frame
- Confirm which panel is fixed and which panel slides.
- Check for warping, loose frames, or damaged tracks.
- Open and close the door several times to see how smoothly it moves.
- Note any spots where the panels flex or rattle; avoid mounting sensors there.
2. Choose the primary monitoring goal
Decide what you care about most so you can place sensors accordingly:
- Perimeter security: Detect any opening from the outside, even a few inches.
- Child or pet safety: Get alerts when the door opens at all, day or night.
- Nighttime protection: Focus on detecting forced entry when the home is occupied.
3. Gather tools and supplies
- Door and window sensor kit (sensor body and magnet)
- Alcohol wipes or mild cleaner and a lint‑free cloth
- Measuring tape or small ruler
- Pencil or painter’s tape for marking positions
- Screwdriver and small drill (if using screws instead of adhesive)
- Replacement adhesive strips, if needed
Best Sensor Placement Options for Sliding Glass Doors
There is no single perfect location that works for every sliding door. Instead, use these common placement patterns and choose the one that fits your door style, frame material, and security goals.
Option A: Vertical placement on the side jamb
This is one of the most common setups for sliding doors.
- Sensor body: Mount on the stationary side jamb or frame, near the edge where the sliding panel meets the fixed panel.
- Magnet: Mount on the sliding panel, aligned with the sensor, so they meet when the door is fully closed.
Pros: Easy to see and access, works with most frames, simple to test. Cons: More visible from inside, may be reachable from outside if the gap is large.
Option B: Horizontal placement at the top of the frame
Top‑frame mounting can be more discreet and less likely to be bumped.
- Sensor body: Mount on the fixed top frame above the sliding panel.
- Magnet: Mount on the top edge of the sliding panel, directly under the sensor.
Pros: Harder for children to tamper with, less visible, often protected from bumps. Cons: Requires a stable, flat top surface and a step stool for installation and maintenance.
Option C: Bottom track or threshold placement
This option is useful if your top or side frames are narrow or uneven.
- Sensor body: Mount on the fixed threshold or lower frame.
- Magnet: Mount on the bottom edge of the sliding panel or in the track area.
Pros: Convenient when upper frame space is limited. Cons: More exposure to dirt, dust, and moisture; higher risk of damage from foot traffic or vacuum cleaners.
Option D: Inside frame for narrow or metal doors
Some sliding doors have thin or metal frames that make surface mounting tricky. In these cases, consider mounting the sensor and magnet inside the frame channel where they are protected and less visible.
Ensure the sensor signal is not blocked by metal, and verify that the magnet can move freely without scraping the frame.
Step‑by‑Step Checklist: Installing a Sensor on a Sliding Door
Use this practical checklist from start to finish. You can print it or keep it open on your phone while you work.
Step 1: Clean the mounting surfaces
- Wipe the frame and door surface where you plan to mount the sensor and magnet.
- Use an alcohol wipe or mild cleaner to remove dust, oils, and residue.
- Let the surfaces dry completely before applying adhesive.
Step 2: Mark your sensor and magnet positions
- Close the sliding door fully and engage the lock.
- Hold the sensor body against the fixed frame in your chosen location.
- Hold the magnet on the moving panel so it sits level with the sensor.
- Use a pencil or small piece of painter’s tape to mark both positions.
- Measure the distance between the two marks to confirm it is within the allowed gap when closed.
Step 3: Check alignment and gap
Before sticking anything down, confirm that the sensor and magnet will stay aligned when the door is closed:
- Ensure the magnet will sit directly next to the sensor, not above or below it.
- Check that the gap is small enough for the sensor to detect the magnet.
- Open the door slightly to see how quickly the magnet will move away from the sensor.
Step 4: Mount the sensor body
- If using adhesive, peel the backing and press the sensor firmly onto the cleaned frame at your mark.
- Hold it in place for the recommended time so the adhesive bonds well.
- If using screws, pre‑drill small pilot holes and then secure the sensor with the provided screws.
- Make sure the sensor is level and does not wobble.
Step 5: Mount the magnet
- With the door still fully closed, align the magnet with the mounted sensor.
- Use adhesive or screws according to the manufacturer’s instructions.
- Confirm that the magnet does not scrape or catch as the door slides.
- Open and close the door slowly to ensure smooth movement.
Step 6: Pair and test the sensor
- Follow your system’s instructions to pair or enroll the new sensor.
- Set the sensor to the correct mode (door, window, or entry, depending on your system).
- Test the sensor by opening the sliding door a few inches and confirming you receive an alert.
- Test again with the door fully open and fully closed.
- Repeat tests with the system armed and disarmed to confirm consistent behavior.
Checklist: Avoiding Common Sliding Door Sensor Mistakes
Use this quick list to double‑check your work and avoid issues that can reduce your security or cause nuisance alarms.
Placement and alignment mistakes
- Sensor and magnet are too far apart when the door is closed.
- Magnet is mounted slightly above or below the sensor, causing intermittent detection.
- Sensor is placed on a flexible or loose section of the frame that moves when the door is used.
- Sensor is mounted on a surface that is not flat, causing poor adhesion.
Adhesion and durability mistakes
- Mounting on dusty, greasy, or damp surfaces.
- Using the wrong adhesive for metal, vinyl, or wood frames.
- Placing sensors where they can be easily kicked, bumped, or hit by furniture.
- Ignoring condensation or water exposure near the bottom track.
Configuration and testing mistakes
- Not testing the sensor after pairing it with your system.
- Leaving the sensor in the wrong zone or room name, causing confusion later.
- Failing to test the sensor after a power outage or system update.
- Not checking the sensor battery status regularly.
Special Considerations for Different Sliding Door Types
Not all sliding doors are the same. Adjust your sensor placement based on the style and material of your door.
Frameless or narrow‑frame glass doors
- Use the widest available part of the frame or track for mounting.
- Consider top‑frame placement to keep hardware off the glass.
- Make sure any adhesive used is rated for glass and does not damage coatings or films.
Heavy wood or composite sliding doors
- Confirm that the door closes consistently without bouncing back.
- Use screws if the surface texture makes adhesive less reliable.
- Check for seasonal swelling that might change the alignment.
Metal frames and tracks
- Be aware that metal can sometimes interfere with wireless signals.
- Mount the sensor so the radio signal has a clear path toward your hub.
- Use adhesives or screws compatible with metal surfaces.
Multi‑panel or wide sliding doors
- Identify which panel is used most often for entry and exit.
- Place the primary sensor on the active panel that opens.
- Consider additional sensors or glass break detection for very wide openings.
Improving Security Beyond Basic Sensor Placement
Door and window sensors are an important layer of protection, but sliding doors can benefit from a few extra safeguards. Combine these measures with your sensor placement for a more complete approach.
Reinforce the sliding door itself
- Use a security bar or dowel in the track to prevent the panel from being forced open.
- Check that the existing latch engages fully and cannot be easily jiggled open.
- Inspect and, if needed, upgrade the lock hardware to a stronger design.
- Make sure the door cannot be lifted off the track from the outside.
Add layered detection
- Consider glass break detection in rooms with large sliding doors.
- Use motion detection as a backup in case the door sensor fails or is bypassed.
- Place lighting or cameras facing the exterior side of the sliding door where appropriate.
Use smart settings and schedules
- Set alerts for when the sliding door is opened during specific hours, such as late at night.
- Enable reminders if the door is left open for more than a set number of minutes.
- Rename the sensor clearly (for example, “Back Patio Slider”) so you instantly know which door triggered an alert.
Maintenance Checklist for Sliding Door Sensors
Once your sensors are installed and working, a little ongoing maintenance keeps them reliable. Use this quick checklist a few times a year.
Monthly or quarterly checks
- Open and close the sliding door to confirm the sensor still triggers correctly.
- Look for signs of adhesive peeling or sensor movement.
- Wipe away dust or cobwebs around the sensor and magnet.
- Confirm the door still closes tightly and does not bounce or misalign.
Battery and system checks
- Review your system app or panel for low‑battery warnings.
- Replace batteries proactively according to the manufacturer’s estimate.
- Test the sensor after any battery change or system reset.
Seasonal and weather‑related checks
- After major temperature swings, verify that the door frame has not shifted.
- Inspect for moisture, condensation, or ice near bottom‑mounted sensors.
- After storms, check that the sliding track is clear of debris that could affect alignment.
Putting It All Together
Sliding doors do not have to be the weak link in your home security. With thoughtful sensor placement, careful alignment, and regular testing, you can turn a vulnerable glass opening into a well‑monitored entry point. Walk through the checklists in this guide, choose the placement that fits your specific door, and verify that your system alerts you the moment the door moves. Combined with basic physical reinforcement and smart settings, well‑placed door and window sensors can give you greater peace of mind every time you lock up for the night or leave home for the day.
If you are planning a broader safety upgrade, consider reviewing the rest of your home’s entry points and interior spaces as well. A consistent, whole‑home approach helps your sliding door sensors work as part of a complete protection plan.
 Security Camera Placement Without Blind Spots: A Practical Homeowner’s Guide
 Motion Sensor Light Placement for Driveway and Side Yard: A Practical Checklist
 Fire Extinguisher Placement and Maintenance at Home: A Practical Checklist