In an emergency, every second counts. If an outlet starts sparking, an appliance begins to smoke, or a pipe bursts near electrical wiring, you may need to shut off power to a specific area of your home fast. A clearly labeled breaker panel can turn a frantic scramble into a calm, confident response. Instead of flipping random switches and hoping for the best, you can go straight to the right breaker and shut power off in seconds.
On this page(click to collapse)
- Why Labeling Your Breaker Panel Matters
- Safety First: Before You Touch the Panel
- Tools and Supplies You Will Need
- Step 1: Open the Panel Door and Review Existing Labels
- Step 2: Create a Draft Circuit Map
- Step 3: Methodically Test Each Breaker
- Step 4: Name Each Circuit Clearly and Consistently
- Step 5: Transfer Your Labels to the Panel
- Step 6: Highlight Critical Emergency Circuits
- Step 7: Share the Panel Map With Your Household
- When to Call a Professional
- Keeping Your Breaker Labels Up to Date
- Bringing It All Together
- Related guides
Many homes have panels that were never labeled properly, or the labels are old, faded, or simply wrong. The good news is that you can fix this yourself with a little time and attention. This guide walks you through how to label your breaker panel step by step, with safety tips, simple tools, and practical naming ideas so anyone in your household can find the right breaker quickly.
Why Labeling Your Breaker Panel Matters
Taking time to label your breaker panel is one of the simplest ways to improve safety and convenience in your home. It is not just about organization; it can directly affect how quickly you can respond in a stressful situation.
Safety Benefits
- Faster emergency shutoff: Quickly kill power to a smoking appliance, a sparking outlet, or a flooded area.
- Reduced risk of shock: When doing minor home projects, you can confidently turn off the correct circuit before working.
- Helps first responders: If firefighters or other responders need to cut power, clear labels can save valuable time.
Everyday Convenience
- Less trial and error: No more flipping multiple breakers just to change a light fixture or outlet.
- Fewer accidental shutdowns: Avoid turning off power to the fridge, home office, or medical devices by mistake.
- Easier troubleshooting: When lights flicker or outlets stop working, a labeled panel helps you track which areas are affected.
Safety First: Before You Touch the Panel
Working around your breaker panel is generally safe if you stay outside the panel cover and follow basic precautions. You do not need to remove the metal cover or touch any bare wires to label your breakers. If you ever feel unsure, stop and consult a licensed electrician.
Basic Safety Tips
- Keep the area around the panel dry and clear of clutter.
- Do not remove the panel cover or touch internal wiring.
- Use a flashlight or work light if the panel area is dim.
- Stand on a dry floor or mat, not on a wet surface.
- Never force a stubborn breaker; if it feels stuck, call a professional.
Tools and Supplies You Will Need
You do not need anything fancy to label your breaker panel. A few simple tools will help you work accurately and keep the labels readable for years.
- Pen or fine-tip permanent marker: For writing clear labels.
- Label maker or adhesive labels (optional): For a cleaner, more durable look.
- Notepad or clipboard: To draft your circuit list before writing on the panel.
- Flashlight or headlamp: Helpful if the panel is in a dim basement, garage, or closet.
- Helper: Someone who can tell you what turns off as you flip breakers.
- Simple circuit tester or plug-in lamp: For checking outlets and confirming which breaker controls what.
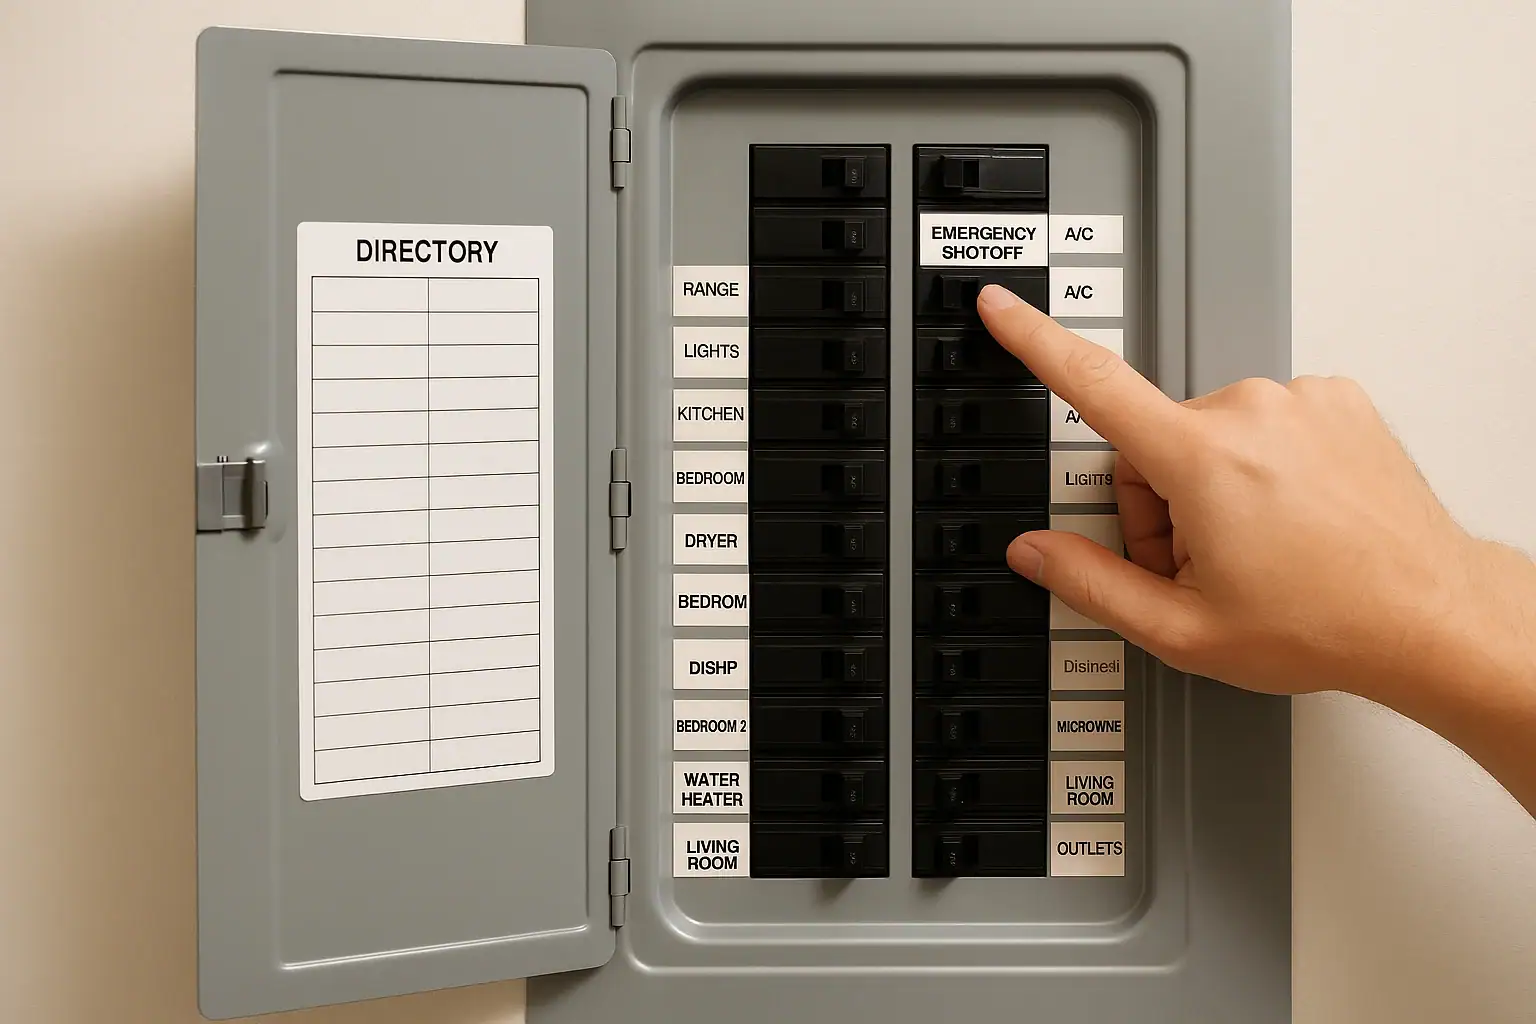
Step 1: Open the Panel Door and Review Existing Labels
Start by opening the panel door. Most panels have a directory area on the inside of the door where circuits can be listed. Some may have handwritten notes next to individual breakers.
Evaluate What You Already Have
- Check for legibility: Are the existing labels faded, smeared, or hard to read?
- Look for vague descriptions: Labels like “lights” or “plugs” are not very helpful.
- Note duplicates or contradictions: If more than one breaker says “kitchen,” you will need to sort that out.
Decide whether to start from scratch or update what is there. In many cases, it is easier to create a fresh, organized list rather than trying to patch an old one.
Step 2: Create a Draft Circuit Map
Before writing on the panel, use a notepad to create a draft list. Number the breakers in the order they appear. Many panels have numbers printed next to each breaker; if not, you can number them yourself from top to bottom, left to right.
Numbering Your Breakers
- Stand facing the panel with the door open.
- Start at the top left breaker and label it “1” on your notepad.
- Move down the left column, then up to the top right, and down again.
- For double-pole breakers (two handles tied together), treat them as a single circuit and note that they are a pair.
This numbered list will become your working map as you test which breaker controls each area of your home.
Step 3: Methodically Test Each Breaker
Now you will match each breaker to the lights, outlets, and appliances it controls. This is where a helper and a simple plug-in device make the process much easier.
Set Up for Testing
- Choose a time when everyone at home knows you will be turning power off and on.
- Turn on lights in several rooms so you can see what changes.
- Plug a lamp, radio, or circuit tester into an outlet in the area you are checking.
Testing Procedure
- Pick one breaker on your list and switch it firmly to the “off” position.
- Have your helper walk through the home and note what turned off: specific rooms, outlets, or appliances.
- Write these details next to the breaker number in your notepad.
- Turn the breaker back “on” before moving to the next one.
- Repeat for each breaker, taking your time to be thorough.
If you are working alone, you can flip a breaker and walk the house yourself, but this will take longer. Using a plug-in lamp or tester and moving it room by room can help you confirm which outlets belong to which circuit.
Step 4: Name Each Circuit Clearly and Consistently
Once you know what each breaker controls, turn your notes into clear, easy-to-understand labels. The goal is for anyone in your home to quickly identify the right breaker in an emergency.
Tips for Effective Circuit Names
- Be specific about locations: Use room names and sides of the house, such as “Kitchen counter outlets, north wall” or “Living room lights, front half.”
- Include floor levels: For multi-story homes, add “1st floor,” “2nd floor,” or “basement.”
- Note major appliances: Label dedicated circuits like “Electric range,” “Dryer,” “Water heater,” or “Well pump.”
- Use plain language: Avoid technical terms; write labels the way you would explain them to a family member.
- Keep it short but clear: You have limited space, so focus on the most important information.
Sample Circuit Label Ideas
- “Kitchen lights and island outlets”
- “Refrigerator outlet only”
- “Living room and hall lights, 1st floor”
- “Bedroom 1 and 2 outlets, 2nd floor”
- “Bathroom outlets, 2nd floor (GFCI)”
- “Garage lights and outlets”
- “Basement lights, east side”
- “Furnace / air handler”
Step 5: Transfer Your Labels to the Panel
With your draft list complete, it is time to write the final labels on or inside the panel. Work slowly so the writing stays neat and readable.
Using the Panel Directory
Most panels have a printed directory on the inside of the door with numbered lines. Match your breaker numbers to these lines and write your final descriptions clearly with a permanent marker or printed labels.
- Write in block letters for easier reading.
- Use dark ink that contrasts with the background.
- If you make a mistake, neatly cross it out and rewrite, or use a fresh label.
Labeling Individual Breakers
For even faster identification, you can place small labels directly next to each breaker handle.
- Use short tags like “KITCHEN,” “LR LIGHTS,” or “BED 1/2.”
- Keep these brief since space is tight; rely on the full directory for detail.
- Make sure labels do not interfere with moving the breaker handle.
Step 6: Highlight Critical Emergency Circuits
In an emergency, you may not have time to read every label. Highlighting critical breakers can help you or a family member act quickly under stress.
Which Circuits to Emphasize
- Main shutoff: The main breaker that cuts power to the entire house.
- Kitchen outlets: Especially those serving large appliances that could overheat.
- Laundry appliances: Washer and dryer circuits.
- Basement or sump pump area: If flooding is a concern.
- Garage and workshop: Where power tools and chargers may be in use.
Ways to Make Them Stand Out
- Use a small colored sticker or dot next to high-priority breakers.
- Add a brief note on the directory such as “Emergency: main shutoff.”
- Post a simple instruction sheet near the panel explaining which breakers to use in common emergencies, like “water leak near laundry” or “smoke from kitchen outlet.”
Step 7: Share the Panel Map With Your Household
A well-labeled breaker panel only helps if people know how to use it. Take a few minutes to walk household members through the panel and explain the basics.
What to Show Family Members
- Where the panel is located and how to open the door.
- How to recognize the main shutoff breaker.
- Which labels matter most for emergencies, such as kitchen, laundry, or basement circuits.
- How to firmly switch a breaker off and back on without forcing it.
Consider taking a clear photo of the labeled directory and saving it to a shared folder or printing a copy to keep in a household binder. This way, you still have the information if the panel door labels become damaged or hard to read over time.
When to Call a Professional
Labeling is a do-it-yourself task, but certain situations call for a licensed electrician. Do not ignore warning signs that suggest deeper electrical issues.
Signs You Need Expert Help
- Breakers that trip repeatedly, especially after you reset them.
- Warm or hot breakers, buzzing sounds, or a burning odor near the panel.
- Loose breakers that wobble or will not stay in the “on” position.
- Evidence of rust, water damage, or corrosion inside or around the panel.
- Confusing or unsafe wiring that you can see even without removing the cover.
If anything looks or feels unsafe, stop and schedule a professional inspection. Your panel labels will still be useful, but safety should always come first.
Keeping Your Breaker Labels Up to Date
Homes change over time. New rooms, added outlets, or upgraded appliances can all affect your circuits. Make a habit of updating your panel labels whenever you make significant changes.
Simple Maintenance Tips
- Review your labels once a year to confirm they still match how your home is wired.
- Update the directory after any electrical work or remodel.
- Replace worn or peeling labels so they remain easy to read.
- Keep a pen or label tape near the panel so updates are quick and convenient.
A few minutes of maintenance can keep your panel clear and accurate for years, giving you confidence that you can act quickly when it matters most.
Bringing It All Together
Labeling your breaker panel is a straightforward project that pays off in both safety and convenience. By methodically testing each circuit, writing clear and consistent labels, and highlighting critical shutoffs, you create a simple roadmap that anyone in your home can follow under pressure.
Once your panel is labeled, consider it part of your broader home safety plan. Combine it with working smoke detectors, accessible fire extinguishers, and a clear family emergency plan. Together, these steps help you protect your home and respond quickly when something goes wrong.
If you would like more ideas for improving safety and smart control around your home, you can explore additional resources and guides in the smart home and safety section at Signature Home Guide.
Recommended next:
Related posts
Browse this topic →
Carbon Monoxide Alarm End-of-Life Beeps: Troubleshooting and Safe Replacement
Childproofing Doors, Windows, Locks, Alarms, and Blind Cords: A Complete Checklist
How to Keep Security Camera Footage Private Inside Your Home
Router Placement at Home for Better WiFi Without Extra Devices
Smart Thermostat Vacation Mode Settings: A Complete Homeowner Guide
Emergency Lighting Plan for Power Outages Without Candles: A Practical Checklist
Keep reading
About this site
Signature Home Guide publishes practical, independent home guides. We aim to be clear, helpful, and transparent.
Affiliate disclosure
As an Amazon Associate, we earn from qualifying purchases. Some links on this site may be affiliate links. If you buy through these links, we may earn a small commission at no extra cost to you. This helps support our content. Learn more.