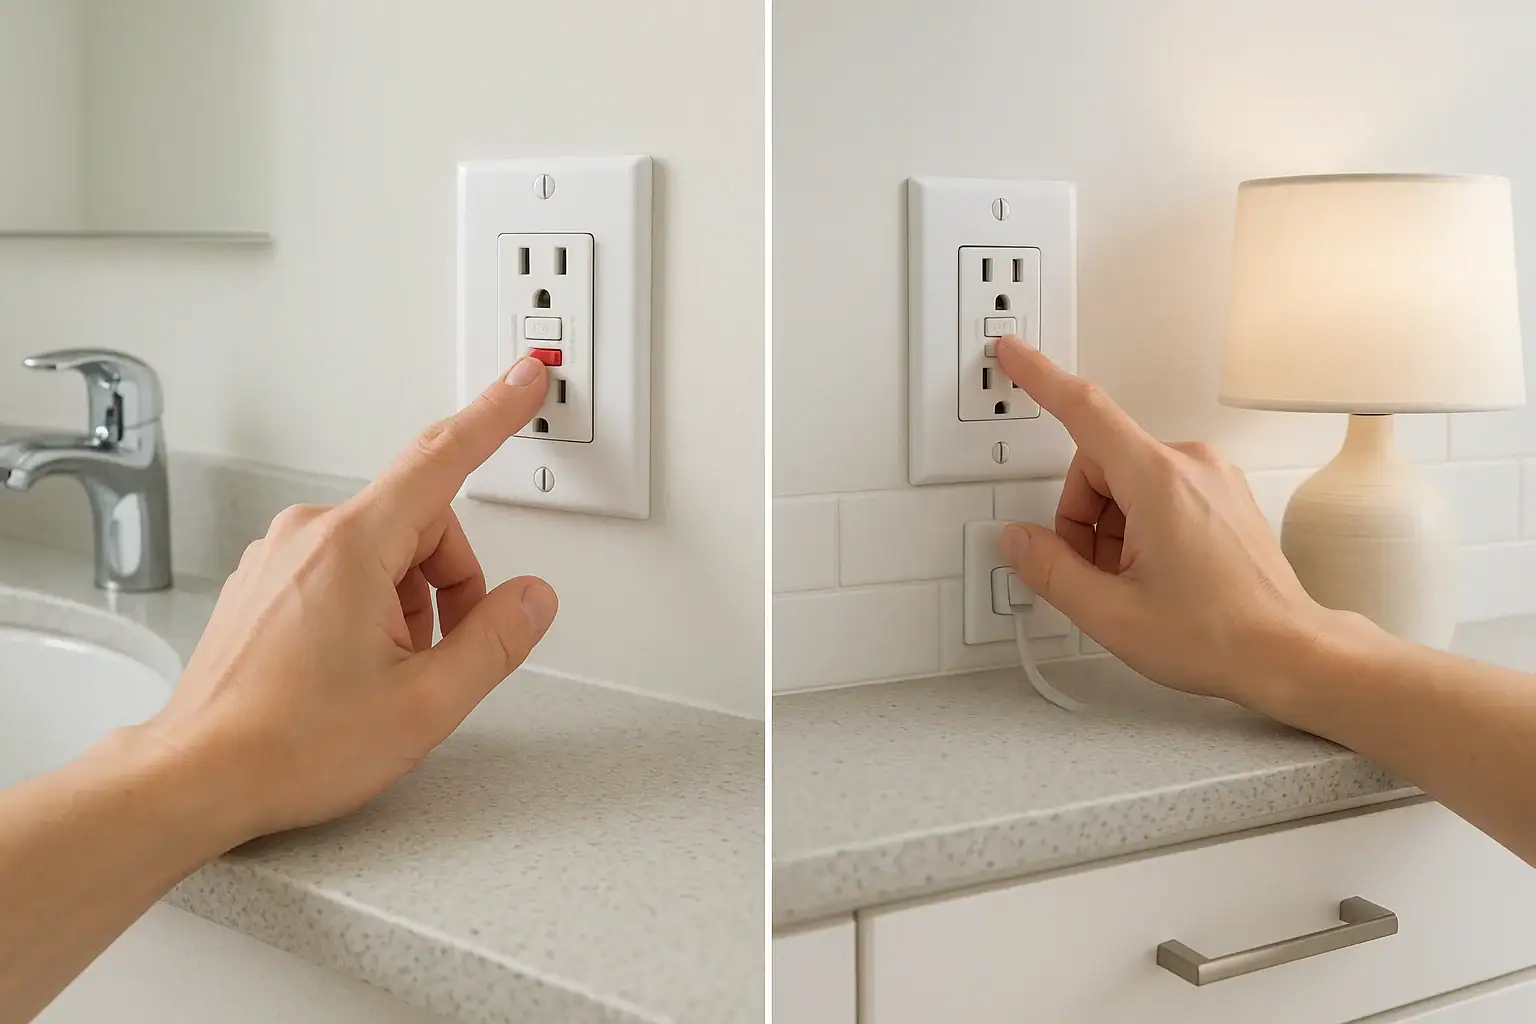
Ground-fault circuit-interrupter (GFCI) outlets are one of the most important safety features in any home, especially in bathrooms and kitchens where water and electricity are close together. These outlets are designed to shut off power in a fraction of a second if they detect a dangerous imbalance in the electrical current, helping to reduce the risk of shock. But a GFCI outlet can only protect you if it is installed correctly and working the way it should. Regular testing is simple, fast, and something most homeowners can do with basic precautions.
This guide walks you through how to test GFCI outlets safely in bathrooms and kitchens using a clear checklist. You will learn how GFCIs work, what tools you need, how to test using the built-in buttons, how to test with a plug-in tester, and what to do if something does not look right. If you ever feel unsure or uncomfortable, stop and contact a licensed electrician. Safety always comes first.
What Is a GFCI Outlet and Why It Matters
GFCI outlets are designed to protect people from electrical shock, especially in areas where moisture is present. They constantly compare the current flowing into the circuit with the current flowing out. If there is even a small difference, the outlet quickly shuts off power.
You can usually recognize a GFCI outlet by the two small buttons on the front:
- TEST button, often darker in color
- RESET button, often lighter in color
In most homes, GFCI outlets are required in:
- Bathrooms
- Kitchens (especially near sinks and countertops)
- Laundry areas
- Garages and unfinished basements
- Outdoor receptacles
Because GFCIs are mechanical devices, they can wear out or fail over time. That is why regular testing is recommended, typically once a month or at least a few times a year.
Safety First: Precautions Before Testing
Before you start testing GFCI outlets in your bathroom or kitchen, take a moment to review basic safety steps. Testing is usually straightforward, but you are still working around live electrical circuits.
Essential safety tips
- Make sure your hands are completely dry.
- Stand on a dry floor or mat, not on a wet surface.
- Keep water away from the outlet while you test.
- Do not remove the outlet cover or work on wiring unless you are qualified.
- Use only UL-listed or nationally recognized testing tools.
- If anything sparks, smells burnt, or looks damaged, stop immediately and call a licensed electrician.
If you have any doubts about the condition of your home’s wiring, or if breakers trip frequently, it is safer to have a professional inspect and test the system for you.
Tools You May Need to Test GFCI Outlets
You can perform a basic test of a GFCI outlet with no tools at all, using only the built-in buttons. However, a simple plug-in tester can give you more information about wiring and outlet condition.
Helpful tools
- Small plug-in lamp or nightlight with an on/off switch
- GFCI outlet tester (plug-in type with indicator lights)
- Flashlight if lighting is limited near the outlet
- Pen and notepad to record which outlets you tested and any issues
A plug-in tester is inexpensive and widely available. It usually has three indicator lights and a chart printed on the body that explains what each light pattern means.
How Often Should You Test GFCI Outlets?
GFCI outlets should be tested regularly to confirm they still trip and reset correctly.
- Monthly: Ideal for bathrooms and kitchens where outlets are exposed to steam, splashes, and frequent use.
- Seasonally: At minimum, test every three months if monthly checks are not realistic.
- After major storms or electrical issues: Test if you have had power surges, flooding, or other electrical problems.
Building a simple routine, such as testing all bathroom and kitchen GFCIs on the first weekend of each month, helps ensure your protection is always active.
Bathroom and Kitchen GFCI Testing Checklist
Use this step-by-step checklist to test GFCI outlets safely in bathrooms and kitchens. Move through the steps in order and note any outlets that do not behave as expected.
Step 1: Locate all GFCI outlets
- Check each bathroom for outlets near sinks, vanities, and countertops.
- In the kitchen, look along countertops, near the sink, and by any prep areas.
- Remember that one GFCI outlet can protect other outlets downstream. Some regular-looking outlets in the same room might be protected by a GFCI located elsewhere.
Step 2: Inspect outlets visually
Before pressing any buttons, look for signs of wear or damage:
- Cracked, loose, or discolored outlet faces
- Burn marks or melted plastic
- Loose wall plates or outlets that move when you plug something in
- Moisture or condensation around the outlet
If you see any of these issues, do not test further. Turn off the breaker for that circuit if you can identify it, and schedule a licensed electrician to inspect and replace the outlet.
Step 3: Plug in a small lamp or nightlight
- Turn the lamp or nightlight switch to the ON position.
- Plug it into the GFCI outlet you are testing.
- Confirm that the light turns on. This shows the outlet currently has power.
Step 4: Use the TEST button
With the lamp still on, press the TEST button on the GFCI outlet.
- The outlet should click, and the lamp should turn off immediately.
- The RESET button may pop out or change position.
- On some models, a small indicator light may change color or turn off.
If the lamp stays on when you press TEST:
- The GFCI is not tripping correctly and may not be providing protection.
- Stop using that outlet and any outlets it might protect.
- Contact a licensed electrician to diagnose and replace the device.
Step 5: Use the RESET button
After confirming that the GFCI trips correctly, restore power:
- Press the RESET button firmly until it clicks into place.
- The lamp should turn back on, confirming that power has been restored.
- If the lamp does not come back on, try unplugging and replugging it, or test the lamp in a different outlet to make sure the bulb is good.
If the GFCI will not reset:
- Check your main electrical panel to see if a breaker has tripped.
- If the breaker is fine and the outlet still will not reset, the GFCI may be faulty.
- Do not force the button. Call a licensed electrician for further evaluation.
Step 6: Repeat for each GFCI and related outlets
Work methodically around your home:
- Test each GFCI outlet in every bathroom.
- Test each GFCI outlet in the kitchen, including those near the sink, island, and any prep areas.
- Note any outlets that do not trip, do not reset, or behave differently from the others.
Keep a simple list of “pass” and “needs service” so you can share accurate information with a professional if needed.
How to Use a Plug-In GFCI Tester
A plug-in GFCI tester can provide extra information about wiring conditions and help confirm that your outlets are wired correctly. This is especially helpful in older homes or if you have recently had electrical work done.
Step 1: Read the tester’s chart
Most testers have three indicator lights and a small chart printed on the body. This chart explains what each light pattern means, such as:
- Correct wiring
- Open ground
- Open neutral
- Reversed hot and neutral
- Other wiring issues
Step 2: Plug the tester into the GFCI outlet
- Make sure the outlet has been reset and is supplying power.
- Plug the tester into the outlet fully.
- Observe which lights turn on and compare them to the chart.
If the tester shows anything other than “correct wiring,” make a note of the outlet location and contact a licensed electrician. Wiring issues can be serious and are not a do-it-yourself repair for most homeowners.
Step 3: Use the tester’s GFCI button (if equipped)
Many plug-in testers include a GFCI test button. This button creates a small fault that should cause the GFCI to trip.
- With the tester plugged in, press the GFCI test button on the tester.
- The GFCI outlet should trip, cutting power to the tester.
- Confirm that the tester’s lights go out.
- Press the RESET button on the outlet to restore power.
If the tester’s GFCI button does not cause the outlet to trip, but the built-in TEST button does, consult the tester’s instructions and consider having the outlet checked by a professional.
Special Considerations for Bathrooms
Bathrooms combine water, steam, and electrical devices in a small space, so GFCI protection is especially important.
Bathroom testing tips
- Test outlets when the room is dry, not right after a shower.
- Check outlets near sinks, mirrors, and built-in cabinets.
- Be aware that one GFCI in the bathroom may also protect outlets in nearby areas such as hallways or adjacent rooms.
- If you have a medicine cabinet with an outlet inside, confirm whether it is GFCI-protected.
If you discover a bathroom outlet that is not GFCI-protected, consider having a licensed electrician upgrade it for added safety.
Special Considerations for Kitchens
Kitchens have multiple appliances and heavy electrical loads, often running at the same time. GFCI protection helps reduce shock risk near sinks and wet areas.
Kitchen testing tips
- Test outlets along countertops, especially near the sink and food prep zones.
- Check outlets used for small appliances such as toasters, coffee makers, and blenders.
- Be aware that some countertop outlets may be protected by a GFCI located in a different part of the kitchen or even in a nearby dining area.
- Do not test GFCIs while high-power appliances are running on the same circuit, as this may cause nuisance trips.
If you find any kitchen outlets near water that are not GFCI-protected, ask a licensed electrician about upgrading them to meet current safety standards.
When to Call a Licensed Electrician
While basic GFCI testing is a suitable task for many homeowners, certain situations call for professional help. Do not ignore any of the following warning signs.
Contact a professional if you notice:
- GFCI outlets that do not trip when you press the TEST button
- Outlets that will not reset, even after checking the breaker
- Burning smells, buzzing sounds, or visible scorch marks
- Frequent tripping of GFCI outlets without a clear cause
- Loose outlets that move or wiggle when you plug something in
- Water damage, flooding, or heavy condensation near outlets
- Tester readings that indicate wiring problems
A licensed electrician can test the circuit more thoroughly, verify that the wiring is correct, and replace any failed or outdated devices. This is an investment in the safety of everyone in your home.
Simple Maintenance Habits for Long-Term Safety
Beyond testing, a few simple habits can help keep your bathroom and kitchen outlets safe and reliable.
- Wipe outlets gently with a dry cloth; never spray cleaners directly on them.
- Avoid overloading outlets with too many high-wattage appliances.
- Replace damaged cords and plugs immediately.
- Teach family members, including older children, how to recognize and test GFCI outlets safely.
- Keep a simple checklist and mark down the date each time you test your GFCIs.
These small steps, combined with regular testing, help ensure that your home’s protection systems are ready when you need them most.
Key Takeaways: GFCI Testing Checklist Summary
Here is a quick recap you can refer to whenever you test GFCI outlets in your bathrooms and kitchens:
- Confirm your hands and the area around the outlet are dry.
- Plug in a small lamp or nightlight and turn it on.
- Press the TEST button and make sure the light turns off.
- Press the RESET button and confirm the light turns back on.
- Use a plug-in tester for extra confirmation of wiring and GFCI function.
- Repeat this process monthly or at least several times a year.
- Call a licensed electrician if an outlet will not trip, will not reset, or shows any sign of damage.
Taking a few minutes to follow this checklist helps keep your bathrooms and kitchens safer for everyone who uses them.
 GFCI Outlet Will Not Reset: Simple Checks and When to Call Help
 How to Test a Smoke Alarm Safely: Simple Checklist
 How to Build a Simple Home Inventory for Insurance Claims: A Practical Checklist