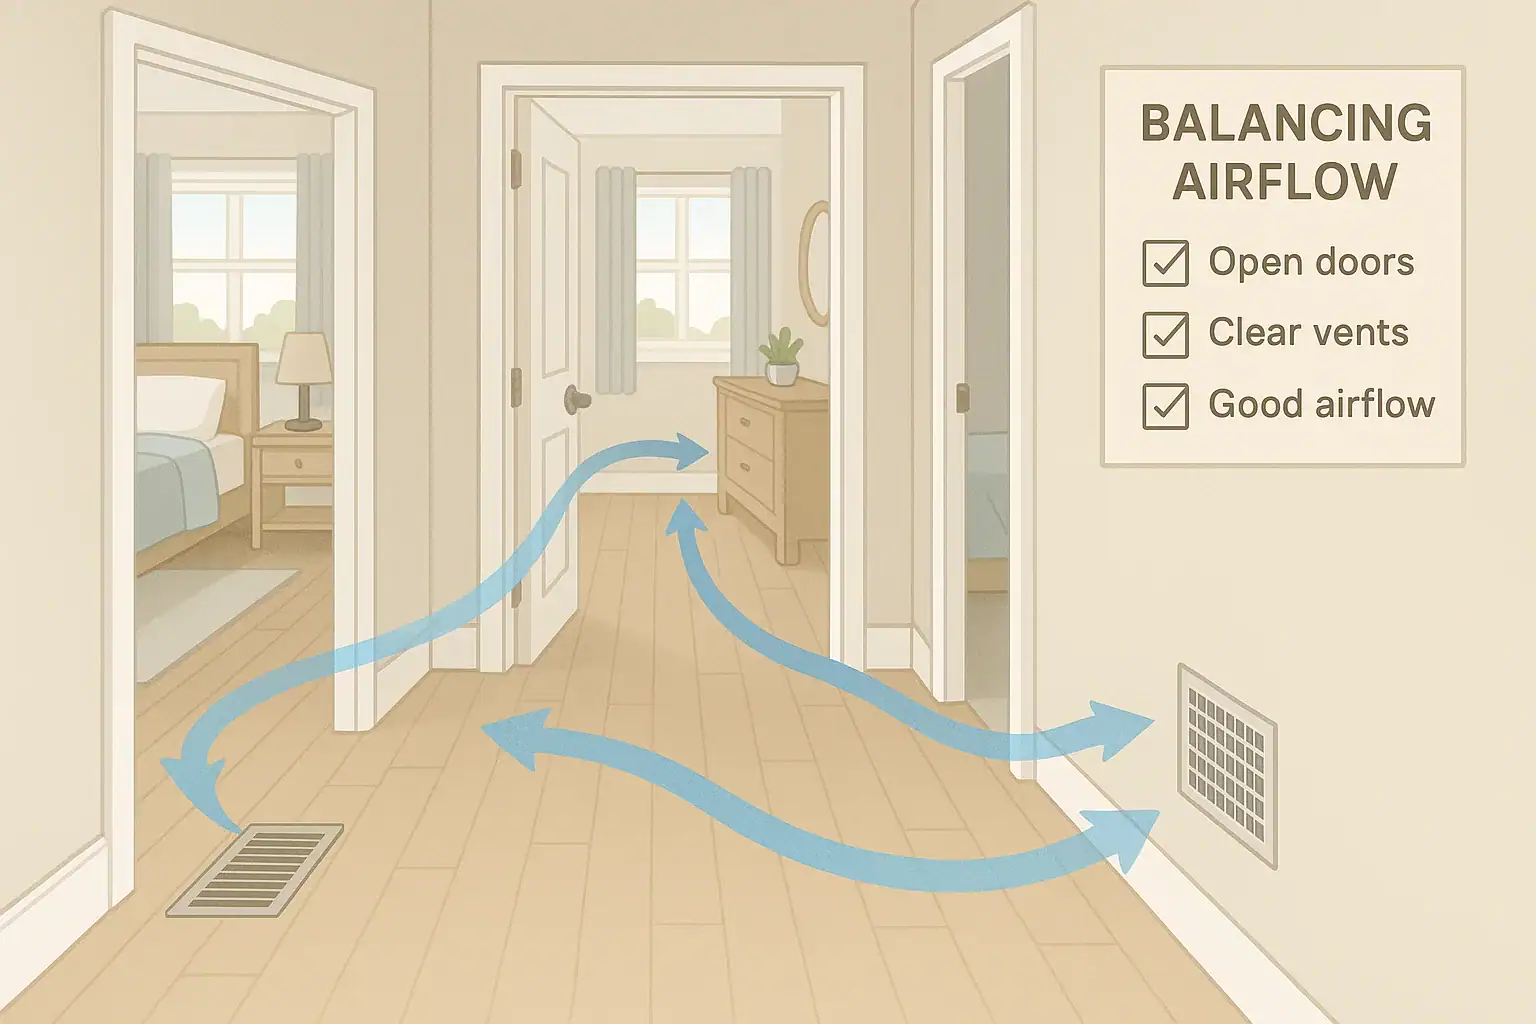
Uneven temperatures from room to room can make your home feel uncomfortable and waste energy. Maybe one bedroom is always stuffy while another feels like a refrigerator, or your upstairs is too warm while the downstairs stays chilly. These hot and cold spots usually come down to one thing: unbalanced airflow. The good news is that you can often improve airflow between rooms with simple checks and adjustments, without touching the internal parts of your heating and cooling equipment.
This step-by-step checklist walks you through how to balance airflow between rooms at home using safe, homeowner-friendly tasks. You will learn what to look for, what to adjust, and when it is time to call a professional. Work through the list in order, make one change at a time, and give your system a little time to respond so you can clearly see what is helping.
Before You Start: Safety and Expectations
Balancing airflow is mostly about managing how air moves through vents, ducts, and rooms, not about opening equipment cabinets or rewiring anything. You will be looking at vents, filters, doors, and duct dampers that are intended for homeowner access.
Safety basics
- Do not remove covers from your furnace, air handler, or outdoor unit.
- Do not reach into electrical compartments or change wiring.
- Turn off the system at the thermostat if you need to move ceiling tiles or work near loose insulation.
- Use a sturdy step stool or ladder when working on high vents.
- Wear a dust mask and gloves if you are sensitive to dust.
What airflow balancing can and cannot do
- Can help: Reduce hot and cold spots, improve comfort, and help your system run more smoothly.
- Cannot fix: Serious duct design errors, undersized or oversized equipment, or major insulation problems.
If you work through this checklist and still have large temperature differences, that is a sign you may need a professional evaluation of your ductwork or equipment sizing.
Step 1: Identify Problem Rooms and Patterns
Start by clearly defining where and when you notice airflow problems. This will guide which adjustments you make later.
Checklist: Document comfort issues
- Walk through each room and note whether it feels too warm, too cool, or comfortable.
- Check at different times of day: morning, afternoon, and evening.
- Notice whether the problem is worse during heating season, cooling season, or both.
- Pay attention to levels: Is the upstairs consistently warmer than the downstairs, or vice versa?
- If you have a simple indoor thermometer, record temperatures in a few rooms for a day or two.
Keep a short list of the worst rooms and whether they need more airflow (too warm in summer, too cold in winter) or less airflow (too cool in summer, too warm in winter).
Step 2: Check and Replace Air Filters
Clogged filters are one of the most common causes of poor airflow. A dirty filter makes the blower work harder and can reduce air to every room.
Checklist: Filter inspection
- Locate your system filter: it may be at the return grille, inside the furnace or air handler, or in a filter rack along the return duct.
- Turn the system off at the thermostat before removing the filter.
- Slide out the filter and hold it up to the light.
- If you cannot see much light through it or it looks gray and dusty, it is time to replace it.
- Check the size printed on the filter frame and install a new filter of the same size and type.
- Make sure the airflow arrow on the filter points toward the equipment.
After replacing a very dirty filter, you may notice an immediate improvement in airflow at your vents. Give the system a few hours of run time before moving on to other major adjustments.
Step 3: Inspect Supply and Return Vents
Supply vents blow conditioned air into rooms, while return vents pull air back to the system. Both must be open and unobstructed for balanced airflow.
Checklist: Supply vent inspection
- Walk through each room and locate all supply vents (in floors, walls, or ceilings).
- Make sure each vent is fully open using the built-in lever or dial.
- Check for furniture, rugs, curtains, or boxes blocking the vent or restricting airflow.
- Move large furniture at least a few inches away from vents so air can spread into the room.
- Use a vacuum with a brush attachment to remove dust from vent grilles.
Checklist: Return vent inspection
- Locate return vents, which are usually larger grilles on walls, ceilings, or floors.
- Confirm that returns are not blocked by furniture, beds, or large objects.
- Vacuum dust from the grilles to improve airflow.
- Do not close return vents; they are essential for proper system operation.
Once vents are open and clear, run the system for a while and see whether any rooms feel noticeably better. If some rooms still receive very little air, continue with the next steps.
Step 4: Improve Air Circulation Inside Rooms
Even if the right amount of air reaches a room, poor circulation can cause temperature differences within that space. Simple changes can help the air mix more evenly.
Checklist: Room-level adjustments
- Keep interior doors open when possible, especially to rooms that feel stuffy or stagnant.
- Make sure ceiling fans are set correctly: counterclockwise in summer for a cooling breeze, and low-speed clockwise in winter to gently push warm air down.
- Move tall furniture that blocks air paths between supply vents and return vents.
- Use small fans to help move air from comfortable rooms into problem areas, particularly in hallways.
- Close blinds or curtains on very sunny windows in hot weather to reduce heat buildup.
Better circulation can reduce the need for more drastic airflow changes and may solve mild comfort issues on its own.
Step 5: Balance Rooms Using Vent Adjustments
Once filters and vents are clean and clear, you can begin to fine-tune airflow room by room. The goal is to slightly reduce air to rooms that get too much and increase air to rooms that get too little.
Checklist: Balancing with supply vents
- Identify target rooms.
- Rooms that are too cool in summer or too warm in winter usually receive too much air.
- Rooms that are too warm in summer or too cool in winter usually need more air.
- Partially close vents in over-conditioned rooms.
- Use the lever on the vent to close it by about 25 percent, not all the way.
- Avoid fully closing vents; this can increase duct pressure and noise.
- Leave vents fully open in problem rooms.
- Make sure vents in rooms that need more air are completely open.
- Double-check that nothing blocks airflow from these vents.
- Run the system and recheck.
- Let the system run for several cycles (a few hours of normal use).
- Revisit each room and note any temperature changes.
- Fine-tune in small steps.
- If a room is still too cool or too warm, adjust vents another small amount.
- Make only one change at a time so you can see its effect.
Think of this process as gently redirecting airflow rather than shutting it off. Small changes can add up to a noticeable improvement in comfort.
Step 6: Check for Duct Dampers (If Accessible)
Some homes have manual dampers installed in the ductwork. These are metal plates inside the ducts that can be adjusted to control airflow to different branches. Adjusting them can be more effective than using only vent controls, but they are not present in every home.
Checklist: Locating and understanding duct dampers
- Look in basements, crawl spaces, or attics along the main ducts leaving the air handler or furnace.
- Manual dampers often have a small metal handle or lever on the outside of the duct.
- Many have a small tab or etched mark showing the position of the damper blade inside.
- In most cases, when the handle is in line with the duct, the damper is open; when it is across the duct, the damper is mostly closed.
- Do not force stuck handles; if they will not move easily, leave them alone and consider a professional visit.
Checklist: Adjusting dampers to balance levels
- Identify which duct serves which area.
- Follow each branch duct visually to see which rooms it feeds.
- Mark ducts lightly with tape and a note such as “upstairs” or “living room” if helpful.
- Address common level issues.
- If the upstairs is too warm in summer, you may want more cool air going upstairs and less downstairs.
- If the upstairs is too cool in winter, you may want more warm air going upstairs.
- Make small damper changes.
- Turn the damper handle slightly toward closed on the branch serving the more comfortable or cooler area.
- Keep the damper mostly open on the branch serving the problem area.
- Test and wait.
- Run the system for several hours and recheck temperatures on each level.
- Repeat small adjustments as needed until levels feel more balanced.
Write down or take a photo of the original damper positions before you start. That way, you can always return to your starting point if needed.
Step 7: Improve Room Return Paths
For air to flow into a room, it must also be able to flow out. If a room has a supply vent but no return vent, closing the door tightly can trap air and reduce flow.
Checklist: Ensuring air can exit each room
- Check whether each room has a dedicated return vent or relies on air flowing under the door.
- Look at the gap under interior doors. A very tight seal can restrict airflow.
- When the system is running, close a door almost all the way and feel for air movement under or around it.
- If closing a door causes a noticeable change in airflow noise or pressure, leave that door slightly open during heating or cooling cycles.
- Consider adding door undercuts or transfer grilles in the long term to improve return paths (this usually requires a professional or skilled handyman).
Better return paths help equalize pressure between rooms and allow your system to move air more freely, which supports more even temperatures.
Step 8: Address Drafts, Leaks, and Insulation Issues
Sometimes what feels like an airflow problem is really a heat gain or heat loss problem. Rooms with poor insulation or air leaks may never feel right, even with plenty of airflow.
Checklist: Quick building envelope checks
- Check windows in problem rooms for drafts by holding your hand near the frame on a windy day.
- Look for gaps around window and door frames and seal them with appropriate caulk or weatherstripping.
- Close unused fireplace dampers tightly when not in use to reduce drafts.
- In rooms over garages or near attics, consider whether poor insulation might be contributing to temperature swings.
- Use thick curtains or cellular shades on large windows to reduce heat gain in summer and heat loss in winter.
Reducing drafts and improving insulation can make your airflow balancing efforts more effective and help maintain consistent temperatures.
Step 9: Monitor Results and Keep a Simple Log
Balancing airflow is often an ongoing process, especially as seasons change. Keeping a simple record helps you understand what works and allows you to repeat successful settings later.
Checklist: Tracking your adjustments
- Write down any vent or damper changes you make, including the date.
- Note how each problem room feels one day and one week after the adjustment.
- Take photos of damper and vent positions once you find a setup that works well.
- Revisit your settings at the start of each heating and cooling season and adjust as needed.
Small, documented changes over time can lead to a well-balanced home without guesswork each year.
When to Call a Professional
Even with careful balancing, some homes have issues that require expert help. Recognizing these signs can save you time and protect your system.
Checklist: Signs you may need expert help
- Temperature differences of more than 5 to 7 degrees between rooms after completing the checklist.
- Very weak airflow at certain vents even when they are fully open and unobstructed.
- Unusual noises from ducts, such as loud whistling, banging, or popping when the system starts or stops.
- Visible duct damage, disconnected sections, or crushed flexible ducts in attics, basements, or crawl spaces.
- High energy bills combined with poor comfort throughout the home.
- Persistent dust issues or musty odors from vents.
A qualified heating and cooling professional can evaluate duct sizing, layout, and leakage, and may suggest sealing, resizing, or adding ducts to properly balance your system. These changes are beyond typical do-it-yourself work but can make a major difference in comfort and efficiency.
Putting It All Together
Balancing airflow between rooms at home is a process of observation, small adjustments, and patience. By working through this checklist in order, you can often solve many comfort problems without major renovations:
- Identify which rooms are too hot or too cold and when the issues occur.
- Replace dirty filters and make sure all vents and returns are open and clear.
- Improve circulation with open doors, fans, and smart furniture placement.
- Use vent adjustments and, if available, duct dampers to gently redirect airflow.
- Ensure each room has a path for air to return to the system.
- Reduce drafts and insulation problems that can mimic airflow issues.
- Track your changes and refine your settings over time.
With a little attention and a methodical approach, you can create a more even, comfortable environment throughout your home. If you reach the limits of what these steps can do, that is a useful discovery too, and it means you can bring in a professional with clear notes about what you have already tried and what still needs improvement.
For more home comfort tips and related guides, explore the air and comfort resources at Signature Home Guide.
 Radiator Heat Balancing Tips for Older Homes: A Practical Guide
 Supply Vent vs Return Vent: How to Tell the Difference in Your Home
 How Often to Change HVAC Filters With Pets: A Practical Homeowner Checklist