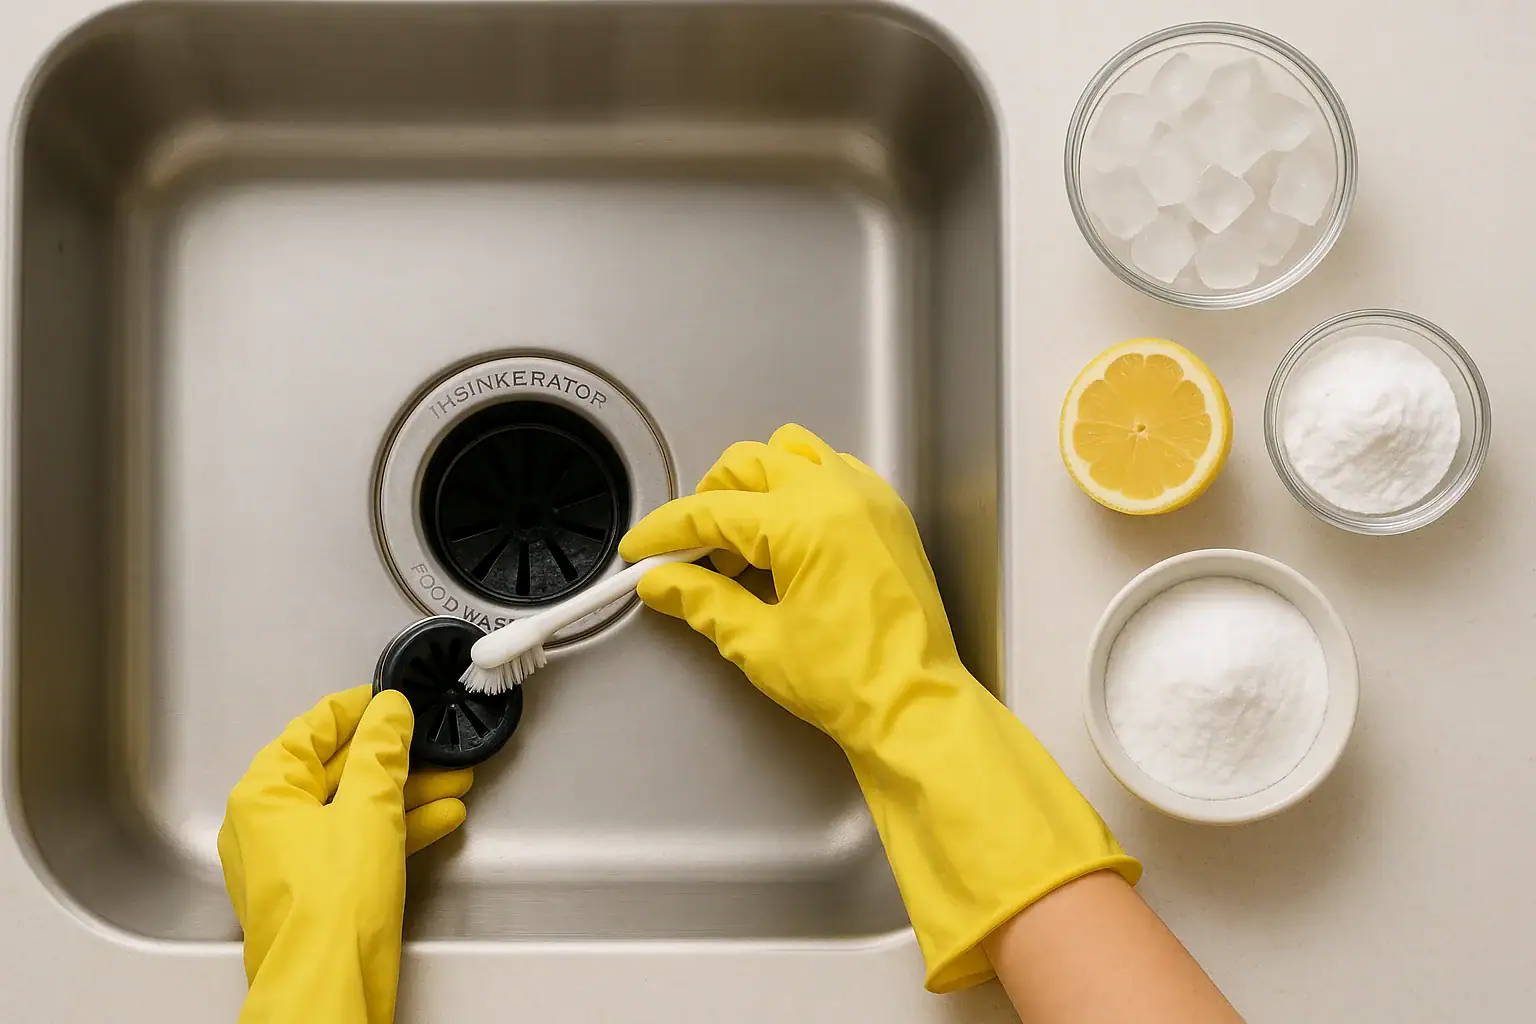
A smelly garbage disposal can make your whole kitchen feel less clean, even when the counters are wiped and the dishes are done. Odors that drift up from the sink are usually a sign that food particles are trapped somewhere in the disposal, drain, or splash guard. The good news is that most smells are easy to fix with a basic cleaning routine and a few simple habits. You rarely need special products or tools, and you usually do not need a service call unless there is a deeper plumbing issue. This guide walks you through the most common causes of garbage disposal smells, how to troubleshoot them, and a step‑by‑step routine to clean and maintain a fresh, odor‑free kitchen sink.
Why Garbage Disposals Start to Smell
Garbage disposals grind food waste, but they are not self‑cleaning. Small particles can cling to the grinding chamber, splash guard, and drainpipe over time. When those particles break down, they release unpleasant odors. Understanding where smells come from helps you choose the right cleaning method and spot early signs of a problem.
Common Causes of Garbage Disposal Odors
- Trapped food particles: Tiny bits of food get stuck under the splash guard, along the sides of the grinding chamber, or in the drain line.
- Grease and fat buildup: Oils, fats, and grease coat the inside of the disposal and pipes, catching more debris and creating a sour or rancid smell.
- Insufficient water flow: Not running enough water before, during, and after grinding leaves food behind to rot.
- Grinding the wrong items: Fibrous foods, starchy foods, and large bones can jam or partially clog the unit, trapping waste.
- Dirty splash guard: The rubber or silicone flaps at the top of the disposal collect slime, bacteria, and food residue.
- Drain or trap issues: Odors can come from the drainpipe or trap below the sink, not just the disposal itself.
- Low use or standing water: A rarely used disposal can develop stale water smells and allow bacteria growth.
Signs the Smell Is More Than Just Food Residue
Most odors are from old food, but some smells point to bigger issues:
- Sewage‑like odor: May indicate a problem with the drain trap, venting, or a deeper plumbing issue.
- Burning or electrical smell: Could signal an overheating motor or mechanical failure. Turn off the unit and avoid using it.
- Moldy or musty odor: Often tied to moisture sitting in hidden areas, such as under the sink or around a slow leak.
If you notice any of these stronger smells along with slow drainage, leaks, or frequent clogs, cleaning alone may not be enough and you may need a professional inspection.
Safety First: Before You Clean the Garbage Disposal
Any time you reach near or into a garbage disposal, safety comes first. The blades and moving parts can cause serious injury if the unit turns on unexpectedly.
Basic Safety Steps
- Turn off the power: Switch the disposal off and unplug it under the sink if possible. If it is hardwired, switch off the breaker at the electrical panel.
- Never put your hand into a running disposal: Wait until all movement and noise have completely stopped.
- Use tools instead of fingers: Use tongs, pliers, or a long‑handled brush to remove objects or scrub inside.
- Check for foreign objects: Before cleaning, make sure there are no utensils, glass, or other hard items inside.
Once the power is off and the area is clear, you can safely start troubleshooting and cleaning.
Step‑by‑Step Garbage Disposal Cleaning Routine
This routine targets the main sources of odor: food residue, grease buildup, and bacteria. Plan to go through the full process when you first notice a smell, then use a shorter version weekly for maintenance.
Step 1: Flush with Hot Soapy Water
Start by loosening and rinsing away easy‑to‑remove debris.
- Plug the sink drain above the disposal.
- Fill the sink with a few inches of hot tap water.
- Add a small amount of dish soap and mix to create suds.
- Remove the plug, turn on the disposal, and let the soapy water flush through.
This helps carry loose particles and light grease down the drain.
Step 2: Clean the Splash Guard Thoroughly
The splash guard is one of the biggest sources of odor because it stays damp and collects food residue on the underside.
- Make sure the power to the disposal is off.
- Lift the rubber or silicone flaps gently to expose the underside.
- Use a small brush or an old toothbrush with hot, soapy water to scrub all sides of the flaps.
- Rinse with a steady stream of hot water.
If the splash guard is removable, you can take it out and soak it in hot, soapy water for a deeper clean before scrubbing and rinsing.
Step 3: Scrub the Grinding Chamber
Next, clean the inside walls and surfaces where food tends to cling.
- With the power still off, shine a flashlight into the disposal to see any visible buildup.
- Use a long‑handled brush or bottle brush dipped in hot, soapy water.
- Scrub the inner sides of the disposal, rotating the brush to reach around the chamber.
- Avoid forcing the brush into the grinding mechanism; focus on the walls and top area.
- Rinse by running hot water for 30 to 60 seconds.
Step 4: Deodorize with Baking Soda and Vinegar
Baking soda and vinegar help loosen grime and neutralize odors without harsh chemicals.
- Pour about half a cup of baking soda directly into the disposal.
- Slowly add one cup of white vinegar. It will fizz and foam.
- Let the mixture sit for 5 to 10 minutes to break down residue.
- Rinse thoroughly with hot water while briefly running the disposal.
This step helps reach small crevices and the upper part of the drain line.
Step 5: Freshen with Ice and Salt
Ice and coarse salt can help knock loose stuck particles and scrub the grinding surfaces.
- Turn the power back on.
- Pour 1 to 2 cups of ice cubes into the disposal.
- Add about half a cup of coarse salt on top of the ice.
- Turn on cold water and run the disposal for 20 to 30 seconds.
- Listen as the ice grinds; when the sound smooths out, turn the unit off.
The ice and salt combination helps clean the blades and inner surfaces mechanically, while also cooling the motor slightly.
Step 6: Final Rinse and Smell Check
Finish with a good rinse to carry away loosened debris.
- Run hot water for another 30 to 60 seconds with the disposal on.
- Turn everything off and let the disposal sit for a minute.
- Smell near the drain opening to check for any remaining odor.
If you still notice a strong smell after this full routine, the issue may be in the drain trap or further down the line rather than in the disposal itself.
Weekly Maintenance Routine to Prevent Smells
Once you have eliminated existing odors, a short weekly routine keeps your garbage disposal fresh and working well. This takes only a few minutes and can be added to your regular kitchen cleaning schedule.
Quick Weekly Checklist
- Flush the disposal with hot, soapy water for 30 to 60 seconds.
- Scrub the splash guard with a small brush and dish soap.
- Run a small handful of ice through the disposal with cold water.
- Do a brief smell check to catch early signs of buildup.
For many households, this simple routine is enough to prevent most odors and minor clogs.
Monthly Deep Clean
Once a month, repeat the full cleaning routine, including baking soda and vinegar. This helps control grease buildup and keeps the drain line clearer. If your kitchen sees heavy use or you cook a lot of oily or starchy foods, you may want to deep clean every two weeks.
What Not to Put in a Garbage Disposal
Preventing smells starts with what you choose to grind. Some items are more likely to cause odors, clogs, or damage to the unit.
Foods That Lead to Smells and Clogs
- Grease, fat, and oil: These coat the blades and pipes, trapping food and turning rancid.
- Large amounts of starchy foods: Items like pasta, rice, and potatoes can swell and form a paste that sticks inside the drain.
- Fibrous vegetables: Tough fibers from items such as celery stalks or corn husks can tangle around moving parts.
- Stringy peels and rinds: Thick peels and rinds can jam or wrap around the grinding mechanism.
- Coffee grounds in large amounts: They can settle like sediment in pipes and contribute to clogs.
- Eggshells in large amounts: The membrane can stick to parts, and ground shell can add to buildup.
Non‑Food Items to Always Avoid
- Glass, metal, or plastic pieces
- Twist ties, rubber bands, and string
- Paper towels or napkins
- Household chemicals or solvents
These items can damage the disposal, dull the grinding parts, or create safety hazards. If something accidentally falls in, turn the power off and use tongs or pliers to remove it safely.
Best Practices for Everyday Garbage Disposal Use
Small habits each time you use your disposal can make a big difference in preventing smells and keeping the unit running smoothly.
Use Enough Water
- Turn on cold water before starting the disposal.
- Let the water run while the disposal is grinding.
- Keep the water running for 10 to 20 seconds after turning the disposal off to flush the line.
Water helps carry ground food through the pipes instead of leaving it to sit and decay inside the disposal or trap.
Feed Food Waste Gradually
Overloading the disposal is a common cause of jams and leftover food.
- Add food scraps in small batches instead of all at once.
- Cut larger pieces into smaller chunks before grinding.
- Alternate soft and harder scraps when possible to help move everything through.
Rinse After Dishwashing
After washing dishes or cleaning the sink, run the disposal with water for a brief rinse cycle. This helps clear soap, food bits, and residue that may have washed down during cleanup.
Troubleshooting Persistent Garbage Disposal Smells
If you have completed a full cleaning routine and still notice odors, it is time to look beyond the grinding chamber. Persistent smells may point to an issue in the plumbing or with the disposal itself.
Check the Drain Trap and Pipes
The curved pipe under the sink, often called the trap, can collect grease and food debris. When buildup becomes heavy, it may start to smell.
- Look under the sink for any signs of leaks or dampness around the pipes.
- If you are comfortable with basic plumbing, you can place a bucket under the trap, loosen the connections, and remove the trap for cleaning.
- Rinse the trap with hot water and a small amount of dish soap, then reassemble carefully.
If you are unsure about removing plumbing parts, consider calling a professional to inspect and clean the drain line.
Address Possible Venting Issues
A sewage‑like smell that does not go away may be related to the household plumbing vent system rather than the disposal. Poor venting can allow sewer gases to enter the home through drains. This is not something to ignore, and it is best handled by a licensed plumber.
When the Disposal Itself May Be the Problem
Older disposals can develop internal wear or hidden cracks that trap debris and moisture. Signs your unit may be near the end of its life include:
- Frequent jams even with proper use
- Loud grinding or rattling noises
- Visible rust or corrosion
- Persistent odors that return quickly after cleaning
If you notice several of these signs, replacement may be more effective than repeated deep cleaning.
Simple Natural Ways to Keep the Disposal Smelling Fresh
Once you have solved the main odor issues, you can use a few natural methods to keep your disposal smelling pleasant between cleanings.
Citrus Scraps for a Light Fresh Scent
Small pieces of citrus peel can add a light, clean scent while helping to scrub the disposal slightly.
- Cut citrus peels into small pieces.
- Run cold water and turn on the disposal.
- Feed the pieces in gradually and let the disposal run until the grinding sound is smooth.
Use only a small amount at a time, and do not rely on citrus alone to fix strong or long‑term odors. It works best as a finishing touch after proper cleaning.
Baking Soda Refresh Between Deep Cleans
On days when you notice a mild smell but do not have time for a full routine, you can do a quick refresh:
- Sprinkle a few tablespoons of baking soda into the disposal.
- Let it sit for 10 to 15 minutes.
- Rinse with hot water while running the disposal briefly.
When to Call a Professional
Most garbage disposal smells can be handled with regular cleaning and good habits. However, there are times when it is safer and more effective to bring in a professional.
Situations That Need Expert Help
- Strong sewage odors that do not improve after cleaning
- Repeated clogs or slow draining even with careful use
- Visible leaks from the disposal or pipes under the sink
- Burning smells, smoke, or frequent tripping of the breaker
- Unusual grinding noises that continue after checking for foreign objects
Addressing these issues early can protect your plumbing, prevent water damage, and keep your kitchen safe and comfortable.
 Kitchen Sink Aerator Cleaning for Low Water Flow: A Step-by-Step Guide
 How to Clean a Dishwasher Filter Step by Step for Sparkling Dishes
 Kitchen Trash Can Odors: Liner, Lid, and Cleaning Fixes That Actually Work