Your refrigerator runs every day, quietly working in the background to keep food cold and safe. But if the door seal is worn, loose, or dirty, cold air can leak out and warm air can creep in. That means higher energy bills, food that spoils faster, and extra strain on your appliance. A simple fridge door seal test can help you catch problems early and keep your kitchen running efficiently.
This checklist walks you step by step through testing, inspecting, and maintaining your refrigerator door gasket. You will learn how to spot early warning signs, how to do quick at-home tests, and what to do if your seal is failing. None of this requires special tools or advanced skills, just a few minutes of focused attention.
Why Your Fridge Door Seal Matters
The flexible rubber or vinyl strip around your refrigerator door is called the gasket or door seal. Its job is to create an airtight barrier when the door is closed. When that barrier is tight and clean, cold air stays in, warm air stays out, and the appliance can hold a safe temperature with less effort.
Energy Efficiency Benefits
A good door seal helps your refrigerator:
- Maintain a stable internal temperature with fewer cooling cycles
- Use less electricity over time
- Reduce wear on the compressor and other components
- Recover temperature faster after you open and close the door
When the seal is leaking, the appliance has to run longer and harder to make up for the lost cold air. That can show up as higher utility bills and a shorter lifespan for the unit.
Food Safety and Freshness
A weak door seal can allow warm, humid air into the fridge. This can cause:
- Temperature swings that push food into the unsafe zone
- Faster spoilage of dairy, meat, and leftovers
- Condensation and moisture buildup on shelves and walls
- More frequent ice crystals or frost in the freezer section
For food safety, the refrigerator should stay at or below 40°F. A compromised seal makes that target harder to maintain, especially in a warm kitchen or during frequent door openings.
How Often to Test Your Fridge Door Seal
Door gaskets do not usually fail overnight. They slowly lose flexibility, get dirty, or start to pull away from the frame. Regular checks help you catch problems early, when a simple cleaning or minor adjustment might be enough.
- Quick check: Once a month, when you wipe down the fridge exterior
- Full seal test: Every 3 to 6 months, or at the start of each season
- Extra checks: After moving the fridge, a power outage, or a major spill
If you notice condensation around the door, rising energy bills, or food spoiling sooner than expected, move your next seal test up on the calendar.
Fridge Door Seal Test Checklist
Use this step-by-step checklist to evaluate your refrigerator seal. You can print it or save it for your next kitchen maintenance day.
Step 1: Visual Inspection
Start by simply looking closely at the gasket with the door open.
- Check the entire perimeter of the door seal, top, sides, and bottom.
- Look for cracks, splits, or areas where the material looks brittle.
- Note any spots that appear flattened, warped, or twisted.
- Check for food residue, sticky spots, mold, or discoloration.
- Make sure the seal is fully attached to the door, with no loose corners.
If you see: deep cracks, missing sections, or areas pulling away from the door, the gasket is likely near the end of its life and may need replacement soon.
Step 2: Feel for Flexibility and Grip
A healthy gasket should be soft, flexible, and slightly springy.
- Gently press the seal with your fingers along several sections.
- Lightly tug the outer edge to confirm it is secure but not stiff.
- Check whether the inner magnetized portion (if present) feels like it wants to cling to the metal frame.
If the material feels hard, brittle, or sticky, it may not compress properly against the frame, which can lead to air leaks.
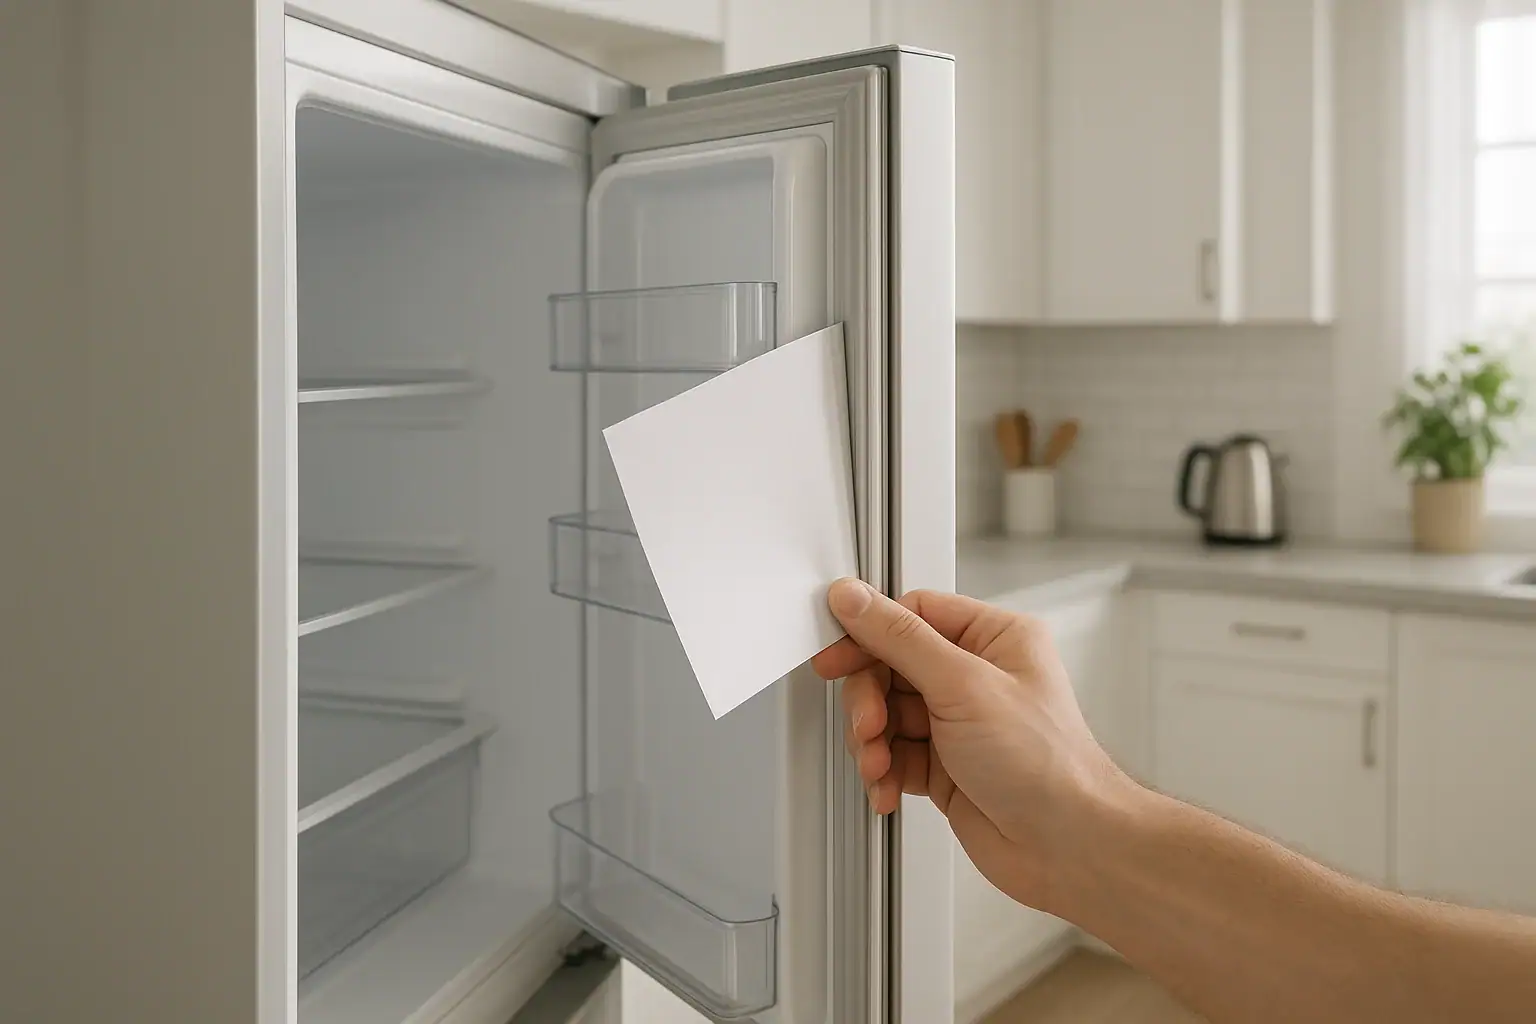
Step 3: The Paper Test (Dollar Bill Test)
The paper test is a simple way to check how tightly the door seal grips the frame.
- Cut or fold a strip of paper about 1 to 2 inches wide. A thin note or receipt can also work.
- Open the fridge door and place the paper so that half is inside and half is outside, crossing the gasket.
- Close the door fully on the paper strip.
- Gently pull the paper. Notice how much resistance you feel.
Repeat this test at several points around the door:
- Top center
- Bottom center
- Left and right sides, both high and low
- Near each corner
How to interpret the results:
- Good seal: The paper slides out, but with noticeable resistance.
- Weak seal: The paper slips out very easily, with little or no tug.
- Bad seal: The paper falls out on its own or does not seem to be pinched at all.
Mark any weak spots so you can focus on them during cleaning and follow-up checks.
Step 4: Check for Cold Air Leaks
Beyond the paper test, you can look for signs of cold air escaping.
- Stand near the closed door and slowly run your hand along the edges. Feel for cool drafts.
- Look for beads of moisture or condensation around the gasket, especially on humid days.
- Notice any frost buildup inside along the door frame or near the freezer door.
If you feel a cool breeze or see moisture where it should not be, that area of the seal may not be closing properly.
Step 5: Listen and Observe During Operation
Your refrigerator can give you clues about a failing seal during normal use.
- Listen for the motor cycling on more often than usual, especially at night.
- Notice if the door seems to pop open slightly after you close it, especially on the second door of a side-by-side setup.
- Check if interior lights stay on because the door is not fully closed.
- Watch for frequent temperature alarms if your model has them.
These are indirect signs, but when combined with the paper test and visual inspection, they help confirm whether your seal is doing its job.
Cleaning and Maintaining Your Fridge Door Seal
Many gasket problems come from dirt, dried spills, and sticky residue rather than physical damage. Regular cleaning can restore a better seal and extend the life of the gasket.
Safe Cleaning Routine
Plan to clean the door seal at least once every one to two months.
- Mix a small amount of mild dish soap with warm water in a bowl.
- Dip a soft cloth or sponge into the soapy water and wring it out well.
- Gently wipe along the entire gasket, including folds and creases.
- Use a soft toothbrush or cotton swab for stubborn spots and tight corners.
- Wipe again with a clean, damp cloth to remove soap residue.
- Dry thoroughly with a towel to prevent moisture buildup.
Avoid harsh chemicals, bleach, or abrasive scrubbers, which can weaken or crack the material over time.
Dealing With Mold or Mildew
If you see mold or mildew on the gasket, address it promptly.
- Use a mixture of mild dish soap and warm water first.
- For stubborn spots, a small amount of diluted white vinegar on a cloth can help.
- Rinse and dry completely after cleaning.
Persistent mold may signal that the seal is not closing properly and moisture is collecting. In that case, a replacement may be the safer long-term choice.
Improving the Seal With Simple Adjustments
Sometimes a gasket looks fine but does not sit flat against the frame. A few adjustments can help:
- Check that the refrigerator is level from side to side and front to back.
- Make sure shelves and containers inside are not pushing against the door.
- Gently warm a slightly warped section of the gasket with warm (not hot) air from a hair dryer on low, then press it into shape and let it cool.
Always use caution with heat. Keep the dryer moving and at a safe distance so you do not melt or deform the gasket.
When to Replace Your Fridge Door Seal
Cleaning and small adjustments can only go so far. At some point, a worn gasket simply cannot hold a tight seal. Replacing it protects both energy use and food safety.
Clear Signs You Need a New Seal
- Large cracks, tears, or missing chunks in the gasket
- Sections that have hardened and no longer compress when pressed
- Areas that have pulled away from the door and will not stay attached
- Paper test fails in multiple locations even after cleaning
- Persistent condensation or frost around the door edges
If you see several of these signs, replacement is usually the most reliable fix.
Basic Replacement Considerations
Door gasket replacement can often be done at home with patience and careful attention to instructions. In general, the process involves:
- Ordering the correct gasket size and style for your refrigerator model.
- Removing the old gasket carefully, noting how it was attached.
- Cleaning the door frame and mounting area thoroughly.
- Installing the new gasket, starting at the corners and working around.
- Checking the seal with the paper test once the new gasket is in place.
If you are not comfortable doing this yourself, a local appliance technician can usually handle the job quickly. The cost of a new gasket and installation is often offset over time by lower energy use and less food waste.
Fridge Temperature and Food Safety Tips
A strong door seal is one part of a bigger picture. To keep food safe and energy use in check, combine a good gasket with smart temperature and storage habits.
Target Temperatures
- Set the refrigerator section to 37°F to 40°F.
- Set the freezer to 0°F.
- Use an appliance thermometer to verify actual temperatures on a shelf.
After adjusting settings or replacing a gasket, give the appliance several hours to stabilize before rechecking temperatures.
Smart Storage to Support a Good Seal
- Avoid overloading door shelves, which can pull the door slightly out of alignment.
- Keep tall containers and boxes away from the gasket area so they do not interfere with closing.
- Arrange items so you can find them quickly, reducing the time the door stays open.
- Cool hot leftovers slightly before placing them inside to reduce steam and moisture.
These small habits help your fridge maintain a steady temperature and take full advantage of a well-sealed door.
Seasonal Fridge Door Seal Check for Your Kitchen
Link your fridge door seal test to other household routines so it becomes a habit instead of an afterthought.
- Pair it with changing air filters or testing smoke alarms.
- Do a seal check when you deep clean the kitchen or defrost the freezer.
- Add a reminder to your calendar every three to six months.
By treating the door seal as part of your regular home maintenance, you help protect your food, your appliance, and your energy budget at the same time.
Quick Reference: Fridge Door Seal Test Summary
Use this short summary as a fast reminder:
- Inspect the gasket visually for cracks, warping, and dirt.
- Press and flex the seal to check for softness and grip.
- Run the paper test around the entire door, marking weak spots.
- Feel for cold drafts and look for condensation along the edges.
- Clean the gasket regularly with mild soap and water.
- Adjust a slightly warped seal with gentle warmth if needed.
- Replace the gasket if it is cracked, hardened, or failing multiple tests.
With this checklist, you can keep your refrigerator door seal in top shape, support safer food storage, and avoid wasting energy in your kitchen.
 Refrigerator Coil Cleaning: How Often and Why It Matters (Checklist)
 How to Set Up a Pantry Inventory System with FIFO for Busy Kitchens
 Condensation Inside Your Refrigerator: Causes, Fixes, and Prevention