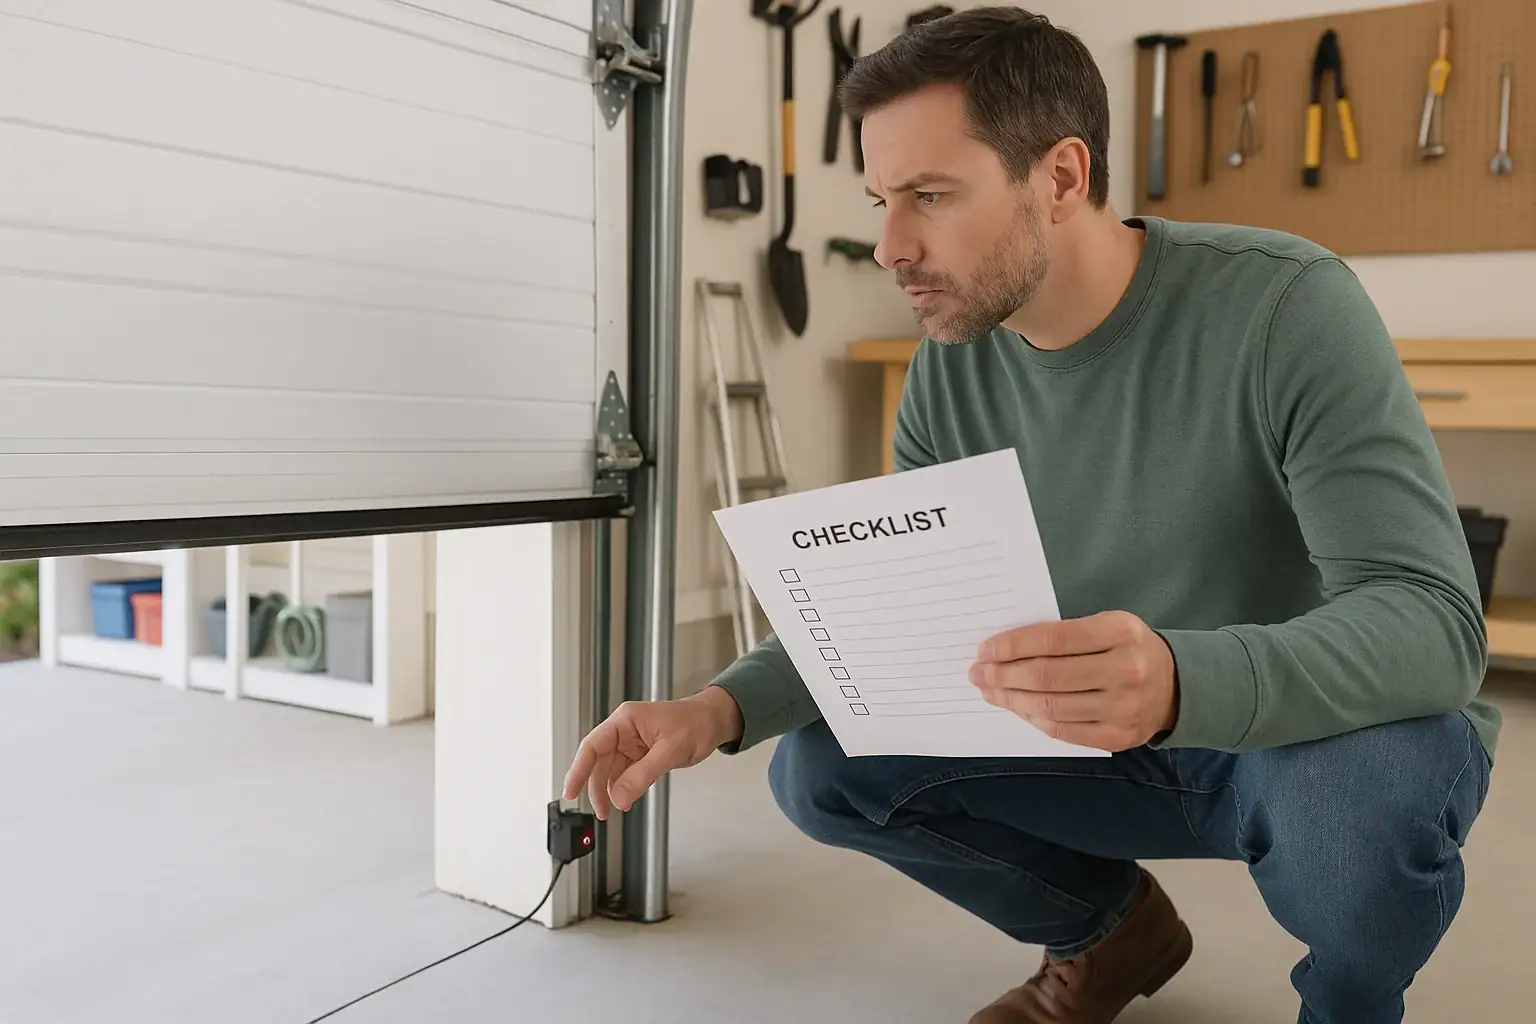
Garage doors are one of the heaviest moving objects in most homes, and when something goes wrong, the results can be serious. Safety sensors are your last line of defense against a closing door hitting a person, pet, or vehicle. A simple monthly testing routine can catch problems early and help prevent accidents. This checklist walks you step by step through inspecting, testing, and maintaining your garage door sensors so you can feel more confident every time the door moves.
Whether your system is part of a larger smart home setup or a basic automatic opener, the principles are the same. You will learn what the sensors do, how to test them correctly, what warning signs to look for, and when it is time to stop using the door and call a professional. Set aside 15–20 minutes, follow this guide from start to finish, and keep it handy as your recurring garage door safety checklist.
Understanding Garage Door Safety Sensors
Garage door safety sensors are usually installed near the bottom of the door tracks on each side. They create an invisible beam across the opening. When something breaks that beam while the door is closing, the opener should stop and reverse, preventing the door from hitting an object or person.
Knowing how they work makes it easier to test and troubleshoot them. Here are the basics:
- Location: Typically 4–6 inches above the floor on both sides of the door track.
- Components: One sensor sends the beam, the other receives it. Both are wired to the opener.
- Indicator lights: Small LEDs on the sensors usually show alignment and power status.
- Function: If the beam is blocked or sensors fail, the door should not close normally.
Because they sit close to the floor, sensors are exposed to dust, bumps, and moisture. That is why regular inspection and testing are essential to keep them working as intended.
How Often to Test Your Garage Door Sensors
Many homeowners rarely think about their garage door sensors unless a problem appears. A better approach is to make testing part of your routine home safety checks.
Use this simple schedule:
- Monthly: Perform a full safety sensor test and quick visual inspection.
- Seasonally: Do a deeper cleaning and alignment check, especially after extreme temperatures or storms.
- After any incident: Test sensors immediately after the door hits an object, the track is bumped, or you notice unusual movement or sounds.
Regular testing not only protects your family but can also extend the life of your opener by catching small issues before they become major failures.
Safety First: Before You Start Testing
Before you begin working around the garage door, take a few basic safety precautions. The door is heavy and under tension, so treat it with respect.
Safety precautions checklist
- Make sure the garage door area is well lit so you can see the sensors clearly.
- Keep children and pets away from the door while you test and inspect.
- Do not place any part of your body under a moving door.
- Know where the emergency release cord is located on your opener.
- If the door moves erratically or looks unstable, stop using it and contact a professional.
Once the area is clear and you understand how to stop the door in an emergency, you are ready to move through the checklist.
Step-by-Step Garage Door Sensor Safety Testing Checklist
Use the following checklist from top to bottom. You can print this list or save it on your phone and walk through it each month.
1. Visual inspection of sensors and wiring
- Confirm each sensor is firmly attached to its bracket and not dangling or loose.
- Check that sensors are mounted at the same height on both sides of the door.
- Look for cracked housings, broken lenses, or visible physical damage.
- Inspect the wires leading to each sensor for cuts, frays, or pinch points.
- Ensure the wires are not caught in the door track or under the rollers.
If you see significant damage to the sensor body or wiring, stop using the automatic function and have the system inspected.
2. Check sensor indicator lights
Most garage door sensors have small indicator lights that reveal their status.
- Verify that both sensors have power (at least one light should be on at each sensor).
- Note the color and pattern of the lights. Common patterns include solid, blinking, or off.
- Walk between the sensors and see if the light on the receiving sensor changes when the beam is blocked.
If a light is off or blinking unexpectedly, it may indicate misalignment, dirt on the lens, or wiring issues.
3. Clean sensor lenses and surrounding area
Dirt and dust can interfere with the beam, especially in garages that see a lot of traffic or wind-blown debris.
- Use a soft, dry cloth or lightly damp microfiber cloth to wipe the sensor lenses.
- Avoid harsh cleaners or abrasive materials that can scratch the lens.
- Clear away cobwebs, leaves, or stored items that might block the beam path.
- Sweep or vacuum the floor area directly in front of the sensors.
After cleaning, recheck the indicator lights. A steady light often means the sensors can now see each other clearly.
4. Verify sensor alignment
Even a slight bump from a bicycle, trash can, or foot can knock sensors out of alignment.
- Stand in front of the sensors and confirm they face each other directly across the door opening.
- Gently nudge the sensor brackets if needed so both lenses are level and aligned.
- Watch the indicator lights as you adjust. A light that changes from blinking to solid often signals proper alignment.
- Once aligned, tighten any adjustment screws on the brackets carefully.
Do not force the sensors. If they will not stay aligned or the brackets are bent, they may need to be repaired or replaced.
5. Perform the obstruction test (beam interruption)
This test confirms that the sensors will stop and reverse the door when something breaks the beam.
- Open the garage door fully.
- Place a solid object, such as a cardboard box or bucket, in front of one sensor so it clearly blocks the beam.
- Use the wall button to try closing the door.
- Observe the door movement carefully.
What should happen:
- The door should not close normally if the beam is blocked.
- Depending on the opener, the door may not move at all, or it may start to move and then reverse immediately.
- Indicator lights may change to show a blocked beam.
If the door closes completely with the beam clearly blocked, stop using the opener and arrange for a professional inspection. This is a critical safety failure.
6. Test automatic reversal with a low object
In addition to the sensors, your garage door opener should have a force or pressure reversal feature. This test is separate from the sensor beam test but is important for overall safety.
- Open the garage door fully.
- Place a solid, flat object such as a piece of wood or a thick board on the floor where the door closes.
- Use the wall button to close the door while you watch from a safe distance.
- Be prepared to press the button again to stop the door if it does not reverse.
What should happen: When the door touches the object, it should stop and reverse within a second or two. If it continues pushing down or does not reverse, discontinue use and have the opener adjusted or serviced.
7. Test remote and keypad operation with sensors
Once you confirm the sensors work with the wall button, test them with any remotes or keypads you use regularly.
- With the door open and the beam clear, use a remote to close the door and ensure it operates normally.
- Break the beam with your leg or an object while the door is moving down. The door should reverse.
- Repeat the same test using an exterior keypad if you have one.
If the sensors respond correctly with the wall button but not with remotes or keypads, you may have a control or programming issue that needs attention.
8. Confirm manual operation and emergency release
Knowing how to operate the door manually is important if the sensors fail or the power goes out.
- Locate the emergency release cord hanging from the opener rail.
- With the door fully closed, pull the cord to disconnect the opener from the door.
- Lift the door manually to confirm it moves smoothly and stays in place when partially open.
- Lower the door gently and reconnect the opener according to your owner’s manual.
If the door is very heavy or difficult to move by hand, the springs or hardware may need adjustment by a trained technician.
Common Garage Door Sensor Problems and Fixes
If your garage door fails any part of the safety testing checklist, use this quick guide to common issues and possible solutions.
Sensors have no lights
- Check that the opener is plugged in and the circuit breaker has not tripped.
- Inspect the sensor wires for loose connections at the opener and at the sensor.
- Look for damaged or cut wires along the wall or ceiling.
- If there is still no power, stop using the door and call a professional.
Lights are blinking or inconsistent
- Clean the lenses and remove any debris blocking the beam.
- Realign the sensors so they face each other directly.
- Check for sunlight or reflections shining directly into a sensor and adjust angle if needed.
- Make sure nothing is hanging or stored in the beam path.
Door will not close unless you hold the wall button
- This often indicates a sensor problem or blocked beam.
- Confirm both sensors are lit and aligned.
- Clear the area between sensors and retest.
- If the issue continues, the opener may be set to a safety override mode that needs service.
Door reverses randomly while closing
- Inspect the tracks for obstructions or damage.
- Check for loose hardware, bent tracks, or worn rollers.
- Verify that the sensors are not being bumped by vehicles, toys, or storage items.
- If the cause is not obvious, schedule a professional inspection.
When to Call a Professional for Garage Door Safety
While many sensor issues are simple, some problems are better handled by a trained technician, especially when they involve springs, cables, or major hardware components.
Contact a professional if you notice any of the following:
- The door closes with the beam blocked during your test.
- The opener does not reverse when it hits a solid object on the floor.
- The door is extremely heavy or difficult to lift manually.
- Springs, cables, or tracks appear damaged or out of place.
- You see exposed or sparking electrical connections.
Do not attempt to adjust torsion springs or high-tension components on your own. These parts can cause serious injury if handled incorrectly.
Integrating Garage Door Safety into Your Smart Home Routine
If you use smart home devices, you can make garage door safety checks more consistent and convenient.
- Set reminders: Use a calendar or smart assistant to remind you to run this checklist monthly.
- Monitor activity: If your opener connects to an app, review activity logs for unexpected openings or closings.
- Check status before bed: Use your phone or smart display to confirm the door is closed each night.
- Combine routines: Add garage door checks to seasonal tasks like changing air filters or testing smoke alarms.
By pairing technology with a simple physical inspection, you create multiple layers of protection for your home and family.
Printable Garage Door Sensor Safety Testing Checklist
Use this condensed version as your quick reference:
- Clear the area and keep children and pets away.
- Inspect sensors for damage and secure mounting.
- Check sensor indicator lights for power and status.
- Clean sensor lenses and remove debris from the beam path.
- Align sensors so they face each other evenly.
- Test obstruction: block the beam and attempt to close the door.
- Test reversal: place a solid object on the floor and close the door.
- Test with remotes and keypads, confirming reversal when the beam is broken.
- Practice manual operation with the emergency release.
- Call a professional if any safety test fails.
Keep this checklist near your garage entry door or with your home maintenance records so it is easy to find when it is time for your next test.
 Medication Lockbox and Cleaning Supply Safety Storage Checklist
 Garage Door Battery Backup Basics for Power Outages: A Practical Guide
 Water Leak Sensor Battery Test Schedule Checklist