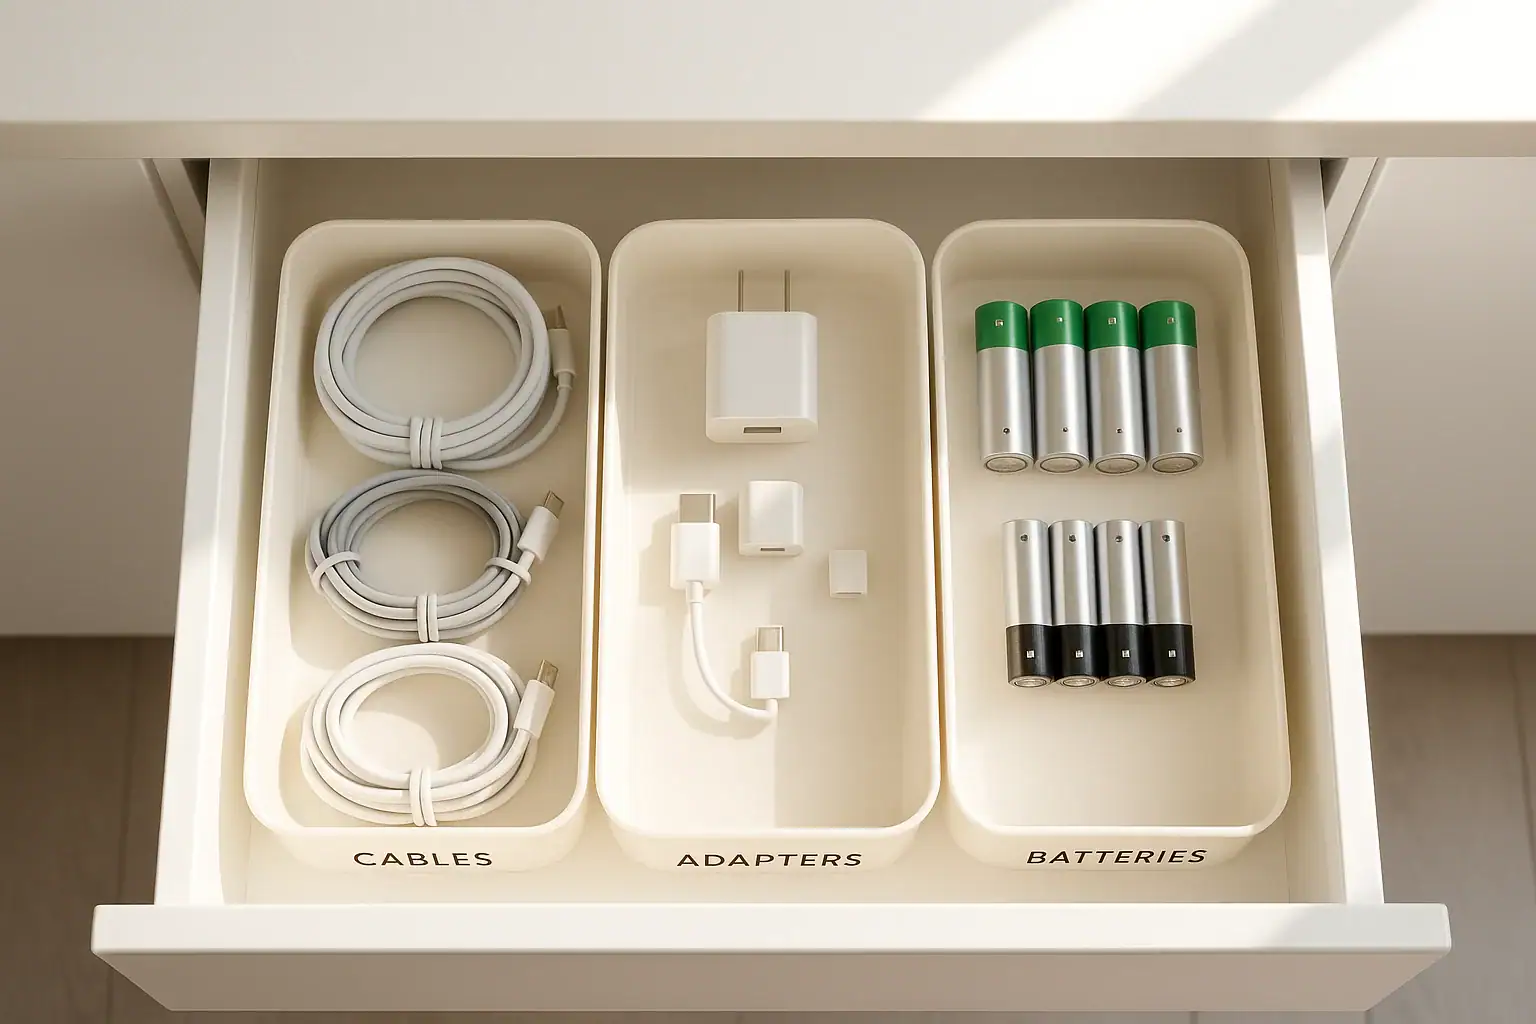
If your charger drawer is a jumbled pile of cords, adapters, and random batteries, you are not alone. This small space tends to become a catch‑all for anything with a plug, which makes it frustrating when you need to find a specific cable in a hurry. The good news is that organizing a charger drawer does not require a full remodel or expensive products. With a bit of planning, some simple dividers, and a clear system, you can turn that chaotic drawer into a tidy charging hub where every item has a home. This guide walks you through decluttering, sorting, and setting up a layout that works for your household, plus tips to keep it organized long term.
Step 1: Empty and Declutter Your Charger Drawer
Before you can organize, you need to see exactly what you have. Most people are surprised by how many duplicate cords and mystery adapters are hiding in one drawer.
Completely empty the space
Take everything out of the drawer and place it on a flat surface like a table or countertop. Wipe out crumbs, dust, and any sticky spots with a damp cloth and let the drawer dry fully.
Sort into quick categories
As you empty the drawer, make fast decisions and place items into simple piles:
- Phone and tablet charging cables
- Laptop and large device chargers
- Adapters and plugs (wall plugs, car adapters, travel plugs)
- Audio and video cables (HDMI, speaker cables, auxiliary cords)
- Batteries (separate by size if possible)
- Unknown or broken items
Do not worry about perfect sorting yet. The goal is to get everything into broad groups so you can see what you actually use.
Declutter ruthlessly
Once you see everything together, it becomes easier to let go of extras. Ask yourself a few questions for each item:
- What device does this belong to?
- Do we still own that device?
- Do we already have several of this same cable or adapter?
Let go of:
- Cables for devices you no longer own
- Frayed, cracked, or unreliable cords
- Duplicate adapters beyond what your household reasonably needs
- Batteries that are leaking, corroded, or long expired
Recycle electronics and cords at an appropriate drop‑off location when possible, and dispose of batteries according to local guidelines.
Step 2: Decide the Purpose of Your Charger Drawer
Not every electronic accessory needs to live in one drawer. Defining the purpose of this drawer helps you avoid overcrowding it again.
Choose what belongs in the drawer
For most homes, a charger drawer works best when it holds only the items used most often. Consider limiting it to:
- Everyday phone and tablet chargers
- Portable device cables (e‑readers, headphones, small gadgets)
- A few essential adapters and wall plugs
- Common battery sizes used frequently in your home
Less frequently used items, like specialty camera cables or rarely used audio cords, can move to a labeled bin in a closet or office instead of crowding the drawer.
Match the drawer to the location
Think about where the drawer is located and what you reach for there most often:
- Kitchen drawer: Focus on family phone chargers, portable device cords, and everyday batteries.
- Office drawer: Include computer cables, backup storage cables, and work‑related adapters.
- Entryway drawer: Store car chargers, portable battery packs, and travel adapters.
Aligning the contents with the room makes it easier for everyone in the household to know where to find and return items.
Step 3: Measure and Plan Your Drawer Layout
Before buying or repurposing organizers, measure the inside of your drawer. A few quick measurements help you choose dividers that actually fit and do not slide around.
Measure the interior
Use a tape measure to note:
- Width (side to side)
- Depth (front to back)
- Height (bottom to top, especially if the drawer is shallow)
Write these measurements down or save them in a note on your phone so you have them handy if you shop for inserts.
Plan zones for different items
Think of the drawer as a small grid, and assign each section a category. For example:
- Front left: daily phone charging cables
- Front right: adapters and wall plugs
- Back left: laptop and large device chargers (coiled neatly)
- Back right: batteries sorted by size
Planning zones first makes it easier to choose or create the right sized compartments.
Step 4: Choose Simple Organizers for Cables and Adapters
You do not need complicated systems to keep cords under control. A mix of small containers and cord ties is usually enough.
Use small containers or dividers
Look around your home for items you can repurpose as drawer organizers:
- Shallow food storage containers
- Small boxes from household items
- Utensil trays or office drawer inserts
- Ice cube trays or silicone muffin cups for tiny pieces
Arrange them snugly so they do not slide around. If needed, use non‑slip drawer liners underneath to keep everything in place.
Keep cables from tangling
Neatly coiled cables are easier to grab and return. You can secure each cable with:
- Reusable cable ties
- Twist ties from produce or bread bags
- Small elastic bands
- Folded paper labels taped around the coil
Coil each cable loosely to avoid damaging the wires, then place it in its designated section of the drawer.
Separate adapters from cables
Instead of letting adapters float around loose, give them their own compartment. Group similar items together:
- Wall adapters in one section
- Car adapters in another
- Specialty adapters (such as video or audio converters) in a smaller compartment
When you keep adapters separate from cords, it is easier to see what you have and avoid buying duplicates.
Step 5: Create a Battery Storage System
Batteries can quickly take over a drawer if they are scattered loose. A simple system keeps them easy to find and safer to store.
Sort by size and type
Group batteries into separate sections:
- AA
- AAA
- 9‑volt
- Button cell batteries (for small devices)
Use small containers, divided trays, or labeled snack‑size bags to keep each size separate.
Store batteries safely
For safety and organization:
- Keep new and used batteries in separate, clearly labeled sections.
- Avoid letting loose batteries roll around in the drawer where they can touch metal objects.
- Store batteries in a cool, dry place away from extreme heat.
If you have young children, consider placing button cell batteries in a container with a secure lid and keeping it toward the back of the drawer.
Step 6: Label Everything Clearly
Labels are the key to keeping your charger drawer organized over time. When every section is labeled, it is easy for any family member to put things back in the right spot.
Label by device or connection type
Choose a labeling style that makes sense for your household. You can label by:
- Device: phone, tablet, laptop, camera, headphones
- Connection type: USB‑A, USB‑C, micro‑USB, lightning, HDMI
- User: parent, teen, guest, shared
Use simple label makers, adhesive labels, or masking tape and a permanent marker. Place labels on the front edge of containers or on the drawer itself.
Label cables individually
To avoid guessing which cord goes with which device, label each cable near the plug. You can:
- Wrap a small piece of tape around the cable and write the device name
- Use pre‑cut label stickers folded over the cord
- Color‑code cables by family member or device type
This small step saves time and prevents arguments over whose charger is whose.
Step 7: Set Up Everyday Habits to Maintain the Drawer
Organization only works if it is easy to maintain. Design your charger drawer so that putting things away is just as simple as tossing them in loosely.
Make the system obvious
Walk through how your family actually uses chargers. If certain cables are used several times a day, place them in the front of the drawer in open compartments. Reserve the back for backup items and rarely used cords.
Create simple rules for the household
Share a few clear expectations so everyone helps maintain the system:
- “One home” for each cable and adapter
- Return borrowed chargers to the drawer at the end of the day
- Do not add random items to the drawer that do not belong
- Place dead batteries in a small, labeled container for recycling
Post a small reminder note inside the drawer if that helps family members remember.
Schedule quick check‑ins
Once a month, do a two‑minute reset:
- Remove any items that do not belong
- Recycle damaged cords and dead batteries
- Refill commonly used battery sizes if they are running low
These short check‑ins prevent the drawer from slipping back into chaos.
Ideas for Different Types of Charger Drawers
Every home uses electronics a little differently. Here are a few layout ideas you can adapt to your own space.
Family command center drawer
This setup works well in a kitchen or main living area where everyone tends to drop their devices.
- Front row: shared phone and tablet cables in clearly labeled sections
- Middle: adapters, portable battery packs, and a small container for earbuds
- Back: AA and AAA batteries, plus a small box for specialty batteries
Home office charger drawer
If your drawer is in a desk, focus on work and computer‑related items.
- Front: laptop charger, external hard drive cables, and printer cables
- Side section: video and audio cables such as HDMI or speaker cords
- Back: backup phone chargers and a small supply of batteries for office equipment
Minimalist essentials drawer
For a small drawer or a simple lifestyle, keep only what you truly need.
- One section for phone charging cables
- One section for adapters and plugs
- One section for a few spare batteries
Store all other cords and specialty items in a separate, clearly labeled box elsewhere.
Tips for Organizing Extra or Rarely Used Cables
Even after decluttering, you may still have a few cables you need only occasionally. Instead of cramming them into your everyday charger drawer, give them a separate home.
Create an “archive” cable box
Use a small bin or shoebox to store rarely used cords and adapters. Label the outside clearly, then inside:
- Coil and label each cable with the device name
- Group similar items in small bags or envelopes
- Include a simple list taped to the inside lid showing what is stored there
Keep this box in a closet, office shelf, or other out‑of‑the‑way spot. This frees up prime drawer space while still keeping extras accessible.
Set a limit on how many extras you keep
It is easy to hang onto every spare cord “just in case.” To avoid clutter:
- Decide on a maximum number of backup cables for each type
- Donate or recycle anything beyond that limit
- Revisit your archive box once or twice a year and declutter again
When to Rethink Your Charger Drawer System
As your devices change, your organization system should change too. Pay attention to signs that your current setup is no longer working.
Common signs it is time to adjust
- You regularly cannot find the right cable quickly
- The drawer will not close smoothly because it is too full
- New devices have different connection types than your old ones
- Family members avoid using the drawer because it feels confusing
If you notice these issues, repeat the declutter and reset process. Often, a few small changes to your zones or labels are enough to restore order.
Enjoy a Calm, Functional Charger Drawer
A well‑organized charger drawer saves time, reduces frustration, and keeps your electronics in better shape. By decluttering, creating clear zones, taming cables, and labeling everything, you turn a messy catch‑all into a simple home base for chargers, adapters, and batteries. The most important part is designing a system that matches how your household actually uses devices, then keeping the rules light and easy to follow. With a few minutes of maintenance each month, your charger drawer can stay neat and functional for the long term, making everyday charging and battery changes quicker and less stressful.
 Smart Bathroom Cabinet Organization for Under-Sink Drawers and Medicine Backups
 Linen Closet Organization: Simple Zones for Sheets, Towels, and Backstock
 Laundry Sorting Systems for Small Households: Simple Ways to Stay Organized