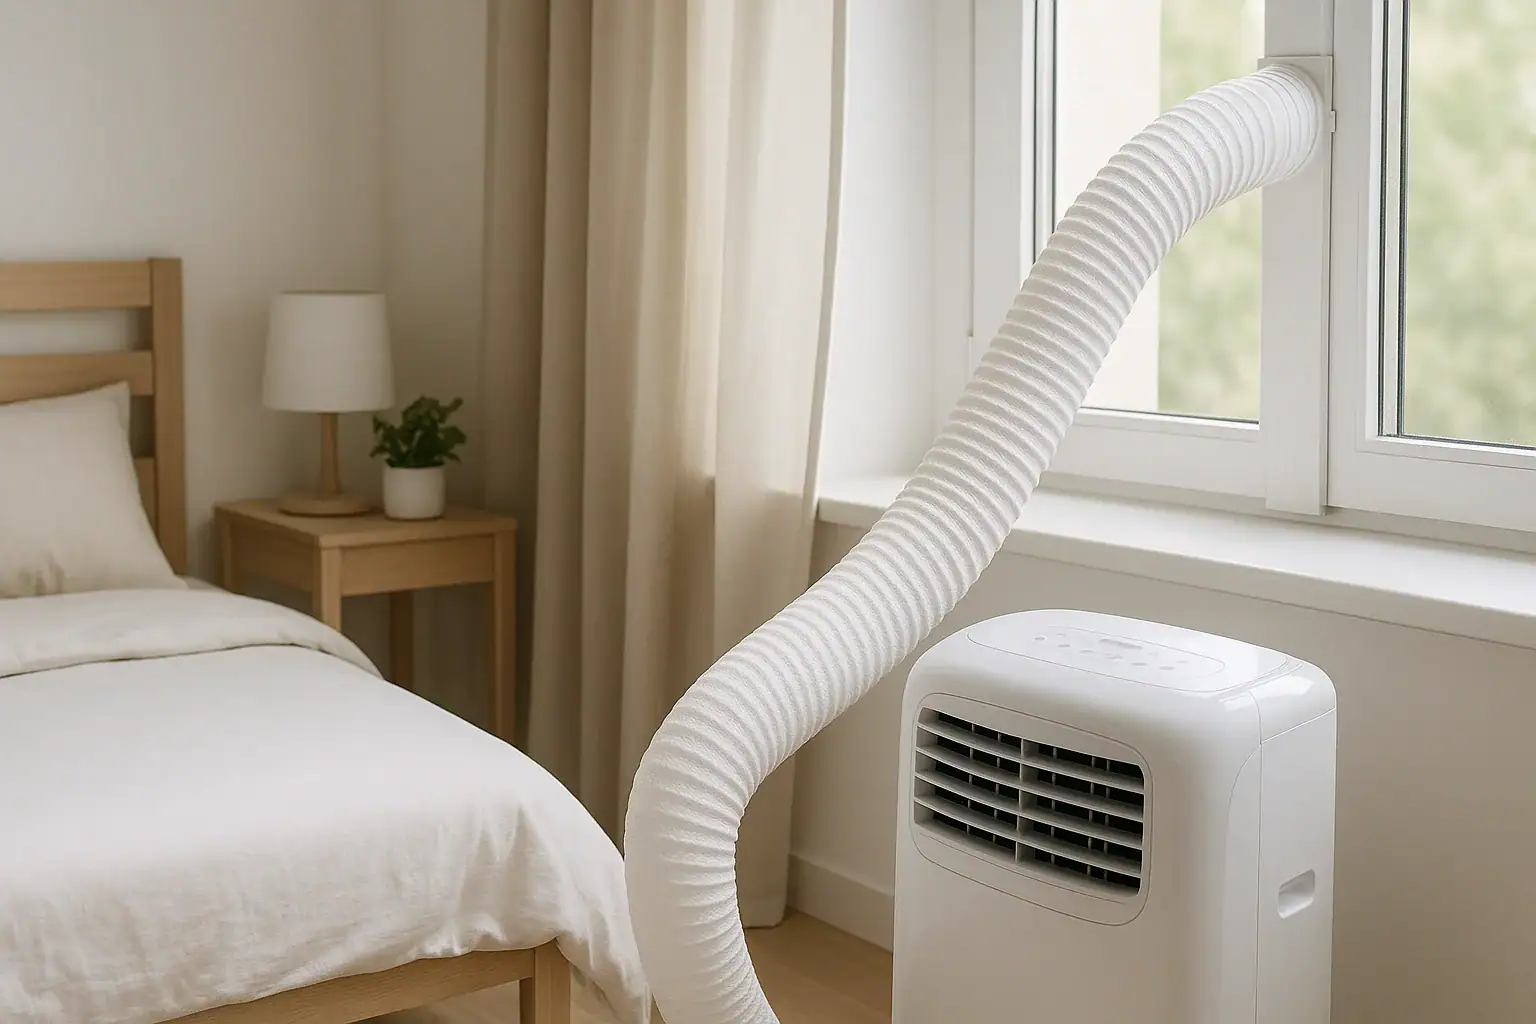
Portable air conditioners are convenient, but the exhaust hose can leak a surprising amount of heat back into your room. Insulating the hose and placing it correctly can make the unit feel stronger, run less often, and keep your space more comfortable. This guide walks you through exactly where to place insulation on a portable AC hose, what to use, and how to avoid common mistakes so you get the most cooling for the energy you pay for.
Why Insulating a Portable AC Hose Matters
A portable air conditioner pulls warm air from your room, cools it, and sends the heat outside through the exhaust hose. That hose gets hot. If it is bare plastic or thin metal, it radiates heat back into the room, working against the cooling you are trying to achieve.
Insulating the hose and placing it correctly helps in several ways:
- Improved cooling performance: Less heat radiates back into the room, so the air coming from the unit feels cooler and stays that way longer.
- Lower energy use: The unit does not have to run as long or as often to reach the same temperature.
- More consistent room temperature: Fewer hot spots near the hose and window area.
- Better comfort near the unit: The space around the hose is less hot and stuffy.
- Reduced strain on the AC: Less heat load can help extend the life of the equipment.
The key is not only adding insulation, but also placing it in the right spots and avoiding blocking the airflow the unit needs to operate safely.
Know Your Portable AC Hose Layout
Before you start insulating, take a moment to understand how your hose is routed and how it connects to the unit and the window or wall panel. Most portable AC setups share the same basic layout:
- Unit connection: A round or oval collar on the back of the unit where the hose snaps or twists into place.
- Flexible exhaust hose: Often a corrugated plastic or thin metal tube that can stretch and bend.
- Window or wall adapter: A panel or plate that fits into a window opening or wall vent.
Each of these areas affects where insulation should start and stop. A good installation covers the hot hose surface while keeping vents and air intakes clear.
Best Materials for Portable AC Hose Insulation
You do not need anything fancy to insulate a portable AC hose effectively. Several common materials work well when used correctly.
Common Insulation Options
- Foam pipe insulation sleeves: Pre-slit foam tubes that wrap around pipes or hoses. They are easy to cut and slide over the hose.
- Flexible foam wrap: Roll foam that can be wrapped around the hose and secured with tape or zip ties.
- Reflective insulation wrap: Bubble or foam core with reflective foil on one or both sides. This helps reduce radiant heat.
- Fiberglass pipe wrap with foil facing: Offers strong insulation but requires careful handling to avoid irritation.
What to Look For
- Heat resistance: The hose can get quite hot, so choose materials rated for higher temperatures.
- Flexibility: The insulation should bend with the hose without kinking or tearing.
- Closed-cell foam where possible: This resists moisture and holds its shape better.
- Easy to remove: Seasonal use is common, so pick something you can take off when you store the unit.
A combination of foam insulation and a reflective outer layer often gives the best balance of performance and ease of installation.
Where to Place Insulation on a Portable AC Hose
Placement matters as much as the type of insulation you choose. The goal is to cover as much of the hot hose as possible without interfering with airflow, controls, or safety features.
1. Start Near the Unit, But Do Not Cover Vents
Begin your insulation run close to where the hose connects to the portable AC, but leave a small gap so the unit can breathe and release any heat from its own housing.
- Leave about 1 to 2 inches of hose exposed right at the connection point.
- Do not cover any air intake grilles or exhaust vents on the unit itself.
- If the hose collar has locking tabs or a release button, keep those clear.
This approach allows you to block most of the radiant heat from the hose without trapping heat inside the unit.
2. Cover the Full Length of the Hose
The middle section of the hose is where most of the heat is lost into the room. Insulate this entire stretch whenever possible.
- Run insulation continuously from near the unit all the way to the window or wall adapter.
- Overlap seams slightly if you are using multiple pieces of insulation.
- Secure the insulation every 8 to 12 inches with tape or zip ties to keep it from slipping.
- Keep the hose as straight and short as possible to reduce backpressure and heat buildup.
If the hose must bend, use gentle curves instead of sharp turns. Tight bends create hot spots and can reduce airflow.
3. Insulate Up to the Window or Wall Panel
The area where the hose meets the window or wall is another common source of heat leak. Insulate right up to this connection, then seal the opening around it.
- Stop the hose insulation about 0.5 to 1 inch before the window adapter so you can still access clamps or locking rings.
- Use weatherstripping, foam tape, or caulk around the window panel to block hot outdoor air from sneaking in.
- If the window panel itself feels hot, consider adding a thin layer of reflective insulation on the room side.
By treating the window or wall opening as part of the system, you avoid undoing the benefits of the hose insulation.
4. Avoid Blocking Condensate Drains or Power Cords
Some portable AC units have a drain hose, drain plug, or electrical connections located near the exhaust hose. These must remain accessible.
- Do not wrap insulation over any drain hose or drain outlet.
- Keep the power cord free so it does not overheat under insulation.
- Leave access to any service panels or filters you need to clean.
Plan your insulation placement with maintenance in mind so you do not have to remove everything just to drain water or clean a filter.
Step-by-Step: How to Insulate a Portable AC Hose
Once you know where the insulation should go, the installation process is straightforward. The steps below assume a typical flexible exhaust hose and foam or wrap-style insulation.
Step 1: Measure the Hose
- Measure the full length of the hose from the unit connection to the window or wall adapter.
- Measure the hose diameter so you can choose insulation that fits snugly.
- Add a few extra inches to your measurements for overlap and trimming.
Step 2: Cut Insulation to Length
- Cut foam sleeves or wrap sections to match your hose length.
- If using sleeves, you may need several pieces placed end to end.
- Label sections for the straight run and any bends to make installation easier.
Step 3: Install Insulation Around the Hose
- Unplug the unit for safety before working around it.
- Slide foam sleeves over the hose or wrap flexible insulation around it.
- Start near the unit, leaving a small gap at the connection point.
- Work your way toward the window or wall, keeping insulation snug but not crushing the hose.
Step 4: Seal Seams and Joints
- Use foil tape or other heat-resistant tape to seal any seams between insulation pieces.
- Overlap joints by at least an inch to prevent gaps where heat can escape.
- Check that there are no exposed sections of hose along the run.
Step 5: Secure the Insulation
- Add zip ties, hook-and-loop straps, or additional tape every 8 to 12 inches.
- Make sure the hose can still flex without the insulation sliding out of place.
- Confirm that the hose is not kinked or sharply bent anywhere.
Step 6: Seal the Window or Wall Opening
- Inspect the window or wall panel for gaps around the edges.
- Add foam weatherstripping or tape where you see light or feel air leaks.
- Close the window as tightly as possible against the panel.
When you are finished, plug the unit back in and run it for 10 to 15 minutes. Carefully feel around the hose and window area. The insulation should be warm, but the room should feel noticeably less hot near the hose than before.
Placement Tips for Different Room Setups
Not every room allows a short, straight hose run. These placement tips help you get the best performance in common layouts.
When the Unit Sits Far from the Window
If your portable AC must sit several feet from the window, the hose will be longer and more prone to heat loss.
- Use the shortest hose length that still allows safe placement of the unit.
- Insulate the entire hose, paying extra attention to the middle section.
- Avoid running the hose along hot surfaces like sunlit walls or near heating vents.
- Consider rearranging furniture so the unit can move closer to the window if possible.
In Small Rooms or Bedrooms
In compact spaces, the radiant heat from a bare hose can be very noticeable.
- Place the unit so the insulated hose runs away from the bed or seating area.
- Keep the hose off the floor if possible to reduce tripping hazards.
- Check that curtains or bedding do not rest against the hose or insulation.
In Attics, Garages, or Bonus Rooms
These spaces often have higher heat loads and less insulation in the walls and ceilings.
- Insulate the hose thoroughly and consider double-wrapping with foam plus reflective wrap.
- Keep the hose away from hot roof decking or uninsulated exterior walls.
- Seal any extra openings in the window or wall panel carefully to keep hot outdoor air out.
Safety Considerations When Insulating a Portable AC Hose
While hose insulation is generally safe, there are a few important precautions to keep in mind.
- Do not block air intakes: The unit needs a steady supply of room air. Keep all intake grilles clear of insulation and other objects.
- Avoid flammable materials: Choose insulation rated for higher temperatures and keep it away from open flames or heat sources.
- Maintain clearance: Leave some space between the insulated hose and walls, furniture, curtains, or bedding.
- Check for overheating: During the first few uses, periodically touch the unit housing and hose connections to ensure they are warm but not dangerously hot.
- Follow the manual: Review your portable AC manual for any specific warnings about modifying the hose or exhaust system.
If you notice unusual smells, tripped breakers, or the unit shutting off unexpectedly after adding insulation, turn it off and inspect the hose path to make sure nothing is blocked or kinked.
Extra Ways to Boost Portable AC Efficiency
Insulating the hose is one of the most effective upgrades you can make, but a few additional steps can further improve comfort and efficiency.
- Shade the window: Use blinds or curtains to block direct sun on the window where the exhaust exits.
- Seal air leaks: Check around doors, windows, and outlets in the room for drafts and seal where needed.
- Use a fan: A small fan can help circulate cool air from the unit throughout the room.
- Clean filters regularly: Dirty filters reduce airflow and make the unit work harder.
- Close unused rooms: Shut doors to rooms you are not trying to cool to keep the cold air where you need it.
Combining hose insulation with these simple habits can make a portable AC feel more like a built-in system, even in challenging summer heat.
When to Replace or Re-Route the Hose
Insulation helps, but it cannot fix every hose problem. In some cases, you may need to replace or re-route the hose for safe and efficient operation.
- Cracked or brittle hose: If you see damage, replace the hose before insulating it.
- Severe kinks: If the hose must bend sharply to reach the window, look for a different path or move the unit.
- Excessive length: Very long hoses reduce performance. Use the shortest length recommended by the manufacturer.
- Multiple extensions: Avoid joining several hose sections together, as this can trap heat and strain the unit.
Once you have a sound hose setup, insulation and careful placement will give you the best results.
Bringing It All Together
Insulating a portable AC hose is a simple project that can noticeably improve comfort and reduce energy use. Focus on covering the full length of the hose, starting near the unit and running all the way to the window or wall adapter, while keeping vents, drains, and controls clear. Use heat-resistant, flexible insulation, seal seams and gaps, and secure everything so it stays in place throughout the season.
With thoughtful placement and the right materials, your portable air conditioner can cool more effectively, run more quietly, and keep your living space comfortable even on the hottest days.
If you are exploring more ways to improve comfort and efficiency around your home, you can find additional air and comfort tips and guides at Signature Home Guide.
 Ceiling Fan Direction for Summer vs Winter: A Clear Homeowner’s Guide
 Window AC Maintenance Checklist Before Summer Heat Arrives
 How Often to Change HVAC Filters With Pets: A Practical Homeowner Checklist