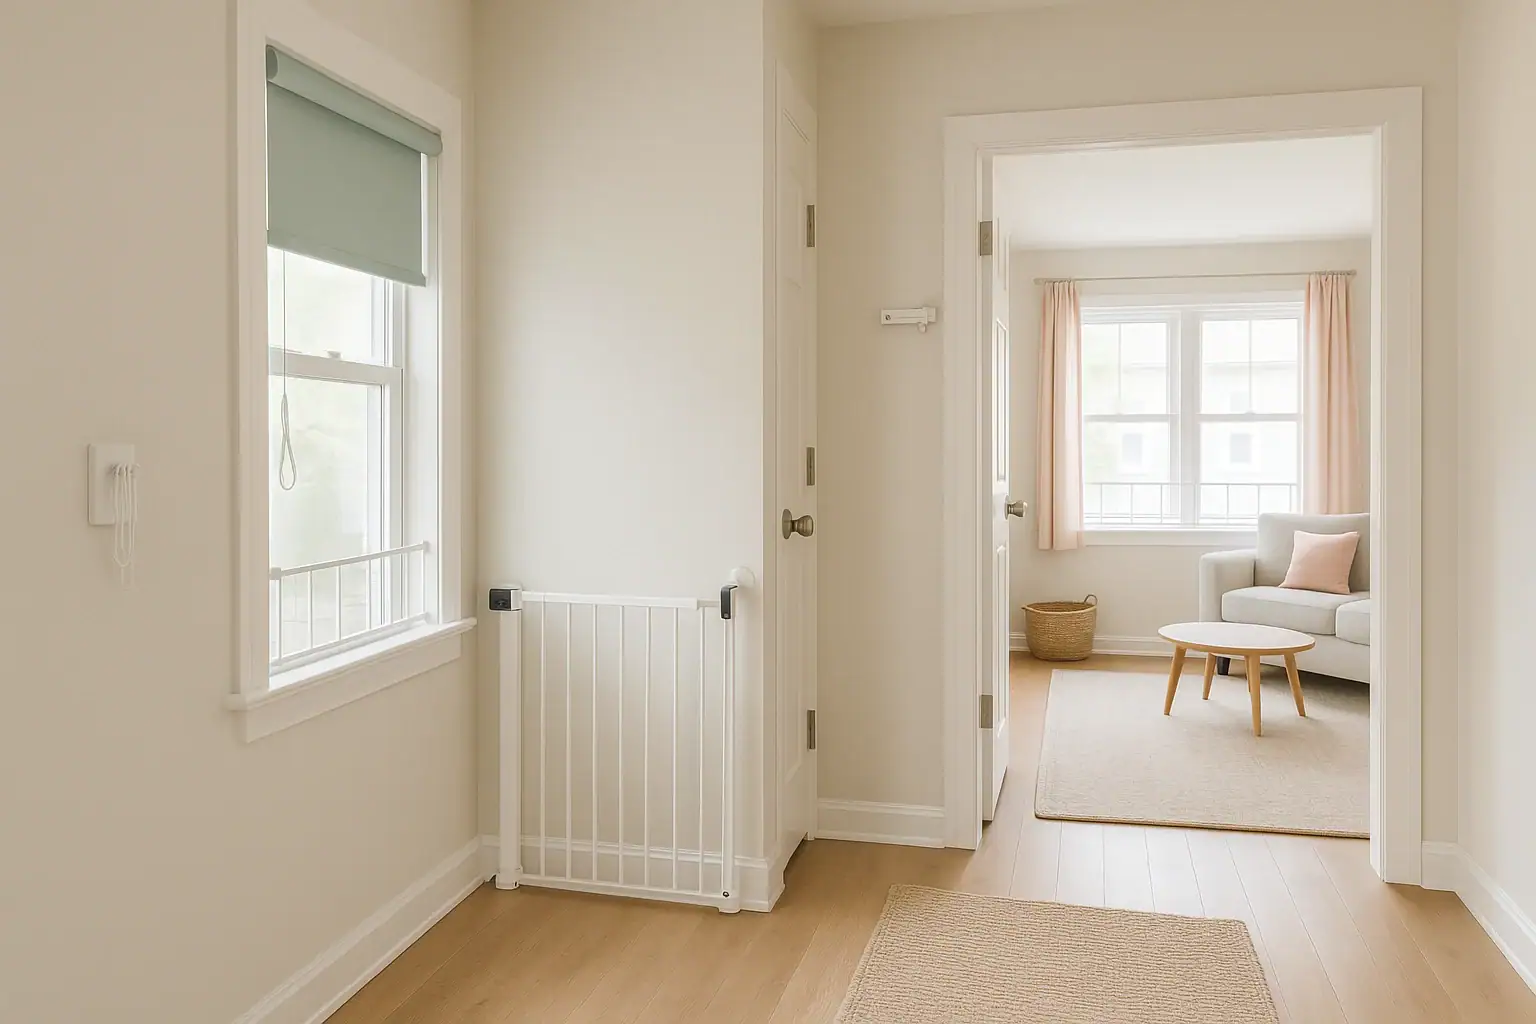
Curious toddlers move quickly, climb higher than you expect, and can defeat simple barriers in seconds. Doors, windows, and cords that seem harmless to adults can become serious hazards for young children. A solid childproofing plan helps you stay a step ahead. This checklist walks through doors, windows, locks, alarms, and blind cords so you can reduce fall risks, prevent wandering, and avoid strangulation hazards. Use it as a practical guide while you walk through your home and decide what to secure, adjust, or replace.
Every home is different, but the safety goals are the same: keep kids from accessing dangerous spaces, prevent falls from heights, and remove cords and loops that can tighten around a child’s neck. You do not need to turn your house into a fortress, but you do want multiple layers of protection. Combine physical barriers, alarms, and smart habits, and review your setup regularly as your child grows and learns new skills.
Step 1: Walk Your Home Like a Toddler
Before you start buying devices or drilling into walls, take a few minutes to see your home from your child’s point of view. This quick walkthrough will help you prioritize what to childproof first.
- Get low: Kneel or sit on the floor and look around each room at toddler level.
- Follow the paths: Imagine where a curious child would go if a door or window were left open.
- Note high-risk areas: Stairs, balconies, decks, upper-story windows, and doors leading outside or to garages and basements.
- Spot tempting items: Doors with interesting handles, windows with low sills, and cords that sway or dangle.
Use a notepad or your phone to list every door, window, and corded blind. You will use this list as you work through the checklist in the next sections.
Checklist for Interior Doors
Interior doors can hide hazards such as cleaning products, tools, medications, or stairs. They can also pinch little fingers. The goal is to control which doors a child can open and to reduce injury if a door slams shut.
Interior Door Safety Checklist
- Identify restricted rooms: Mark bathrooms, laundry rooms, utility rooms, home offices, and storage closets as high priority.
- Add child-resistant latches: Use door knob covers or lever handle locks on doors that must stay closed to children.
- Secure doors to stairs: Place safety gates at the top and bottom of stairways and use a lock or latch on any door leading directly to stairs.
- Prevent finger pinches: Install finger-pinch guards or foam door stoppers on doors that children use often.
- Check closing force: Adjust door closers or hinges so doors do not slam shut with strong force.
- Keep keys out of reach: Remove keys from interior locks or store them at adult height to prevent children from locking themselves in.
Special Considerations for Bathroom and Laundry Doors
Bathrooms and laundry areas contain water, heat, and chemicals. Treat these doors as top priority.
- Use child-resistant locks or knob covers on bathroom and laundry doors.
- Store detergents, cleaning products, and medications in locked cabinets, even if the door is secured.
- Install a high hook or latch on the outside of doors if knob covers are not practical.
- Check that exhaust fan switches and heater controls are out of reach of young children.
Checklist for Exterior Doors
Exterior doors are a major concern because they can lead directly to traffic, water, or extreme temperatures. Young children may slip outside quietly if a door is not secured.
Exterior Door Safety Checklist
- Raise the locking point: Install secondary locks or latches higher than a child can reach.
- Add door alarms: Use simple contact alarms or smart sensors that alert you when a door opens unexpectedly.
- Use child-resistant locks: Choose locks that require a motion or strength level beyond most toddlers, while still allowing quick exit for adults.
- Secure sliding doors: Use floor-level bars, track locks, or pins to prevent sliding doors from opening more than a few inches.
- Check pet doors: Make sure a child cannot crawl through a pet door to reach the yard, pool, or driveway.
- Clear the landing area: Keep steps, porches, and entry mats free of tripping hazards.
Doors to Garages, Basements, and Utility Areas
These doors often lead to tools, vehicles, and other hazards. Treat them as restricted access points.
- Install self-closing hinges and a secure latch on the door to the garage.
- Keep garage door openers and keypads out of reach of children.
- Use a child-resistant lock on doors leading to basements, workshops, or storage areas.
- Ensure good lighting at these doors so adults can check surroundings quickly.
Childproofing Windows to Prevent Falls
Windows are a major source of fall injuries for young children. Screens are designed to keep bugs out, not kids in. The goal is to prevent children from opening windows wide enough to climb or fall through, especially on upper floors.
Window Safety Checklist
- Identify high-risk windows: Focus on windows above the first floor and windows near furniture a child could climb.
- Install window guards or stops: Use devices that limit how far windows can open, while allowing quick release for adults in an emergency.
- Keep furniture away from windows: Move beds, chairs, toy boxes, and dressers away from window sills.
- Lock windows when closed: Use built-in locks and add secondary locks if needed.
- Check window screens: Do not rely on screens for child safety. Treat them as cosmetic only.
- Secure low windows: For ground-level windows, limit opening width to reduce the chance of a child wandering outside unsupervised.
Types of Windows and How to Secure Them
Different window styles need different childproofing approaches.
- Double-hung windows: Use stops so the bottom sash opens only a few inches, or open from the top where possible.
- Sliding windows: Add track locks or adjustable bars to limit how far the window can slide.
- Casement windows: Use locks on the crank handle and consider window guards if the opening is large.
- Awning windows: Check that the opening is too small for a child to fit through, or add stops or guards.
Locks and Latches: Layers of Protection
Locks and latches are your first line of defense against curious hands. For childproofing, think in layers: one device might slow a child, but two or three devices working together are more reliable.
Choosing Child-Resistant Locks and Latches
When selecting locks and latches, look for these features:
- Requires two actions: Devices that need pressing and sliding, or pushing and turning, are harder for toddlers to defeat.
- Out of sight or reach: High-mounted locks reduce the chance a child will experiment with them.
- Adult-friendly: You should be able to operate the device quickly in low light or in an emergency.
- Durable materials: Choose sturdy designs that will not break under repeated use.
Where to Use Extra Locks and Latches
- On exterior doors, especially those leading to yards, pools, or driveways.
- On doors to garages, basements, and storage areas.
- On windows in children’s bedrooms and playrooms.
- On doors to balconies, decks, and rooftop areas.
Review your locks regularly. As children grow taller and stronger, they may suddenly reach or figure out devices that once seemed secure.
Using Alarms and Smart Alerts for Extra Awareness
Alarms and smart sensors add another layer of safety by alerting you when a door or window opens. They do not replace physical barriers, but they can buy you precious seconds to respond.
Door and Window Alarm Checklist
- Decide where alarms are needed: Focus on exterior doors, doors to garages and basements, and upper-story windows in children’s rooms.
- Choose audible alerts: Use chimes, beeps, or spoken alerts that you can hear over normal household noise.
- Consider smart notifications: Use sensors that send alerts to your phone if a door or window opens unexpectedly.
- Set up night modes: Use bedtime settings that alert you if a child opens a door or window after a certain hour.
- Test regularly: Check batteries and connectivity on a schedule, such as the first day of each month.
Integrating Alarms With Your Daily Routine
Alarms are most effective when they are part of your everyday habits.
- Turn on chime or alert modes whenever you are busy cooking, doing laundry, or working from home.
- Use quick-glance dashboards or apps to confirm that doors and windows are closed before bed.
- Teach older children what the alarms mean and how to respond if they hear one.
Making Blind Cords and Window Coverings Safe
Blind cords and loops can pose a serious strangulation risk. Children can become tangled quickly and quietly, even when you are nearby. The safest option is to remove corded window coverings in areas where children spend time, but there are also ways to improve safety if replacement is not possible right away.
Blind Cord Safety Checklist
- Identify all corded coverings: Walk through your home and list every blind, shade, or curtain with a cord or loop.
- Prioritize children’s spaces: Focus first on nurseries, bedrooms, playrooms, and living areas where kids spend the most time.
- Shorten cords: Adjust or trim cords so they are well out of reach of children.
- Use cord cleats or wind-up devices: Secure cords high on the wall, wrapping them tightly so no loop hangs down.
- Eliminate loops: Use devices that separate continuous loops into two single cords, reducing strangulation risk.
- Move furniture away: Keep cribs, beds, chairs, and dressers away from windows with cords.
When to Replace Corded Blinds
In some cases, the safest option is to replace old window coverings entirely.
- Replace blinds with long, dangling cords in children’s rooms and play areas.
- Consider cordless shades, shutters, or other coverings that operate without exposed cords.
- If replacement is not immediate, use multiple safety measures: shorten cords, secure them high, and remove loops.
Room-by-Room Childproofing Checklist
Use this quick room-by-room guide to make sure you have covered doors, windows, locks, alarms, and blind cords throughout your home.
Nursery and Children’s Bedrooms
- Install window stops or guards on all windows.
- Keep cribs and beds away from windows and cords.
- Remove or secure any corded blinds or shades.
- Use door latches or knob covers if you need to limit wandering at night.
- Consider a door or window alarm for upper-story rooms.
Living Room and Family Areas
- Secure sliding doors with locks, bars, or track devices.
- Add alarms or chimes to doors leading outside or to balconies.
- Install window stops or guards on accessible windows.
- Replace or secure blinds and shades with dangling cords.
- Move climbable furniture away from windows and doors.
Kitchen and Dining Area
- Use child-resistant locks on doors leading to the garage or basement.
- Secure any windows near counters or benches that children could climb.
- Keep cords from nearby blinds or shades tied up and out of reach.
- Consider a door alarm for the main exit door if the kitchen opens to the outside.
Bathrooms and Laundry Room
- Use door locks or knob covers to control access.
- Install window locks or stops on any windows within reach.
- Remove or secure blind cords, especially near tubs or changing areas.
- Keep doors closed and locked when not in use.
Garage, Basement, and Utility Areas
- Use strong locks on doors leading to these spaces.
- Install self-closing hinges on the door to the garage.
- Add alarms to doors if children can reach them.
- Secure any windows that could allow a child to exit or enter these areas.
Smart Habits to Support Your Childproofing
Devices are only part of the solution. Daily habits help keep your home consistently safer.
- Do a nightly safety sweep: Before bed, check that doors are locked, windows are closed or limited, and alarms are set.
- Update as your child grows: Reevaluate locks, latches, and furniture placement every few months.
- Teach basic rules: As children get older, explain why they should not open doors or windows without an adult.
- Share the plan: Make sure all caregivers know how to use locks, alarms, and childproofing devices correctly.
Putting It All Together
Childproofing doors, windows, locks, alarms, and blind cords is not a one-time project. It is an ongoing process that changes as your child grows and your home evolves. Start with the highest-risk areas: exterior doors, upper-story windows, and any room with water, chemicals, or tools. Add layers of protection with locks, guards, and alarms, and remove or secure blind cords wherever children spend time.
Walk through your home with this checklist in hand and tackle a few items at a time. Each improvement, from a simple door chime to a secured window guard, reduces risk and gives you more peace of mind. With thoughtful planning and regular review, you can create a home that supports your child’s curiosity while keeping them as safe as possible.
For more ways to combine traditional childproofing with modern home technology, explore additional smart home safety guides and adapt the ideas that fit your family and your space.
 Outlet Overload Signs and Safe Power Strip Use at Home
 Smart Motion Sensor Lighting Placement for Safer Entryways and Hallways
 Water Heater Leak Pan and Alarm Setup Checklist for a Safer Home