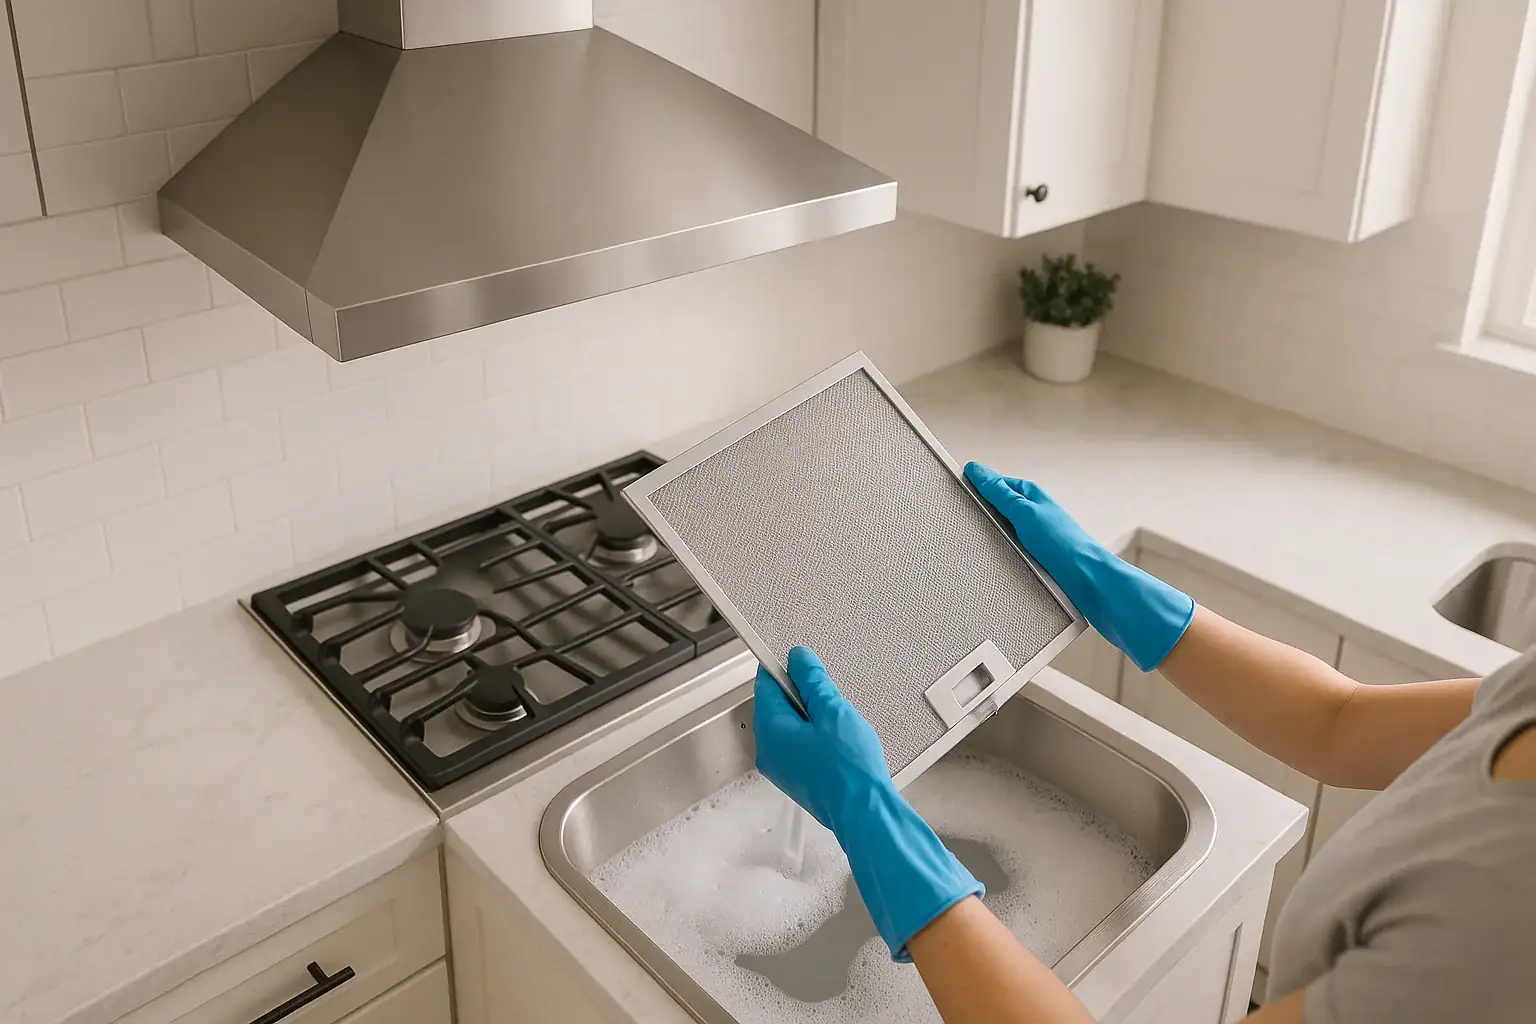
Range hood filters quietly protect your kitchen every time you cook, trapping grease, smoke, and odors before they spread through your home. Over time, though, that grease builds up and leaves filters clogged, sticky, and far less effective. The good news is that you can clean range hood filters without a greasy mess, harsh chemicals, or a lot of effort. With a simple routine and the right method, you can keep suction strong, reduce lingering cooking smells, and even help extend the life of your range hood.
This guide walks you through everything you need to know: how often to clean, how to remove and inspect your filters, several mess-free cleaning methods, and easy ways to keep grease from building up so quickly. Whether you have a ducted or ductless hood, mesh or baffle filters, you will find a step-by-step process that fits your kitchen and your schedule.
Why Clean Range Hood Filters Regularly?
Every time you sauté, fry, or simmer, airborne grease and steam rise toward your range hood. The filter captures that grease so it does not end up on your cabinets, walls, or ceiling. When the filter is coated, the hood has to work harder and may still leave your kitchen smoky or greasy.
Benefits of a clean range hood filter
- Better suction and airflow: Clean filters let air move freely, so smoke and steam are pulled out of the kitchen more effectively.
- Less lingering odor: Removing built‑up grease helps reduce stubborn cooking smells.
- Cleaner cabinets and walls: A working filter traps grease before it settles on nearby surfaces.
- Lower fire risk: Heavy grease buildup can become a fire hazard near high heat.
- Longer hood life: When the fan is not straining against clogged filters, it may last longer and run more quietly.
Cleaning does not need to be complicated. A quick, regular routine keeps grease under control so you never face a thick, sticky mess.
How Often Should You Clean Range Hood Filters?
The right schedule depends on how often and what you cook, as well as the strength of your range hood. Use these general guidelines, then adjust based on what you see and smell in your kitchen.
- Light cooking (a few times a week, little frying): Clean every 2 to 3 months.
- Moderate cooking (daily use, some frying): Clean every 4 to 6 weeks.
- Heavy cooking (frequent frying, searing, or high‑heat cooking): Clean every 2 to 4 weeks.
- Noticeable odor or visible grease: Clean as soon as you see a sticky film or smell lingering grease even after the fan runs.
If you cannot remember the last time you cleaned your filters, now is a good time to start fresh and then set a reminder on your calendar or phone.
Know Your Range Hood Filter Type
Before you start, identify the type of filter you have. This helps you choose a cleaning method that works without causing damage.
Common range hood filter types
- Aluminum or stainless steel mesh filters: Thin, layered metal mesh that feels light and slightly flexible. These are very common and designed to be cleaned and reused.
- Metal baffle filters: Heavier, solid metal panels with slotted baffles. Often used on more powerful hoods and also reusable.
- Charcoal or carbon filters: Usually found in ductless hoods that recirculate air. These are typically not washable and must be replaced when saturated.
Check your range hood manual or a label inside the hood if you are unsure. In most cases, metal mesh and baffle filters can be cleaned at home, while charcoal filters are disposable and should not be soaked.
Step 1: Prepare Your Space to Avoid a Mess
The key to cleaning range hood filters without a greasy mess is setting up a simple workspace that contains splashes and drips.
Gather basic supplies
- Rubber or latex gloves (optional but helpful for greasy filters)
- Soft sponge or non‑scratch scrub brush
- Old toothbrush or small detailing brush for corners
- Dish soap or a gentle degreasing cleaner
- Large sink, basin, or plastic tub
- Microfiber cloths or old towels
- Baking soda (for extra grease cutting if needed)
Set up a no‑mess cleaning area
- Clear your kitchen sink or laundry sink.
- Line the counter around the sink with an old towel to catch drips.
- If your sink is small, place a plastic tub or large baking dish inside to keep water contained.
- Keep a trash bag nearby for any loose debris or used paper towels.
With everything ready, you will be able to move quickly from one step to the next without tracking grease around the kitchen.
Step 2: Safely Remove the Range Hood Filters
Most range hood filters slide or pop out easily, but it is worth taking a moment to do this carefully so you do not bend the frame or scratch your hood.
- Turn off the range and hood fan. If you cooked recently, let the area cool completely.
- Locate the filter tabs or handles. Look along the front or underside of the hood for small metal tabs, latches, or finger pulls.
- Support the filter with one hand. Use your other hand to press or slide the tab. Tilt the filter downward and gently slide it out.
- Inspect the filter. Note which side faces down and how it was positioned. This will make reinstallation easier later.
- Repeat for additional filters. Place them on a towel near the sink.
If the filters feel stuck, do not force them. Check for a second latch or consult the manual for your hood model. For very greasy filters, wear gloves to avoid slippery hands.
Step 3: Choose a Low‑Mess Cleaning Method
There are several ways to clean range hood filters without turning your kitchen into a splash zone. Choose the method that best fits your filter type and the level of grease buildup.
Method 1: Sink soak with dish soap and baking soda
This method works well for most metal mesh and baffle filters and keeps the mess contained in the sink.
- Fill the sink or tub with very warm water. Aim for enough water to fully submerge the filters.
- Add dish soap. Squeeze in a generous amount of grease‑cutting dish soap and swish to mix.
- Sprinkle in baking soda. Add 2 to 4 tablespoons, depending on the size of your sink. It will fizz slightly and boost degreasing power.
- Submerge the filters. Place them in the water, ensuring they are fully covered. Soak for 10 to 20 minutes.
- Gently scrub. Use a soft brush or sponge to loosen remaining grease, paying attention to corners and edges.
- Rinse thoroughly. Run warm water through both sides until it runs clear and no soap remains.
- Set on a towel to dry. Stand the filters upright or at an angle so water can drain out.
This approach keeps splashing to a minimum and relies on soaking to do most of the work, which is easier on your hands and your filters.
Method 2: Low‑splash spray and wipe in a basin
If your sink is small or you want to limit how much water you use, try a spray‑and‑wipe method inside a tub or basin.
- Place a plastic tub or large pan in the sink. This will catch drips and keep grease contained.
- Lay the filter flat inside. Work with one filter at a time.
- Spray with warm water. Use a gentle stream from the faucet or a spray bottle to dampen the filter.
- Apply dish soap or degreasing cleaner. Drizzle or spray directly onto the surface.
- Scrub gently. Use a soft brush to work the soap into the mesh or baffles. Flip and repeat.
- Rinse inside the tub. Tilt the filter and rinse with a low stream of water so splashes stay inside the container.
- Drain and dry. Shake off excess water and place on a towel to air‑dry.
By working inside a tub, you avoid greasy splatter on the surrounding countertop and backsplash.
Method 3: Dishwasher cleaning (only if safe for your filter)
Some metal filters can be cleaned in the dishwasher, but it is important to confirm that yours are dishwasher‑safe. When in doubt, use a manual method instead.
- Place filters in the bottom rack, lying flat.
- Run a normal or heavy cycle with hot water.
- Avoid overloading so water can reach all surfaces.
- Skip heated dry if your manual recommends air‑drying.
Dishwasher cleaning is convenient but may cause discoloration over time. This usually does not affect performance, but if appearance matters, hand washing is gentler.
Step 4: Tackle Stubborn Grease Without the Mess
If your filters have not been cleaned in a long time, you may see thick, sticky patches of grease that do not come off with a quick soak. You can still handle these without coating your sink in residue.
Tips for heavy buildup
- Extend the soak time: Let filters sit in hot, soapy water for 30 minutes, refreshing the water if it cools and the grease re‑settles.
- Use a soft brush, not steel wool: Abrasive pads can scratch metal and damage protective coatings.
- Spot‑clean problem areas: Dip a toothbrush in soapy water and gently scrub corners, seams, and thick deposits.
- Replace extremely clogged filters: If grease is baked on and the filter is warped or corroded, it may be safer and more effective to replace it.
Avoid using harsh oven cleaners, bleach, or highly caustic chemicals on filters unless your manual specifically states they are safe. These products can release strong fumes and may damage metal or nearby surfaces.
Step 5: Rinse, Dry, and Reinstall the Filters
Proper rinsing and drying prevent streaks, dripping, and water spots on your cooktop.
Rinse thoroughly
- Run warm water through both sides of the filter.
- Check that no soap bubbles remain in the mesh or baffles.
- Gently shake the filter over the sink to remove excess water.
Dry completely
- Place filters on a clean towel or drying rack.
- Allow them to air‑dry fully, ideally for at least 30 to 60 minutes.
- For faster drying, pat gently with a microfiber cloth, then let them finish air‑drying.
Reinstalling damp filters can cause water to drip onto your cooktop or inside the hood, so give them time to dry.
Reinstall the filters
- Align the filter correctly. Make sure the same side faces down as before removal.
- Insert the back edge first. Slide it into the rear slot or groove.
- Lift and secure the front. Push up until the tab or latch clicks into place.
- Test for movement. Gently tug to confirm the filter is secure.
- Turn on the fan briefly. Check that airflow feels strong and there are no rattles.
What About Charcoal or Carbon Filters?
If your range hood does not vent outside and instead recirculates air back into the kitchen, it likely uses charcoal or carbon filters in addition to metal grease filters.
- Do not soak or scrub charcoal filters. Water and soap will ruin the carbon material.
- Replace them instead of cleaning. Most need replacement every 3 to 6 months, depending on use.
- Follow the manual for replacement steps. These filters usually twist, clip, or slide into place behind the metal grease filters.
Even if charcoal filters are present, you still need to clean the metal grease filters regularly to prevent greasy buildup and maintain good airflow.
How to Keep Range Hood Filters Cleaner for Longer
A few simple habits can slow down grease buildup so cleaning is quicker and less messy each time.
Use your range hood correctly
- Turn the fan on before you start cooking. This creates airflow that captures steam and grease from the beginning.
- Use higher speeds for frying or searing. More airflow means more grease pulled into the filter instead of onto nearby surfaces.
- Let the fan run a few minutes after cooking. This clears remaining steam and odors.
Adjust cooking habits slightly
- Use lids when possible. Covering pans reduces splatter and airborne grease.
- Keep oil at appropriate temperatures. Overheated oil smokes more and creates heavier deposits.
- Wipe the underside of the hood regularly. A quick weekly wipe prevents grease from dripping onto filters.
Combining these habits with a consistent cleaning schedule means you will rarely face extremely greasy filters again.
Simple Maintenance Checklist
Use this quick checklist to keep your range hood and filters in good shape with minimal effort and mess.
After cooking
- Run the fan for a few extra minutes.
- Wipe visible splatter on the cooktop and hood front.
Weekly
- Wipe the underside of the hood with a damp cloth and a drop of dish soap.
- Check for sticky spots around the filter area.
Monthly or as needed
- Remove and clean metal filters using a soak or basin method.
- Inspect for any warping, corrosion, or damage.
Every few months
- Replace charcoal filters if your hood recirculates air.
- Lightly dust or vacuum the fan housing if accessible and safe to do so.
When to Replace Range Hood Filters
Even with good care, filters do not last forever. Knowing when to replace them helps keep your kitchen air cleaner and your cooking area safer.
Signs it is time for new filters
- Metal mesh is torn, dented, or permanently warped.
- Grease remains trapped even after thorough soaking and scrubbing.
- There is visible corrosion or flaking metal.
- Airflow remains weak even with clean filters and a working fan.
- Charcoal filters have been in place longer than the recommended time.
Replacing worn filters and keeping a regular cleaning routine is usually more affordable than repairing or replacing a strained range hood fan later.
Final Thoughts
Learning how to clean range hood filters without a greasy mess comes down to three things: setting up a contained workspace, letting warm soapy water do most of the work, and staying consistent. With a simple soak‑and‑scrub routine every few weeks, you can keep your filters clear, your kitchen air fresher, and your cooking area safer.
If you are building a broader kitchen maintenance routine, consider pairing filter cleaning with other regular tasks, such as wiping cabinet doors or cleaning the sink. Small, steady habits go a long way toward a cleaner, more comfortable kitchen.
For more kitchen and home care tips, you can explore related guides in the water and kitchen section of your favorite home resource sites, and build a schedule that fits your cooking style and household needs.
 Kitchen Sink Aerator Cleaning for Low Water Flow: A Step-by-Step Guide
 How to Clean an Induction Cooktop Without Scratches: Step-by-Step Guide
 Garbage Disposal Smell Causes and a Simple Cleaning Routine That Works