If you open a kitchen cabinet and plastic containers tumble out, you are not alone. Food storage containers are some of the hardest items to keep organized. Different sizes, mismatched lids, and random takeout containers can quickly turn any cabinet or drawer into a chaotic jumble. The good news is that you can create a simple, sustainable system that keeps lids from disappearing and makes it easy to find exactly what you need for leftovers, lunches, and meal prep.
On this page(click to collapse)
- Step 1: Empty Everything and Start Fresh
- Step 2: Match Containers and Lids
- Step 3: Decide How Many Containers You Really Need
- Step 4: Choose the Best Storage Spot
- Step 5: Choose a System for Lids
- Step 6: Organize by Shape, Size, and Frequency of Use
- Step 7: Use Simple Organizers You May Already Have
- Step 8: Label for Easy Maintenance
- Step 9: Create Simple Rules to Keep Lids from Getting Lost
- Step 10: Special Tips for Small Kitchens
- Step 11: Keep Food Safety in Mind
- Putting It All Together
- Related guides
This guide walks you through a step‑by‑step process to sort, pare down, and organize your containers using practical strategies that work in real kitchens. You will learn how to choose the right storage spot, how to corral lids so they stop getting lost, and how to maintain your system with just a few minutes of effort each week. Whether you have a spacious kitchen or a small apartment, you can adapt these ideas to fit your space and your cooking habits.
Step 1: Empty Everything and Start Fresh
To fix container clutter, you need to see exactly what you own. That means pulling every container and lid out of your cabinets, drawers, and pantry.
Clear the space
- Choose a clear surface such as a table or countertop.
- Lay down a clean towel if you are worried about dust or crumbs.
- Remove all food storage containers, lids, and random pieces from every spot in your kitchen.
It may look overwhelming at first, but having everything in one place makes it much easier to see what you actually use and what is just taking up space.
Group by material and type
Once everything is out, sort into broad categories:
- Plastic containers and their lids
- Glass containers and their lids
- Specialty pieces such as divided meal prep containers or freezer-safe sets
- Single-use or disposable containers you plan to reuse
This quick sort helps you see duplicates, worn-out pieces, and what you tend to reach for most often.
Step 2: Match Containers and Lids
The main reason lids go missing is that they are not stored in a way that matches how you use them. Before you decide on a storage system, you need to know which pieces actually belong together.
Pair everything you can
- Match each container with its correct lid by size and shape.
- Check for a snug fit to be sure it will not leak.
- Set each complete set (container plus lid) into a “keep” area.
Deal with orphans and extras
You will almost always end up with a pile of extra lids and random containers. Decide what to do with them right away:
- Orphan lids: Place them in a small box or bag and set a reminder to look for their containers within a week. If you do not find a match, let them go.
- Orphan containers: Keep only a few that can double as drawer organizers or craft storage. Recycle or donate the rest if possible.
- Damaged pieces: Discard containers that are cracked, warped, stained, or missing key parts.
Being firm at this stage makes the rest of the process much easier. The goal is to keep only containers that are in good condition and have a matching lid.
Step 3: Decide How Many Containers You Really Need
Most kitchens have far more containers than they actually use. Keeping a reasonable number prevents piles from tipping over and makes it easier to put everything away.
Consider your household and habits
Ask yourself a few questions:
- How many people are in your household?
- How often do you cook and store leftovers?
- Do you pack lunches most days, only sometimes, or rarely?
- Do you freeze meals in bulk or mostly store short-term leftovers?
Use your answers to estimate what you really need. For example, a family that cooks most nights and packs lunches may need more containers than someone who eats out frequently.
Create a simple container “capsule”
Think of your containers like a capsule wardrobe: a small, versatile set that covers most situations. A balanced mix might include:
- Several small containers for sauces, snacks, and dressings
- Medium containers for single portions and lunches
- Large containers for leftovers, meal prep, and batch cooking
- A few specialty pieces you truly use, such as divided trays or deep freezer-safe containers
Once you decide on your ideal number, set aside the extra pieces. You can donate them if they are in good condition or keep a very small overflow box in a less convenient spot, such as a high pantry shelf, for occasional use.
Step 4: Choose the Best Storage Spot
The right location makes it much more likely that you will stick with your system. You want containers close to where you use them most, but not in the way of everyday cooking.
Good locations for most kitchens
- Lower cabinet near the dishwasher or sink: Ideal for quick unloading and putting away.
- Deep drawer under the counter: Great if you like to see everything from above and avoid bending into cabinets.
- Pantry shelf at waist height: Works well if your cabinets are already full of dishes.
Try to avoid very high shelves for everyday containers. If you must use them, store only lightweight pieces up high and keep heavier glass containers lower down.
Match the spot to your routine
Think about your typical flow:
- If you pack lunches in the morning, a drawer near the fridge can save time.
- If you usually pack leftovers right after dinner, a cabinet near the stove or sink makes sense.
- If kids pack their own snacks, consider a low shelf they can reach safely.
Once you pick a primary spot, commit to keeping all everyday containers there. This reduces wandering pieces and lost lids.
Step 5: Choose a System for Lids
Lids are the hardest part to manage, so give them a dedicated system. There are several approaches that work well in real homes.
Option 1: Store containers with lids on
This is the simplest system to maintain:
- Each container is stored with its lid snapped on or resting upside down on top.
- Containers nest inside each other by size, with the matching lid on the top container.
Pros: Lids never go missing, and you can quickly see what is available. Cons: Takes a bit more space and may not work well for very small kitchens.
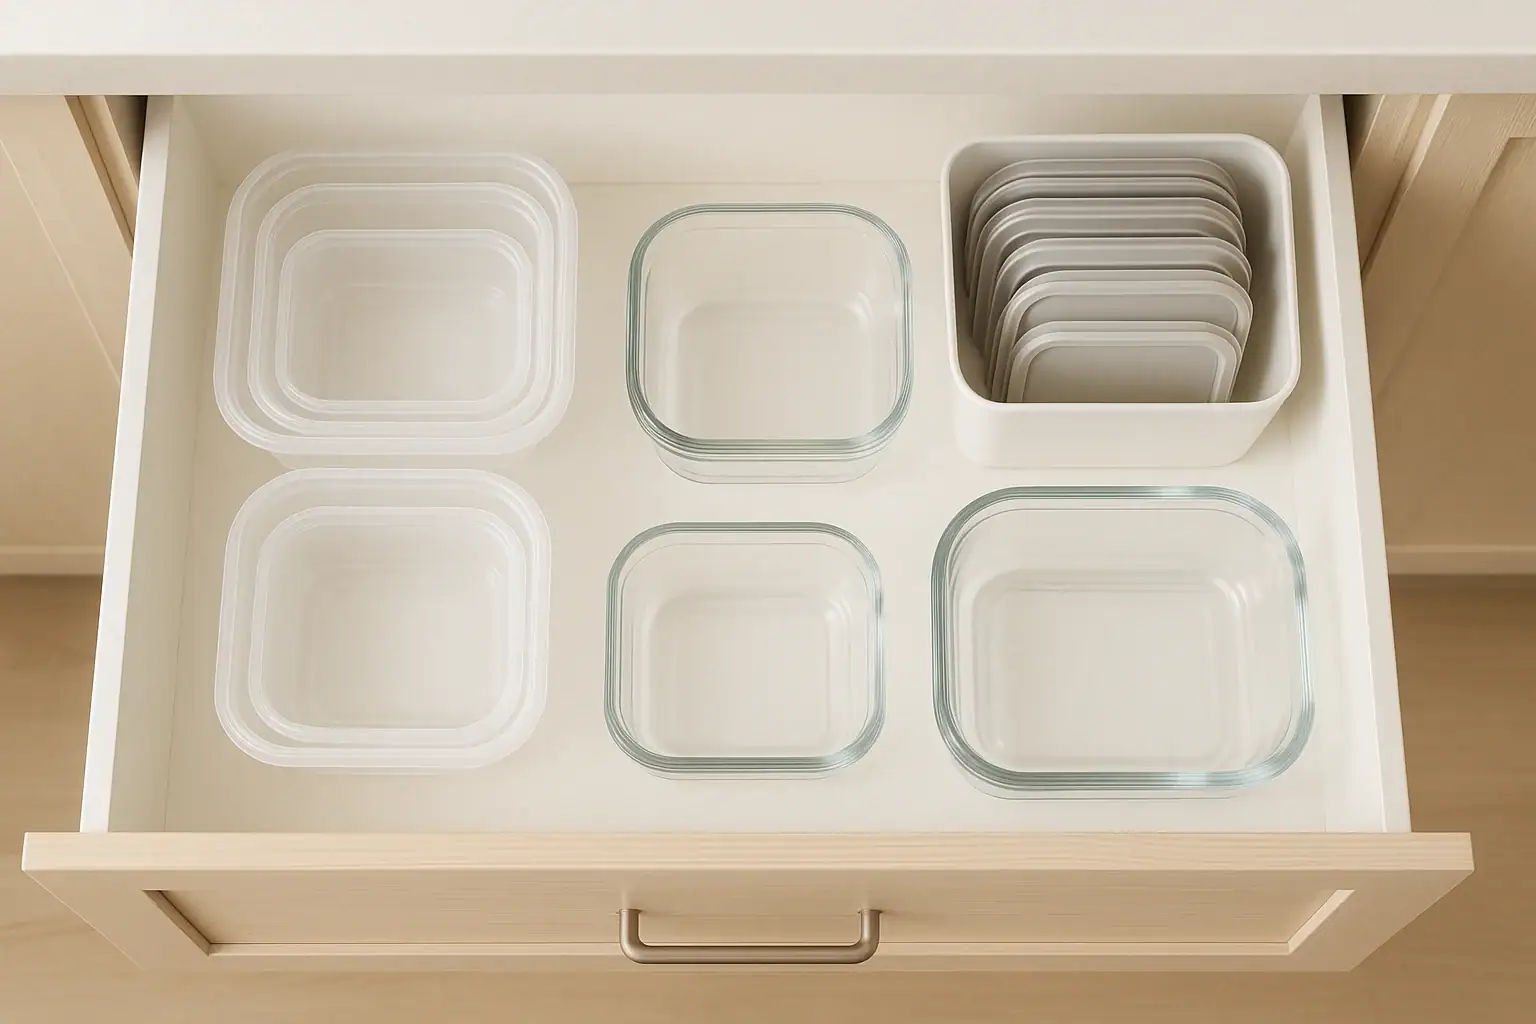
Option 2: Store containers nested, lids in a separate organizer
If you want to save space, this method works well:
- Nest containers by shape and size into a few tidy stacks.
- Store lids upright in a small bin, shallow basket, or divided organizer.
- Group lids by size or shape so you can find the right one quickly.
Pros: Efficient use of space and easy to see lid options. Cons: Requires a little more effort to maintain grouping.
Option 3: Drawer dividers or file-style organizers
If you have a deep drawer, you can organize lids like files:
- Use adjustable dividers or small bins to create sections.
- Stand lids upright by size or by the containers they match.
- Label sections if that helps you or your family remember where things go.
This method keeps lids visible and prevents them from sliding around every time you open the drawer.
Step 6: Organize by Shape, Size, and Frequency of Use
Once you have chosen a lid system, fine-tune your layout so it matches how often you use each type of container.
Group by shape first
- Keep round containers together and square or rectangular containers together.
- Avoid mixing shapes in the same stack, which makes nesting harder and increases tipping.
- Store lids in the same shape groups so you can quickly match them.
Then group by size and use
Within each shape group, organize by size and how often you reach for them:
- Place your most-used sizes in the front or at eye level.
- Store rarely used large containers toward the back or on a higher shelf.
- Keep specialty items, like divided meal prep containers, in their own small section.
This arrangement reduces digging and makes it easy to grab what you need without disturbing the whole cabinet.
Step 7: Use Simple Organizers You May Already Have
You do not need special products to create a functional system. Many homes already have items that can double as organizers.
Low-cost and repurposed organizers
- Shallow bins or baskets: Perfect for holding lids upright or corralling small containers.
- Dish racks or file sorters: Can hold lids vertically like folders.
- Small boxes: Sturdy boxes from pantry items can be trimmed and used as drawer dividers.
- Turntables: Helpful on deep shelves to make containers easier to reach.
When to consider buying organizers
If you want a more polished system, look for:
- Adjustable drawer dividers that can be cut to fit your space
- Stackable bins for deep cabinets
- Lid organizers with built-in dividers for different sizes
Measure your cabinet or drawer before buying anything to avoid pieces that are too tall, too wide, or do not allow doors to close properly.
Step 8: Label for Easy Maintenance
Labels are optional but can be very helpful, especially if multiple people use the kitchen. Labels show exactly where each type of container and lid should go.
What to label
- Front edges of shelves or cabinet walls
- Bins or baskets that hold lids or small containers
- Sections of a drawer if you are using dividers
Simple labeling ideas
You do not need a label maker. You can use:
- Masking tape and a pen
- Removable stickers
- Small tags tied to baskets
Use short, clear labels such as “Small Round,” “Lunch Containers,” or “Glass Lids.” The goal is to make it obvious where each item belongs so everyone in the household can help keep things organized.
Step 9: Create Simple Rules to Keep Lids from Getting Lost
Once your system is set up, a few simple habits will keep it working. The key is to make the rules easy enough that you and your family can follow them without much thought.
Everyday habits
- Always match before storing: Do not put away a container without either snapping on the lid or placing both pieces in their designated spots.
- Unload the dishwasher with intention: Put containers and lids away immediately instead of leaving them on the counter.
- Limit extras: Keep only a few reusable takeout containers and recycle or pass along the rest.
Weekly or monthly quick check
Set a short recurring reminder to do a quick reset:
- Scan for orphan lids or containers and try to match them.
- Remove any damaged or warped pieces.
- Re-nest stacks that have become messy.
This five-minute reset prevents clutter from building up again and keeps your system running smoothly.
Step 10: Special Tips for Small Kitchens
If you have limited cabinet or counter space, you need to be a bit more strategic, but an organized container system is still possible.
Be ruthless about quantity
- Keep only the number of containers you can comfortably store without stacking more than two or three high.
- Let go of duplicate sizes you rarely use.
- Choose containers that nest tightly to save space.
Use vertical and hidden spaces
- Install a small shelf riser in a cabinet to create a second level for lids.
- Use the inside of a cabinet door for a slim lid organizer if the door can still close fully.
- Consider a single, compact set of containers that all share the same style of lid.
In a very small kitchen, it can also help to store bulk or rarely used containers outside the main kitchen area, such as on a high pantry shelf or in a storage closet.
Step 11: Keep Food Safety in Mind
While organizing, it is a good time to think about safety and longevity. Not every container is ideal for every use.
Check for wear and tear
- Discard containers that are cracked, chipped, or badly stained.
- Watch for lids that no longer seal tightly, especially if you use them for liquids.
- Replace containers that have warped from heat and no longer stack well.
Assign containers by purpose
- Use sturdier containers for freezer storage to prevent cracking.
- Reserve a few leak-resistant containers for soups, sauces, and dressings.
- Keep a separate small group for dry snacks and pantry storage if you like to decant items.
Labeling containers for specific uses can help you and your family grab the right type for the job and extend the life of your set.
Putting It All Together
Organizing food storage containers does not have to be complicated. By pulling everything out, matching lids and containers, keeping only what you truly need, and choosing a simple storage system, you can finally stop hunting for missing lids. The most important step is creating a setup that matches your actual habits and kitchen layout, not an idealized version of how you think you should cook.
Once your system is in place, a few small habits—like always matching lids before storing, unloading the dishwasher with a plan, and doing a quick monthly reset—will keep your cabinets from sliding back into chaos. Over time, you will save time, reduce frustration, and make everyday tasks like packing lunches and putting away leftovers feel smoother and more manageable.
If you want more ideas for improving your kitchen and home, explore additional guides and resources on water and kitchen organization at Signature Home Guide.
Recommended next:
Related posts
Browse this topic →
How to Clean an Induction Cooktop Without Scratches: Step-by-Step Guide
How to Tame Kitchen Countertop Clutter Zones for Coffee Prep and Drop Areas
Fridge Door Seal Test Checklist for Better Energy Use and Food Safety
Under Sink Cabinet Water Damage: What To Check Before It Gets Worse
How to Store Flour, Rice, and Pasta to Prevent Pests at Home
Dishwasher Rinse Aid Basics: What It Does and When It Actually Helps
Keep reading
About this site
Signature Home Guide publishes practical, independent home guides. We aim to be clear, helpful, and transparent.
Affiliate disclosure
As an Amazon Associate, we earn from qualifying purchases. Some links on this site may be affiliate links. If you buy through these links, we may earn a small commission at no extra cost to you. This helps support our content. Learn more.